
Permission is granted to copy, distribute and/or modify this document under the terms of the GNU Free Documentation License, Version 1.1. A copy of the license is included in the section entitled “GNU Free Documentation License”
JavaScript allows you to create ‘dynamic, interactive’ web pages: web pages that do things in response to what your readers do, without having a separate page for each possible response. In this tutorial, I’m going to cover some of the very basics of using JavaScript in your web pages. I’m going to assume that you know a little bit about HTML, but nothing about programming or JavaScript. If you aren’t familiar with HTML, you’ll want to go over the Web Writing Guide at http://www.hoboes.com/NetLife/Web_Writing/ first.
First, JavaScript has nothing to do with Java. Java is a separate programming language. JavaScript is a language for scripting web browsers and web servers, although it is seeing other uses as it becomes popular. Java was created by Sun and is designed for complete software applications, while JavaScript was created separately by Netscape Corporation and was later standardized as the ECMAScript standard. It is designed for modifying (and “scripting”) web pages.
The cover image is a tracing, done in Inkscape, of Mount Semeru and Mount Bromo on the Isle of Java. Java may mean “beyond”, but it might also mean “home”. Java was created through volcanic activity and still contains many active volcanoes. Despite these dangers, it is the most populous island in Indonesia. Volcanic activity ensures a rich soil throughout the island.
Whether any of this relates to JavaScript is left to your imagination.
JavaScript turns every web page into a collection of objects that you can modify and interact with. JavaScript turns everything that the visitor does into events that you can modify and intercept.
Go to http://www.hoboes.com/NetLife/Web_Scripting/Web_Scripting_Resources/ to download the resource zip archive and uncompress it. Open the file “1941.html” in your favorite text editor. There are several links on that page; some of the links are local (they go to hoboes.com) and some of them are not local (they go to Wikipedia and Amazon). We’re going to make the non-local ones open in a new window (or tab, depending on the visitor’s preferences).
Look in the HTML’s “head” area for a comment that says “put your scripts.js here”. Underneath that line, add this:
<script type="text/javascript" src="scripts.js"></script>
This line tells the browser to look for some scripts in the file “scripts.js”. We’re going to put our JavaScript code there. The syntax for the <script> tag is very similar to the syntax for the <img> tag.
The <script> tag can go anywhere in your document, but you’ll usually put it in the <head> area when you’re using it to include a file containing JavaScript. We’ll use it for other purposes later in this tutorial.
Our first version will do nothing—literally. It will block all links on this page. Put this into your scripts.js file:
function manageLinks(event) {
return false;
}
document.onclick=manageLinks;
Save scripts.js into the same folder as 1941.html. Reload 1941.html in your browser. Try clicking on some of the links: none of them should work.
If the links do work, you’re going to need to track down the error. In Firefox or in Safari, you have an error console that will display any errors in your page, as well as the line those errors occurred on. If you’re not already using one of those browsers, you’ll need to download the latest version and use it for testing your scripts.
What do these four lines do? The first three lines create a “function”. A function is a collection of scripting lines that you can call by name elsewhere in your script file and anywhere on your web page. We’ll be creating a lot of functions over the course of this tutorial. This function has the name “manageLinks”. The lines of a function are contained between the opening curly bracket and the closing curly bracket.
Functions often accept “parameters” or “arguments”. The manageLinks function accepts one parameter, which it names “event”.
Functions often return data to whoever called the function. The manageLinks function always returns “false”. That’s its only purpose for the moment: it is its only line. All JavaScript lines that do something, such as the “return” line, end in a semicolon.
The final line overrides an event. The “onclick” event happens every time someone clicks something anywhere on the web page. The web page itself is an object. In JavaScript the web page is the “document”. We’re telling the document—the web page—that every time the visitor creates an “onclick” event (by clicking something) to call our manageLinks function.
So, what happens when the visitor clicks on a link on the web page? The link itself is an object, usually an HTMLAnchorElement (we’ll deal with that sort of thing later). Whatever object they clicked on generates an event, in this case an onclick, and starts bubbling that event up through the document. If the link is contained in a paragraph element, the onclick bubbles up through the paragraph. If the paragraph is contained in a body element, the onclick bubbles up through the body, and so on, until it hits the topmost parent of all of the elements in the web page, the document.
Once the onclick event hits the document, we’ve told document that all onclicks need to call manageLinks.
The manageLinks function always returns false. That tells the document not to do anything else. If we returned nothing, or if we returned true, the document would know to continue doing what it otherwise would have done. You can try that now. Change the ‘false’ to ‘true’, reload the web page, and try clicking some links. Now they’ll work.
Blocking all links isn’t particularly useful. Eventually we don’t want to block any links, we want the browser to treat some links differently.
Replace the manageLinks function with:
function manageLinks(event) {
var link = event.target;
var url = link.href;
window.alert("The url is " + url);
return false;
}
Save scripts.js and reload the web page, and now when you click on a link an alert box will pop up telling you what the URL of that link is.
In JavaScript, objects have properties. The “event” that the browser sends the manageLinks function has a property called “target”. That target is the HTML element that the visitor clicked on. HTML elements are themselves objects with properties, and the <a> tag has the property “href” that corresponds to the “href” attribute in the HTML.
To get at the properties of an object, use a period and then the property name after the object’s name. The target of the event object is event.target; the href of the link object is link.href.
In scripting languages we often use variables to store data for later use. Here, we’re using the variable “link” to store the HTML element that the visitor clicked on, and we’re using the variable “url” to store the URL that that HTML element has in its href attribute. Later in the script, we use the “url” variable as an alert message.
When you create a variable inside of a function, you’ll want to put the keyword “var” in front of that line. If you don’t do that, the variable becomes “global” and is accessible in any other function, as well as throughout your web page. That might sound useful—and occasionally it is—but it also makes it very easy to confound two supposedly different variables that happen to have the same name. Keep your variables safe by using the “var” statement to create them.
Variables in JavaScript are case sensitive. URL and url are different variables. It’s generally a good idea to avoid confusing variable names (such as having both the variables URL and url in the same script). You should name your variables in a way that reminds you of what the variable contains. Often, your variable names will contain more than one word. You can use capital letters or underscores to mark the beginning of each new word. For example, manageLinks might instead have been named manage_links.
Objects in JavaScript also contain methods. Methods do something. The window, for example, has a method called “alert” that displays a message. Methods are functions that are attached to an object. Just like functions, some of them accept parameters. The window.alert method accepts a string of text, which it displays in the browser. You will find window.alert extremely useful when testing your scripts.
There are different types of variables in JavaScript. One common type is the string. A string is just a collection—a string—of text. In the latest version of our script, the text “The url is ” is a string; we can tell that it’s a string because it is between quotes. The variable “url” is also a string.
We can combine strings (“concatenate” them) using the “+”. Within the window.alert method, we concatenate “The url is ” with the url variable.
If you haven’t already, try clicking on a part of the page that isn’t a link. The URL will be “undefined”. That’s because most elements don’t have an href attribute. They don’t have a URL. But they can still be clicked on. So what element actually gets the click? Let’s find out.
function manageLinks(event) {
var link = event.target;
var url = link.href;
var tag = link.tagName;
window.alert("The url for " + tag + " is " + url);
return false;
}
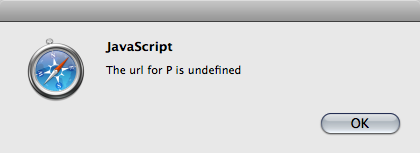 Each HTML element has a “tagName” property that is the name of that HTML tag. This version of the manageLinks function gets that tagName and displays it in the alert box. So now you should see alerts like “The url for P is undefined” or “The url for A is http://www.hoboes.com/Mimsy/Movies/”.
Most elements are contained within other elements. What actually gets the click? The bottom-most element. That’s important, because sometimes the <a> tag is not the bottom-most element. Try clicking on the two images to the right and left of the headline at the top of the page. The alert box will say that the URL for IMG is undefined, but those images are linked. The problem is that it’s the <img> tag that is getting the click—the <a> tag surrounds the <img> tag but the <img> tag is the bottom-most tag. The URL is stored on the <a> tag. If we’re going to do something special with the URL, we need to find the <a> tag first.
Change the manageLinks function to:
function manageLinks(event) {
var link = event.target;
//go up the family tree until we find the A tag
while (link.tagName != 'A') {
link = link.parentNode;
}
var url = link.href;
var tag = link.tagName;
window.alert("The url for " + tag + " is " + url);
return false;
}
Now, whenever you click on a link, the alert will tell you what URL applies to that object, even if (as for an <img> tag) the element you clicked on does not itself contain the href.
The first new line in this version of the manageLinks function is a comment. JavaScript completely ignores all lines that begin with two slashes. We can use this to place comments in our script to remind us of what the script is doing. Whenever it isn’t immediately obvious what a section of the script is doing, you should add a comment to that section describing the purpose of those lines.
The second new line in this version of manageLinks is a while statement. Notice that the line with the while ends in an open curly bracket, and there is a new close curly bracket two lines below it. Just like a function, a while contains JavaScript code that only gets performed if special conditions are met. For functions, the special condition is that you call the function by name. For whiles, the special condition is that some condition is true. As long as that condition remains true, the lines between the opening and closing brackets of the while will loop, performing themselves over and over.
The condition is specified inside of the opening and closing parentheses. Here, our condition is that “link.tagName != ‘A’”. The characters “!=” mean “is not equal to”. Let’s take a look at how this condition is or isn’t met. If the visitor clicks on an <a> tag, the browser will check that condition and ask “link.tagName is not equal to A; is that true or false?” In that case, the condition is false: the visitor did click on an <a> tag, so the tagName is A.
If the visitor clicks on an <img> tag, what happens? The first time through, “link.tagName is not equal to A” is true: link.tagName is IMG, and IMG is not A. So the while’s code is performed for one loop. During that one loop, the variable “link” is set to its own parent node. If the <img> tag is contained within an <a> tag, its parent will be that <a> tag. So the second time through, “link.tagName is not equal to A” is false: link.tagName is A and A is A. The condition is false, so the while loop ends.
Notice one thing this function doesn’t do that it used to do: it no longer tells us that the URL for P is undefined. It doesn’t alert us on any click that doesn’t somehow bubble up to an <a> tag. We haven’t added any code to stop alerting us, so what happened? If you haven’t already noticed it in your error console, you should be seeing an error that “link has no properties” or “null value” when you try to click on a part of the page that has no link.
The “while” loop we’ve added goes up the HTML family tree until it finds an <a> tag. What happens if it never finds an <a> tag? Eventually, it reaches the top-most element and can’t go any further. The <html> tag’s parentNode is undefined. JavaScript is perfectly happy to deal with undefined values. But undefined values also have no properties, and trying to get a property that doesn’t exist is an error. Once link becomes undefined, link.tagName is an error. We need to fix that.
So let’s change the manageLinks function again.
function manageLinks(event) {
var link = event.target;
//go up the family tree until we find the A tag
while (link && link.tagName != 'A') {
link = link.parentNode;
}
if (link) {
var url = link.href;
var tag = link.tagName;
window.alert("The url for " + tag + " is " + url);
}
return false;
}
Now, the script will basically act the same way to the visitor—only showing the alert if they click on a link—but the errors will go away in the error console.
The conditional in the while parentheses is no longer just “link.tagName is not equal to A”. There’s now a “link &&” in front of that. Double ampersands in JavaScript mean “and”. They combine two different conditionals into one conditional. Here, the first conditional is just “link”. When a variable stands alone as a conditional, it is “true” if it contains something, and “false” if it contains nothing. Nothing can be zero, an empty string, or undefined. So as long as the link variable points to a valid HTML element, the link variable will evaluate to “true”. Once it is undefined, it will evaluate as false.
In logical statements, “false and anything” is always false: “false and true” is false, “false and false” is also false. So once link becomes undefined, JavaScript doesn’t even bother checking the rest of the conditional, and it never runs into the error that link.tagName doesn’t exist.
Just like functions and whiles, an if statement marks off lines of JavaScript inside curly brackets. Just like while, the if needs a conditional between parentheses. With an if, however, the conditional is only evaluated once. There is no looping. If the conditional is true, the if’s lines are performed. If the conditional is false, the if’s lines are not performed.
So in this example, if the link variable is undefined, we don’t bother trying to get the href and tagName off of it, nor do we pop up an alert box.
Ifs and whiles will constitute the bulk of your more complex functions. The purpose for which manageLinks has been building to is to treat external links different from local links. You might guess from that, that we’re going to use an “if” to do something like “if the link is external, do this, otherwise, do that”.
If you guessed that, you’re right. Let’s continue to build this script slowly. We know how to block links, and we know how to let them work normally, so let’s block external links and allow local links to work normally.
The first thing we need to decide is, what is an external link? When you’re programming, you need to know the precise conditions that you want to act on. What are the conditions that make a link external?
In this example, we’ll decide that “external” links are links that don’t go to www.hoboes.com. Any URL that doesn’t begin with http://www.hoboes.com/ is an external link.
Replace manageLinks with this:
function manageLinks(event) {
var link = event.target;
//go up the family tree until we find the A tag
while (link && link.tagName != 'A') {
link = link.parentNode;
}
if (link) {
var url = link.href;
var linkIsExternal = url.indexOf('http://www.hoboes.com/') != 0;
if (linkIsExternal) {
return false;
}
}
return true;
}
If all goes well, you should now be able to follow any link that leads to the www.hoboes.com web site, but be blocked from following links that don’t go to www.hoboes.com.
Strings in JavaScript are objects just like HTML elements are. They have methods and at least one property (length). One of the methods that strings have is indexOf. The indexOf method accepts as its parameter a string of text. It returns the location of that string of text in itself. If the string of text doesn’t appear anywhere, indexOf returns a negative one.
Test this using your browser. In your browser’s URL bar, type:
javascript:window.alert("hello world".indexOf("world"))
The alert box should say “6”, because “world” starts at location 6 in “hello world”. Now, type:
javascript:window.alert("hello world".indexOf("ll"))
It will come back with “2”, because “ll” starts at location 2 in “hello world”.
Notice that “w” and “l” are the seventh and third characters respectively in the text “hello world”. JavaScript, like many programming languages, starts counting at zero rather than one. This is a useful feature in other situations but it can be a bit confusing when working with string indexes.
javascript:window.alert("hello world".indexOf("hello"))
Comes back with “0”. When a string begins with the string sent as a parameter to indexOf, we’ll get back a zero. So if a URL begins with “http://www.hoboes.com/” url.indexOf('http://www.hoboes.com/') will be zero. Otherwise, it will either be -1 or (unlikely) something greater than 0.
Conditionals can be used outside of while loops and if statements. Variables can contain true or false just like they can contain objects and strings. A conditional produces true or false no matter where it is at. This means that “url.indexOf('http://www.hoboes.com/') != 0” (read as “url.indexOf('http://www.hoboes.com/') is not equal to 0”) is either false (if the URL begins with http://www.hoboes.com/) or true (if it doesn’t).
This makes the variable linkIsExternal either true or false.
And this makes the if statement return false if the link is external (linkIsExternal is true).
We already know that if the function returns false, it blocks the visitor from following the link.
If there is no link, or if linkIsExternal is false, the if doesn’t do anything, and the script continues on until it reaches “return true”.
Finally, we’re going to make this do what we planned to do all along: external links go into a new window (or tab), local links stay in the current window. We’re already set: we have the function doing something special if the link is an external link.
That something special is to block the link, but we don’t want to block it, we just want to open it in a different window.
We’ve been using window.alert without talking about it. The window is an object just like the document is an object. The document is the web page; the window is the browser window that contains the web page. One of the methods that the window has is the method to display an alert box. Another method is a method to open a new window.
Above “return false” in manageLinks, add:
window.open(url, "ExternalToReviews");
The if should now be:
if (linkIsExternal) {
window.open(url, "ExternalToReviews");
return false;
}
The window.open method accepts two parameters: the URL to go to, and the name of the window it will open in. If a window of that name already exists, window.open uses it; otherwise, it creates a new window with that name. This helps keep from filling the visitor’s screen with browser windows.
Be careful how you use this knowledge. Designers love restricting their visitors, constraining their ability to leave the site and go somewhere else, restricting their ability to navigate except in predesigned paths. For the most part, you don’t need to open new windows for your visitors, because they can do that themselves if they want it.
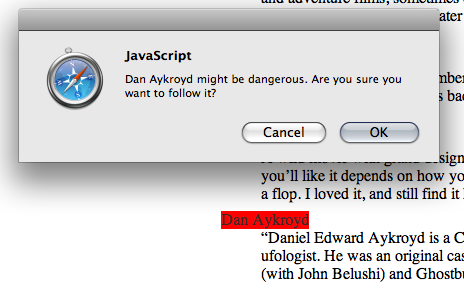
Suppose, however, that there are some links we’ve categorized as dangerous. Maybe we’re writing about web viruses, and we’re giving some examples of pages that have been infected in the past. Or we’re writing about libel, and we’re giving some examples of pages that have libeled. For those links—and only those links—perhaps it makes sense to pop up a confirmation box reminding the visitor that they should be careful following this link.
The first step is to determine what makes a link dangerous. What criteria can we use to detect that we’ve categorized this link as dangerous but not some other link?
Most likely, if we’re categorizing links we’re also putting CSS classes on those links. For example, we might have a CSS class named “dangerous” that gets applied to dangerous links. JavaScript can check for that.
Go into the HTML for 1941.html and categorize three links as “dangerous”. Add “class="dangerous"” to the <a> tag for them. I recommend using the links in the link list (“<div id="links">”) towards the bottom of the page.
Then replace manageLinks with:
function manageLinks(event) {
var link = event.target;
//go up the family tree until we find the A tag
while (link && link.tagName != 'A') {
link = link.parentNode;
}
if (link) {
if (link.className == "dangerous") {
var confirmation = window.confirm(link.text + " might be dangerous. Are you sure you want to follow this link?");
return confirmation;
}
}
return true;
}
We can access the class attribute of an <a> tag using the className property. (The word “class” in JavaScript is reserved for other purposes.) The conditional “==” is the opposite of “!=”. It means “is equal to”. This conditional reads “if link.className is equal to ‘dangerous’ then…”.
One of the methods that windows have is the “confirm” method. It’s like an alert box, except that it provides both a “cancel” and an “OK” (or equivalent) button. If the visitor chooses “cancel”, window.confirm returns false. If the visitor chooses “OK”, window.confirm returns true. This matches what we return to tell the browser to follow or not follow the link, so we can just go ahead and return the result of window.confirm.
One final step before we leave link-munging behind. While popping up the alert box, it would be nice to highlight the link they just clicked on. JavaScript has full access to the styles of HTML elements. We can set the background color of the link tag to, for example, bright red.
function manageLinks(event) {
var link = event.target;
//go up the family tree until we find the A tag
while (link && link.tagName != 'A') {
link = link.parentNode;
}
if (link) {
if (link.className == "dangerous") {
var normalBackground = link.style.backgroundColor;
link.style.backgroundColor = "red";
var confirmation = window.confirm(link.text + " might be dangerous. Are you sure you want to follow it?");
link.style.backgroundColor = normalBackground;
return confirmation;
}
}
return true;
}
All of the styles of an element are stored in the style property on that element; the style property is itself an object with properties of its own. Those properties are CSS styles. The dashes are removed, and the succeeding words capitalized. The style “background-color” becomes the property “backgroundColor”.
In this example, we first store the existing background color, set the background color to red, handle the confirmation, and then reset the background color to whatever it was before.
One of the things about JavaScript is that how it works often changes, sometimes in response to the annoying things web spammers do, and sometimes because the behavior is simply undefined.
Despite the sample image, changing the background color before displaying an alert window doesn’t work in Safari: Safari’s behavior has changed since I wrote that part of this tutorial. Safari waits until the script ends to update the style change, at which point we’ve changed it back to the original. As I write this in March 2012, this code does work as expected in Chrome and Firefox.
This is one of those cases where you have to decide if the inconsistency matters. Is the red background color critical, or is it just something to make it easier for the visitor if the visitor happens to be using a browser that supports it?
One common use of web pages is to display images, with one image per page. Normally the page doesn’t change except for the image. JavaScript can help speed things up, by not reloading anything except for the new image.
From the resources.zip archive, open “gallery.html” in your browser. Verify that it works by following the links to the images. Clicking on each link should open just that image in your browser. If it doesn’t work in standard HTML, it won’t work after you add JavaScript to the mix.
Once you’re satisfied that the links work, add a script tag to the <head> of gallery.html.
<script type="text/javascript" src="gallery.js"></script>
Create a new, empty, script file called “gallery.js”, and in this file put:
function switchImage(link) {
window.alert(link.href);
return false;
}
This function will accept one argument: the link to the new image. For the moment, however, all the function will do is open an alert box displaying the URL to the image.
For each <a> tag in the HTML of gallery.html, add an onclick attribute with the value “return switchImage(this);”. For example, the first link’s line will look like this:
<li><a onclick="return switchImage(this);" href="gallery/Ancient_Sarcophagi.jpg">Ancient Sarcophagi</a></li>
Because switchImage returns false, the browser won’t follow the link.
In the previous example, we put an onclick into the document object using JavaScript. Here, we’re putting an onclick into the <a> tag using HTML.
When inserting JavaScript into HTML tags, “this” is always the tag that the JavaScript has been inserted into. Here, “this” is the <a> tag object containing a link to Ancient_Sarcophagi.jpg.
If you look in the HTML, you’ll see that the <img> tag has an ID of “frame”. When we call the switchImage function, we want to find the element with that ID in the document.
Replace switchImage with:
function switchImage(link) {
var imageFrame = document.getElementById("frame");
imageFrame.src = link.href;
return false;
}
Now, when you click on a link the image in the display should switch immediately to that link’s image.
The document object has a method called getElementById. XHTML tags can have a unique identifier as one of their attributes. No “id” attribute can be used more than once in an XHTML page, so getElementById is always specific to a single element.
Look carefully at the method’s name: the Id portion of the name is capital-I and lowercase-d. JavaScript functions are case sensitive, so using getElementByID, as I often do, will fail.
Most attributes of HTML tags can be modified using JavaScript, and that includes the src attribute of <img> tags. The switchImage function sets the “src” attribute of the <img> tag to the “href” attribute of the <a> tag the visitor clicks on.
We now have a fully working photo gallery. What can we do to improve it? Photos often have captions, and each of the <a> tags linking to our photos has a title attribute whose text would make a perfect caption. So far, we’ve only modified the attributes of HTML tags. But once we get ahold of a tag’s object, we can even modify the text that the tag surrounds. If there’s a paragraph on the page and we want to change the text of that paragraph, we can do so—as long as we can find that paragraph’s JavaScript object.
If the paragraph has an ID attribute, we can use getElementById to get ahold of that paragraph. In the HTML for gallery.html, find the <img> tag with the ID “frame”. Underneath it—but still inside the <div> that surrounds it—add an empty paragraph with the ID “caption”:
<div>
<img id="frame" src="…" />
<p id="caption"></p>
</div>
Add two lines to the switchImage function:
function switchImage(link) {
var imageFrame = document.getElementById("frame");
imageFrame.src = link.href;
var captionParagraph = document.getElementById("caption");
captionParagraph.innerHTML = link.title;
return false;
}
Try this, and now when you click on one of the links, not only will the image change but a caption will display beneath the image.
The innerHTML is the stuff between the beginning and ending of a tag. If a paragraph was <p>Hello, world!</p> and you set the innerHTML to “Goodbye, cruel world!”, the result is as if it were <p>Goodbye, cruel world!</p>.
As you might guess from the name, innerHTML can contain HTML as well as straight text. This means that the innerHTML can contain <a> tags, <em> tags, and any tag that legally fits inside the tag you’re modifying. Try replacing “captionParagraph.innerHTML = link.title” with:
var caption = link.title;
caption = caption.replace(
'William Miller',
'<a href="http://wikipedia.org/wiki/William_Miller_(engraver)">William Miller</a>'
);
captionParagraph.innerHTML = caption;
The “replace” method on a string looks for the first parameter and replaces it with the second parameter. In this case, it looks for the text “William Miller” and it replaces it with a link to Wikipedia’s William Miller entry.

Currently, the photo gallery only acts in response to visitor activity. That is almost always the best way to start, and often the best way to stop as well. Let the visitor have control over what happens in their browser. With a photo gallery, however, a slide show might be useful. What would we need in order to make this gallery into a slide show?
1. We need a list of the images. And we have a list of images. JavaScript can access our HTML, and our HTML contains a UL filled with one LI per image.
2. We need to be able to set actions to happen in advance. After we switch to the next image, we don’t want to immediately switch to the image after that—the image would only be onscreen for a fraction of a second. We need to switch to the next image, wait ten or fifteen seconds, and then switch again, and so on.
The first step is to construct a list of the images and pull one of them out to display. Arrays in JavaScript are variables just like any other, but we construct them using the Array statement. For example:
var fruit = new Array('apple', 'banana', 'orange');
Later on, if we want the second fruit, we would use “fruit[1]”. For example, “window.alert(fruit[1])”. Just like with strings, JavaScript starts counting arrays at zero. So if there are three items, the items are item 0, item 1, and item 2.
We could construct our list of images in this way, listing each image in the Array statement. But one of the most important rules of programming is DRY: Don’t Repeat Yourself. We already have a list of the images in the HTML. If there’s some way that our script can access this list, we don’t have to repeat ourselves.
Give the <ul> tag an ID. Call it “images”. The ul tag should look like:
<ul id="images">
Now that the UL has an ID, we can get it using getElementById. Create a new function, “randomImage”.
function randomImage() {
var imageUL = document.getElementById("images");
var aList = imageUL.getElementsByTagName('A');
var aChoice = Math.floor(Math.random()*aList.length);
switchImage(aList[aChoice]);
}
Once you have this function, go to the URL bar of your browser and type “javascript:randomImage()”. Most of the time, the image should change to a random image. (Remember that since we only have six images, sometimes it will randomly choose the image we already have.)
Every element has the ability to produce a list of its descendants. One of the more useful methods that elements have for listing their descendants is “getElementsByTagName”. It provides a list of all elements of that tag name that are contained by this element.
In the randomImage function, the parent element is the UL with the id “images”. After calling getElementsByTagName('A') on that element, we have a list of every A tag contained within that UL. This list is the six images in our image gallery.
For certain kinds of programming, random numbers are useful. JavaScript has a Math object with a method (Math.random) that provides a random number from 0 to 1, but never reaching 1 (though it can reach zero). If we multiply that number by the length of a list, we end up with a random number from 0 to the length of the list (but never reaching the length of the list). This number will include decimals, such as 4.149.
Math.floor will remove decimals from a positive number. Applying Math.floor to a random number from 0 to the length of a list will produce a random integer from 0 to one less than the length of the list. For our list of six A tags, it will produce a random integer between 0 and 5.
Once we have that random integer, we pull that item from aList using the square brackets. If aChoice is 3, then aList[aChoice] is the fourth image link.
Finally, let’s have it choose a random image every time a visitor visits the page. Add this to the end of gallery.js:
window.onload=randomImage;
This is just like the “document.onclick” we used in the “Intercepting Clicks” example. In this case, however, we’re telling the window that, when it is done loading, to call the randomImage function.
What we’re really working towards is an automatic slide show, one that can advance through all of the images in the gallery automatically.
Let’s go ahead and make a new function called slideShow. It will start when the window finishes loading, and it will display each of the images in order.
function SlideShow() {
this.slides = document.getElementById("images").getElementsByTagName('A');
this.imageFrame = document.getElementById("frame");
this.captionParagraph = document.getElementById("caption");
this.currentSlide = 0;
this.advance = function() {
this.currentSlide++;
var link = this.slides[this.currentSlide];
this.imageFrame.src=link.href;
this.captionParagraph.innerHTML = link.title;
}
}
This looks very similar to what we’ve already done, with some odd flourishes I’ll get to in a moment. Test this out using:
javascript:gallery = new SlideShow();
javascript:gallery.advance();
Do the first line (new SlideShow) once. Do the second line as many times as you want. It should advance one slide every time you run it.
There is a whole bunch of “this” in this function. Previously, we used “this” to pass an A element to another function. What “this” really means is “the current thing”, and that current thing can be a function as well as an element. In fact, functions in JavaScript look a whole lot like objects. They can contain properties and methods just like HTML elements can and just like the window and the document objects do.
What we’re doing with “this” throughout this function is setting up one methods (advance), and several properties (currentSlide, imageFrame, captionParagraph, and slides). We’ll be using currentSlide to remember which slide was most recently displayed. We’ll use imageFrame and captionParagraph just like we used them in the switchImage function. And we’ll use slides to remember the list of images, so that we don’t have to recreate the list every time we cycle through a slide.
The advance method adds one to the currentSlide property, then gets the A element using that number. When gallery.currentSlide is 3, it will display image and caption from the third A element.
I mentioned earlier that new arrays can be created using “new Array()”. Well, new objects of any kind can be created using “new”. “gallery=new SlideShow()” creates a new SlideShow and puts it in the variable “gallery”.
I gave SlideShow a capitalized name; that’s not required, but it is somewhat standard for naming classes.
And note that there is no “var” in front of “gallery =”. That’s because this needs to be a global variable. We’ll be using it from multiple places on the page by the time we’re done.
There’s one more minor new thing: “++”. When a numeric variable is followed by two plus signs, this “increments” the variable: adds one to it. Adding one to (and subtracting one from) variables is so common that many programming languages include this abbreviated way of doing it. It’s easier to type and see than “this.currentSlide = this.currentSlide + 1”.
The equivalent for “decrementing” a variable by one is “--”. If we wanted the slide show to go backwards, we’d be using “this.currentSlide--”.
Calling gallery.advance() advances to the next slide—until it reaches the last slide. Then all it does is create an error in your error console. That’s because gallery.currentSlide has gone off the end of the list of A elements. It’s trying to get the seventh, eighth, and so on element out of a list of six elements. This is easily fixed: after incrementing currentSlide, check to see if it’s longer than the list:
this.advance = function() {
this.currentSlide++;
if (this.currentSlide >= this.slides.length) {
this.currentSlide = 0;
}
var link = this.slides[this.currentSlide];
this.imageFrame.src=link.href;
this.captionParagraph.innerHTML = link.title;
}
Test it out again using “javascript:gallery = new SlideShow();” and “javascript:gallery.advance();”, and no matter how many times you call “advance” it will continue cycling. After the last image it will switch back to the first image.
We’ve also just learned one more comparison. The symbols “>=” means “greater than or equal to”. In this example, the comparison is, “is this.currentSlide greater than or equal to this.slides.length?”
Now we have an object that keeps track of the slides and can advance through them. We need a function to get up that object (to do the “gallery=new SlideShow()” for us) and a function to regularly advance through the slides.
//create a gallery and start the slide show in motion
function beginShow() {
gallery = new SlideShow();
window.setTimeout(advanceSlide, 30000);
}
//advance the slide show, and set the timer for the next advance
function advanceSlide() {
gallery.advance();
window.setTimeout(advanceSlide, 5000);
}
In the URL bar, type “javascript:beginShow()” and wait 30 seconds. After 30 seconds it should advance to the second slide, and then advance every five seconds afterwards.
Add beginShow to the windows’ onload and the show will start up 30 seconds after the page loads.
window.onload=beginShow;
You can see in these two functions why we need gallery to be global (which is why we don’t create it using “var gallery = …”). The gallery variable is created in one function but used in the next. If it were created using “var”, it would only be available in the function that created it.
The window object is your doorway to the visitor’s computer—as much of a doorway as you’re going to get. It includes a method for telling the browser to run some code at a later time. The setTimeout method accepts a function and a number of milliseconds as its parameters. In beginShow above, we’re telling the browser to run the advanceSlide function in 30,000 milliseconds (30 seconds). Every time it runs advanceSlide, the last thing advanceSlide does is tell the browser to run advanceSlide in 5000 milliseconds (5 seconds).
Timers are the reason we have to put the control code in a separate function instead of in a method on the SlideShow class. If we try to have the timer call a method on gallery, it will happily call that method—but without any of the context of the method being part of an object. It will lose track of “this” and apply it to the window instead of to the gallery object.
The slide show is set to advance every six seconds, but we also have links along the bottom that let the visitor choose which slide they want to view. If they choose a slide during the slide show, chances are they’re only going to be able to look at it for a few seconds. Let’s make the show pause for about thirty seconds every time the visitor makes a choice.
The first step is to move image selection from the separate “switchImage” function to a method on the gallery object. Separate out the code in “advance” that switches the image into its own method:
function SlideShow() {
this.slides = document.getElementById("images").getElementsByTagName('A');
this.imageFrame = document.getElementById("frame");
this.captionParagraph = document.getElementById("caption");
this.currentSlide = 0;
this.advance = function() {
this.currentSlide++;
if (this.currentSlide >= this.slides.length) {
this.currentSlide = 0;
}
this.displayImage(this.slides[this.currentSlide]);
}
this.displayImage = function(link) {
this.imageFrame.src=link.href;
this.captionParagraph.innerHTML = link.title;
}
}
Test that the slide show still works, and when it does, add a switchImage method:
this.switchImage = function(link) {
this.displayImage(link);
this.lastActionTime = new Date();
return false;
}
And change every instance of “return switchImage(this);” in the HTML to “return gallery.switchImage(this);”. A search and replace on “switchImage” to “gallery.switchImage” should do it.
Make sure that clicking the links still works and that the automatic slide show still works. When they do, add a new method that will check if the page has been idle; this new method will check that a property called lastActionTime was at least 30 seconds ago. It will return true if the page has been “idle” and false if it has not.
this.lastActionTime = new Date();
this.idle = function() {
var now = new Date();
if (now.valueOf() > this.lastActionTime.valueOf() + 30000) {
return true;
} else {
return false;
}
}
Finally, add a new method for the advanceSlide function to call. This function will only advance if the page has been idle.
this.idleAdvance = function() {
if (this.idle()) {
this.advance();
}
}
Replace “gallery.advance();” in the advanceSlide function with “gallery.idleAdvance();”. Now the slide show will only move after 30 seconds of inactivity. You can adjust the three delays used by the system.
1. If you want it to wait five minutes before starting the slide show, change 30000 to 300000 in beginShow. 300,000 milliseconds is 300 seconds, which is 5 minutes.
2. If you want it to wait for one minute of inactivity before restarting the slide show, change 30000 to 60000 in the idle method of SlideShow.
3. If you want it to advance every four seconds instead of every five seconds, change 5000 to 4000 in the advanceSlide function.
There’s a new object in the idle method: the Date object. Date objects contain the current date and time, down to the milliseconds. The method valueOf() returns the date and time of the object as milliseconds, allowing us to easily compare two dates. In the SlideShow, we’re creating a lastActionTime property that contains that last time the visitor manually shifted the slide show. The idle method creates a variable to store the current time (“now”), and then compares that with the lastActionTimeProperty—after adding 30000 milliseconds to lastActionTime.
The “>” comparison means “is greater than”. The comparison in the idle method is, “is now in milliseconds greater than the last action time in milliseconds with 30000 milliseconds added to it”.
If statements can have an “else” clause that specifies what to do if the comparison condition is not met. Here, if now is not greater than the last action time plus 30 seconds, the line in the else section applies. Thus, the idle method will either return true (the condition is met) or false (the condition is not met).
Just to make sure we’re all on the same page, here’s the current version of the SlideShow object and related functions:
function SlideShow() {
this.slides = document.getElementById("images").getElementsByTagName('A');
this.imageFrame = document.getElementById("frame");
this.captionParagraph = document.getElementById("caption");
this.currentSlide = 0;
this.advance = function() {
this.currentSlide++;
if (this.currentSlide >= this.slides.length) {
this.currentSlide = 0;
}
this.displayImage(this.slides[this.currentSlide]);
}
this.displayImage = function(link) {
this.imageFrame.src=link.href;
this.captionParagraph.innerHTML = link.title;
}
this.switchImage = function(link) {
this.displayImage(link);
this.lastActionTime = new Date();
return false;
}
this.lastActionTime = new Date();
this.idle = function() {
var now = new Date();
if (now.valueOf() > this.lastActionTime.valueOf() + 30000) {
return true;
} else {
return false;
}
}
this.idleAdvance = function() {
if (this.idle()) {
this.advance();
}
}
}
//create a gallery and start the slide show in motion
function beginShow() {
gallery = new SlideShow();
window.setTimeout(advanceSlide, 30000);
}
//advance the slide show, and set the timer for the next advance
function advanceSlide() {
gallery.idleAdvance();
window.setTimeout(advanceSlide, 5000);
}
window.onload=beginShow;
That’s how to use timers for long periods of time, but we can also set timers to extremely short periods of time, on the order of just a few milliseconds. This is useful for animation effects. Timers combined with style changes can make very appealing animations. For example, there is a style called “opacity” that sets the transparency of an element. We can use this to fade out one image and then fade in the next.

Go ahead and type this into the URL bar:
javascript:gallery.imageFrame.parentNode.style.opacity=.5
You should see the image and the caption fade to 50% opacity. Change that number to 0 and the image and caption will fade completely. Put it back to 1 and the image and caption will return to full strength.
The “parentNode” of an element is the element that surrounds it, its immediate parent. The parentNode of gallery.imageFrame is the <div> tag that encloses it. By setting that DIV element’s opacity, the opacity of everything contained by the DIV is also affected.
Create a fade function. This function will fade out until the opacity is zero, and then advance the slide. It will return true or false depending on whether the fade is done or not.
this.fade = function() {
var done = false;
var opacity = this.imageFrame.parentNode.style.opacity;
if (opacity=="") {
opacity = 1;
}
opacity -= .1;
if (opacity <= 0) {
opacity = 0;
done = true;
}
this.imageFrame.parentNode.style.opacity = opacity;
if (opacity == 0) {
this.advance();
this.imageFrame.parentNode.style.opacity = 1;
}
return done;
}
This function checks the opacity of the parent DIV, and reduces it by .1 each time. Note that the first time through, the opacity doesn’t exist on the DIV’s style, so we need to check to see if it’s empty. If it is empty, we set it to 1. When opacity drops to zero, we set the “done” variable to true. We also compare “less than or equal to zero” instead of “equal to zero”, just in case the numbers we’re using drop it to below zero. We set opacity to zero to ensure that it never drops below zero.
At the end of the function, if opacity has reached zero, we advance the slide and reset opacity to 1 so that the slide is visible again.
During a fade, the advanceSlide function will use a very small number for the setTimeout method. Once the fade is completed, it will use the normal 5,000 milliseconds.
function advanceSlide() {
if (gallery.fade()) {
window.setTimeout(advanceSlide, 5000);
} else {
window.setTimeout(advanceSlide, 10);
}
}
It knows whether or not the fade has completed by whether or not gallery.fade returns true or false.
The symbol for “-=” is very similar to the symbol “--” and “++”. Where “--” reduces the variable by 1, “-=” reduces the variable by whatever is after the symbol. Setting “opacity -= .1” means “reduce opacity by .1”. There’s an equivalent for increasing a variable, and that’s “+=”, which we’ll start using when we set the new image to fade in.
The comparison “<=” means “less than or equal to”. We’re checking to see if “opacity is less than or equal to zero”.
Of course, we also want the next image to fade in. To do this, we need to keep track of which direction the fade is going. Add a new property above the fade method, “fadeDirection”, and set it to “out”. By default, we’ll be fading out. Once we finish fading out we’ll set that property to “in”. And once we finish fading in we’ll set it to “out” again.
Remove the “this.imageFrame.parentNode.style.opacity = 1;” line. Instead of going directly to full opacity, we’re going to fade back in.
this.fadeDirection = "out";
this.fade = function() {
var done = false;
var opacity = this.imageFrame.parentNode.style.opacity;
if (opacity=="") {
opacity = 1;
}
if (this.fadeDirection == "out") {
opacity -= .1;
if (opacity <= 0) {
opacity = 0;
this.fadeDirection = "in";
}
} else {
opacity += .1;
if (opacity >= 1) {
opacity = 1;
done = true;
this.fadeDirection = "out";
}
}
this.imageFrame.parentNode.style.opacity = opacity;
if (opacity == 0) {
this.advance();
}
return done;
}
There’s nothing new here. We’ve added an “if” around the opacity reduction: if we’re fading out, reduce the opacity. Otherwise, increase the opacity. When the opacity drops to zero, reverse the fade direction. When the opacity increases to 1, remember that we’re done fading, and reverse the fade direction for the next time.
And yet, when you run this, what happens? The ancient sarcophagi fades out, Carrick Castle starts fading in… and then it stops. It’s as if the opacity isn’t changing. It’ll sit there forever. Put a “window.alert(opacity);” just in front of “this.imageFrame.parentNode.style.opacity = opacity;”.
You’ll be able to see the numbers drop; there are a couple of rounding errors as it drops, but they shouldn’t matter. It starts coming up to “00.1”, and then to… “0.10.1”? And then it just keeps repeating it. What’s that?
JavaScript is a “loosely typed” or “weakly typed” language. This means that you don’t have to care if a particular variable contains a number or if it contains a string of text. If you try to subtract two from five, JavaScript doesn’t care if you originally set up the variables as strings or as numbers.
javascript:window.alert(5-2);
javascript:window.alert("5"-"2");
Some languages don’t let you do that. If you set it up as a string, you can’t do math on it. If you set it up as a number, you can’t treat it as a string of text characters. Scripting languages are often loosely typed; it usually makes them easier to use, especially on the web.
The problem is that JavaScript also supports “operator overloading”. Operator overloading means that some operators (such as the “+” or, in this case, “+=”) can do different things depending on the type of variable they’re applied to.
javascript:window.alert(5+2);
javascript:window.alert("5"+"2");
For numbers, the plus sign adds two numbers together. For strings, the plus sign (and its related operators) concatenates both sides. If any string is involved, JavaScript converts all of the values to a string and concatenates.
Style values are always strings. So while we can get away with “opacity -= .1”, because the minus sign isn’t overloaded, we can’t get away with “opacity += .1”. We need to convert the opacity to a number first. The specific kind of number we need it to be is a “float”, that is, a number with floating decimal points.
For the “if” where we check if the opacity is empty, add an “else” to convert the opacity to a number:
if (opacity=="") {
opacity = 1;
} else {
opacity = parseFloat(opacity);
}
If the opacity is empty, we set it to the number 1. No need to convert that to a number, because “1” without quotes around it is already a number. If the opacity is not empty (“else”), we use JavaScript’s parseFloat function to convert it to a floating point number.
Now, the slides should both fade out and fade in again.
We’ve lost the idle timer in this version, because we’re not using the idle method.
Put “if (this.idle()) {…}” around the fade code. That will cause it to not perform any fading during the idle period of thirty seconds after the visitor clicks on one of the image links. But we also need to think about what happens if the visitor clicks during a fade. The DIV is faded down to .3 opacity, the visitor clicks on an image link, and then the DIV is going to be stuck at half-fade until the slide show starts again. We need an “else” to reset all of the fade properties when fade is called during an idle period. We’ll need to set done to true, set the opacity back to 1, and set the fadeDirection back to “out”.
this.fadeDirection = "out";
this.fade = function() {
var done = false;
if (this.idle()) {
var opacity = this.imageFrame.parentNode.style.opacity;
if (opacity=="") {
opacity = 1;
} else {
opacity = parseFloat(opacity);
}
if (this.fadeDirection == "out") {
opacity -= .1;
if (opacity <= 0) {
opacity = 0;
this.fadeDirection = "in";
}
} else {
opacity += .1;
if (opacity >= 1) {
opacity = 1;
done = true;
this.fadeDirection = "out";
}
}
} else {
//we are not or are no longer idle
//be done and set opacity back to 1 just in case
done = true;
opacity = 1;
this.fadeDirection = "out";
}
this.imageFrame.parentNode.style.opacity = opacity;
if (opacity == 0) {
this.advance();
}
return done;
}
The slide show will now fade until the visitor clicks, at which point it will immediately unfade. It’ll then wait for thirty seconds before resuming the slide show.
Currently, if the visitor revisits a slide during the slide show, the slide will pause, but it won’t reset itself. If the last slide it displayed was Lochmaben Castle and the visitor clicks on Ancient Sarcophagi, then after thirty seconds the slide show will resume at Lochnaw. This makes sense; there’s no reason to revisit slides we’ve already seen just because we wanted to revisit one of the slides.
However, there is one condition where this doesn’t make sense. Go ahead and reload the page, and before the slide show starts click on Carrick Castle. When the slide show starts, Carrick Castle will fade out… and then Carrick Castle will fade in again. The slide show thinks it needs to go from slide 1 to slide 2, and doesn’t care that we’re already looking at slide 2.
As long as we can assume that there are always at least two unique images, this is an easy fix. In the advance method, we can compare the href of the link to the src of the current image. If they’re the same, just advance again.
this.advance = function() {
this.currentSlide++;
if (this.currentSlide >= this.slides.length) {
this.currentSlide = 0;
}
//if the new slide is the same as the current slide, advance again
if (this.slides[this.currentSlide].href == this.imageFrame.src) {
this.advance();
} else {
this.displayImage(this.slides[this.currentSlide]);
}
}
The advance method calls itself to advance again if it’s about to display the same image that’s already onscreen. This requires that there be at least two unique images. If there’s only one image, it will never stop. It will keep trying to advance to a unique image, and eventually the browser will have to kill it.
One of the nice things about using classes is that the shared information on the object makes it easier to add new functionality. Suppose we want to be able to display a random image, as we did earlier with a function? In the SlideShow class, it becomes a two-line function:
this.randomSlide = function() {
this.currentSlide = Math.floor(Math.random()*this.slides.length);
this.advance();
}
And then add this, for example, to the beginShow() function so that a random images shows on page load again:
//create a gallery and start the slide show
function beginShow() {
gallery = new SlideShow();
gallery.randomSlide();
window.setTimeout(advanceSlide, 30000);
}
By manipulating the data that already exists on the object, you can easily add new functionality.
If you’re following this directly from the handout, the answers (or possible answers) are revealed directly beneath the questions. So if you want to try it yourself, don’t read too quickly.
One of the important lessons of programming is to write code that you understand. This often means making functions with informative names that both describe the code and make the code easier. In the section “Random image”, Math.floor(Math.random()*maximum) is not immediately obvious as a random integer generator. How would you write a function called "random" that returned a random integer (a) between 0 and a parameter given to the function, and (b) between a minimum and a maximum? This function might look like, in use, “var randomInteger = random(4)” to provide a random integer between 0 and 3. Or it might look like “var randomInteger = random(4, 1) to provide a random integer between 1 and 4, or “var randomInteger = random(4, 3) to provide a random integer between 3 and 6.
Possible answer:
function random(range, floor) {
var randomInteger = Math.floor(Math.random()*range);
if (floor) {
randomInteger += floor;
}
return randomInteger;
}
It will return a random number from 0 to the first parameter; if you give it a second parameter, that number will be added to the initial random number. So, random(3) will produce a number from 0 to 2, but random(3, 1) will produce a number from 1 to 3.
Once you’ve added it to gallery.js, you can test it using “javascript:window.alert(random(4))”.
For the purpose of the randomImage function—choose a random image when the visitor first comes to the page—we want the random list to include the default image in the <img> tag. But what if you were using this random function to switch to a new random image? You wouldn’t want the current image to be one of the choices. How would you rewrite randomImage to never return the current image?
Possible answer: I can think of two possibilities. The first one (and the safest) is to construct a new list from the old one, that excludes any links whose href attribute is the same as the current img tag’s src attribute. This solution is a bit tricky, because it requires looking up the for loop in the JavaScript documentation and it requires looking up how to add an item to an array.
//a safe random image excluding the current image
function randomImage() {
var aList = document.getElementById("images").getElementsByTagName('A');
currentImage = document.getElementById("frame");
var usableImages = new Array();
for (var aIndex=0;aIndex<aList.length;aIndex++) {
var a = aList[aIndex];
if (a.href != currentImage.src) {
usableImages.push(a);
}
}
if (usableImages) {
var aChoice = Math.floor(Math.random()*usableImages.length);
switchImage(usableImages[aChoice]);
}
}
Another possibility is to keep calling randomImage() until we get a random a tag whose href doesn’t match the src of the current img. There’s nothing new in this solution, but it does involve a trick that we haven’t covered yet.
//a fast random image excluding the current image
function randomImage() {
var aList = document.getElementById("images").getElementsByTagName('A');
if (aList.length > 1) {
currentImage = document.getElementById("frame");
var aChoice = Math.floor(Math.random()*aList.length);
//if the choice is the same as the current one, don't use it
if (aList[aChoice].href == currentImage.src) {
randomImage();
} else {
switchImage(aList[aChoice]);
}
}
}
This uses recursion—randomImage is calling itself. Recursion can be a very useful tool for programming, especially when dealing with lists of items. In this case it’s probably a bit dangerous. We’re checking that there are multiple <a> tags before recursing, because otherwise it would recurse forever, with each recursion choosing the only image in the list, realizing it’s the same as the current image, and recursing. Eventually the browser will recognize that something’s wrong and cancel the script.
We used javascript: URLs in the URL bar to advance the slide show while we were testing it. Those URLs work just as well inside of the page. You can make an “advance” link to “javascript:gallery.advance();". Do that. And then, write a new method for SlideShow that moves backwards, and provide a link to that as well.
this.retreat = function() {
this.currentSlide--;
if (this.currentSlide < 0) {
this.currentSlide = this.slides.length-1;
}
this.slide(this.currentSlide);
}
Test it using “javascript:gallery.retreat()” and when it works, add it as a link on the page.
Then, add another button to turn automatic sliding on or off. Add a property called “paused” which, when true, causes “advance” to not advance the slides. Create a method called “pause” which sets that property to true, and another method, “play”, which sets that property to false.
For extra extra credit, use only a single link to switch between pause and play. The pause method will change that link to read “Resume slide show” and call gallery.play(), where the play method will change the link to read “Pause slide show” and call gallery.pause().
JavaScript is often used in forms to provide feedback and guidance to the person filling out the form. Open “menu.html” in your browser, and think about what we might do to make this form easier to use. Note that because this is a tutorial about JavaScript and not about server-side code, form submission is disabled. One thing you can do to test it out is replace the javascript block in the form’s “action” attribute with “mailto:youremail”. When you submit the form, your browser will either send it via your e-mail software, or it will send it directly via e-mail. E-mailed form submissions aren’t often readable, however, so you may be better just leaving it as “Not Implemented”.
Probably the most common use of JavaScript for forms is to require one or more fields to be filled out. This form is meant for taking an order. There are two things that are required: something to eat or drink, and the customer’s name. Let’s do the name first, because it’s the easiest.
Create a “menu.js” script file, and include it using:
script type="text/javascript" src="menu.js"></script>
Create a function called “verifyOrder” in that file.
function verifyOrder(form) {
var customerField = form["customer"];
if (!customerField.value) {
customerField.style.backgroundColor = "red";
window.alert("We need your name in order to deliver your order.");
return false;
} else {
customerField.style.backgroundColor = "inherit";
return true;
}
}
Add “onsubmit="return verifyOrder(this);"” to the <form> tag in the HTML page.
When you submit the form without filling out your name, it will display an alert box explaining that the name is required, and it will color the name input box red. If you type something into the name field and then submit, then the browser will submit the form to the form’s “action” (in this case, showing “Not Implemented”).
You can get a form’s input elements using the same method you would to get an element from an array. If there’s an input called “customer”, then form["customer"] is that element. We can even change the style on that element just as we would for any other element.
Input elements have a “value” property. This property contains the value of that element. If the customer has typed something into the element, the value property will be what they typed.
One of the attributes that <form> tags can have is onsubmit. The onsubmit attribute must contain JavaScript, and that JavaScript is performed when the form is submitted. If that JavaScript returns true, the form is submitted. If that JavaScript returns false, the form is not submitted. The verifyOrder function returns false if the customer field is empty, or true otherwise.
Remember, “this” in a tag is that tag. Since the “onsubmit” is in the <form> tag, “this” means that specific form. When it gets passed as the first parameter to “verifyOrder”, the first parameter in verifyOrder is called “form”.
It doesn’t do much good to require a customer name without also requiring that the customer choose something to order. If you look at the HTML, there are three groups of radio buttons involved in ordering: the “drinks” group, the “sides” group, and the “dishes” group. We need to check to see that at least one of those items is checked.
However, radio buttons are part of a group: there is usually more than one radio button with the same name. Using form[groupname] will return a list of all of those radio buttons. You can see this by typing “javascript:window.alert(document.forms.menu['sides'])”. It should say something like “object collection”. We need a function that will return the value of the selected radio button.
function radioValue(form, radioGroup) {
var buttons = form[radioGroup];
for (var button=0;button<buttons.length;button++) {
if (buttons[button].checked) {
return buttons[button].value;
}
}
return false;
}
Test this by typing “javascript:window.alert(radioValue(document.forms.menu, 'sides'))” in the URL bar. If no side is selected, the alert box should say “false”. If a side is selected, the code for that side should display.
Add this to the verifyOrder function, before the line that checks customerField.value:
if (!(
radioValue(form, 'drinks') ||
radioValue(form, 'sides') ||
radioValue(form, 'dishes'))
) {
document.getElementById('orders').style.backgroundColor = "red";
window.alert("Please choose something to eat and/or drink.");
return false;
} else {
document.getElementById('orders').style.backgroundColor = "inherit";
}
Now, if you try to submit your order before choosing something from one of the menus, you’ll be alerted, and the form will not submit. If you choose something from one of the menus, but don’t type something in the name box, you’ll be alerted to the latter error. Only if you both choose something from the menu and type something in the name box, will the form submit.
Radio buttons almost always have values, whether they’re selected or not. With radio buttons (as with checkboxes), the important property is checked. If the radio button is checked, it’s value will be submitted. The checked property is either true or false.
We’ve seen while loops already, but not for loops. The “for” loop has three sections in the parentheses, each separated by a semicolon from the others. First, there’s the initializer. In this case, that’s “var button=0”. The for loop begins by creating a variable called button and setting it to zero.
Second, there’s the loop test. When the loop test is met, the for loop stops and continues on to the next line following the for loop’s closing brace. In this example, the loop test is “button<buttons.length”. If the list of radio buttons contains four items, for example, then the loop will end if “button” is ever four or more.
Finally, there’s the counting expression. Every time the loop comes around again, it performs the counting expression. The counting expression usually increments and decrements the variable created in the initializer. In this example, the counting expression is “button++”. Each time the loop comes around again, button is incremented by one.
This means that, in this example, button will start at zero, become one, then two, then three, and so on, until it reaches the last item in the list of buttons. For each value of button, the JavaScript between the braces will be performed.
Two bars (pipes) are another form of compound conditional, like the two ampersands. Double bars mean “or”. So this example means “if there’s a value for drinks or if there’s a value for sides or if there’s a value for dishes”. Then, the exclamation point reverses that. So if there’s a value for anything, the conditional is not met and no alert is displayed.
Currently, verifyOrder only displays one error at a time. But it’d be nice, if the customer missed two fields, to highlight both of them. But we don’t want to pop up a separate alert box for each warning. So we need to store the messages and display them all at once. We can use an Array to do this.
function verifyOrder(form) {
var customerField = form["customer"];
var warnings = new Array();
if (!(
radioValue(form, 'drinks') ||
radioValue(form, 'sides') ||
radioValue(form, 'dishes'))
) {
document.getElementById('orders').style.backgroundColor = "red";
warnings.push("Please choose something to eat and/or drink.");
} else {
document.getElementById('orders').style.backgroundColor = "inherit";
}
if (!customerField.value) {
customerField.style.backgroundColor = "red";
warnings.push("We need your name in order to deliver your order.");
} else {
customerField.style.backgroundColor = "inherit";
}
if (warnings.length) {
warnings = warnings.join("\n");
window.alert(warnings);
return false;
} else {
return true;
}
}
Now, if you leave off both an order and your name, you’ll see the two errors all at once, and both sections of the form will be highlighted.
We’re using two of the more useful methods of Arrays here: push and join. Array.push adds a new item to the end of the list. Array.join(character) joins each item of the array together into a string of text, separating each item by the character we gave join as a parameter.
Backslash-n is commonly used to make a new line. When you have “\n” in a string of text, JavaScript replaces those two characters with a newline character instead. You’ll use “\n” often when joining arrays. Backslashes are used for other special characters, too. If you need a tab, you can use “\t”. If you really do want a backslash, use two backslashes: “\\”.
The bottom of the menu has a list of specials. You can see that the CSS for those lines is set to highlight the lines if the mouse moves over them. Why not, if a special is clicked, automatically select the items in the menu that correspond to that special?
The first thing we’ll need is a function that can check the radio button in a specified group, according to a desired value.
function markSpecial(radioGroup, special) {
var form = document.forms.menu;
var buttons = form[radioGroup];
for (var button=0;button<buttons.length;button++) {
if (buttons[button].value == special) {
buttons[button].checked = true;
return;
}
}
}
Test this:
javascript:markSpecial("sides", "eggsalad");
javascript:markSpecial("sides", "slaw");
javascript:markSpecial("dishes", "burger");
If the function is working, you should see the appropriate radio button get selected each time you use that function in the URL bar.
A special, however, has three items. It will be easier to mark the specials if we can call one function that, in turn, calls markSpecial for each of the three choices.
function special(drink, side, meat) {
markSpecial('drinks', drink);
markSpecial('sides', side);
markSpecial('dishes', meat);
}
This function takes three strings: the drink code, the side code, and the dish code. Try it:
javascript:special("sling", "potatosalad", "rib");
javascript:special("water", "eggsalad", "chicken");
Now all we need to do is add an onclick to the specials <li> tags.
<li onclick="special('roy', 'eggsalad', 'burger');">Rob Roy, egg salad, and a steakburger.</li>
<li onclick="special('margarita', 'slaw', 'chicken');">Margarita, Coleslaw, and roasted chicken.</li>
You should now be able to click on each special to mark the menu for those orders. Go ahead and make up some more specials. All you need to do is copy the lines that are already there, and change the text and function call.
Everybody likes it when the bartender remembers their drink from last time. Let’s make our form remember it, too. Remembering things from past visits requires cookies. Cookies are bits of data stored on the client’s computer. The browser sends all of the cookies relevant to your page, every time it loads the page.
Cookies need a name, an expiration date, and a path. You’ll use the name to access the cookie’s value later. The browser will throw out the cookie when the expiration date passes. And the browser will use the path to choose which cookies to send your page. We’re going to send it a path of “/” so that all pages on our site (which, for testing purposes, is most likely your local hard drive) will get the cookie we set.
//set a cookie that will expire in 14 days
//and is valid on the entire site
function setCookie(cookieName, cookieValue) {
//get the current time
var expirationDate = new Date();
//add ten days by converting to milliseconds
expirationDate = expirationDate.valueOf() + 14*24*60*60*1000;
//turn the milliseconds back into a date
expirationDate = new Date(expirationDate);
//create cookie string; it needs an expiration date and a path
var expires = "; expires=" + expirationDate.toGMTString();
var path = "; path=/";
var theCookie = cookieName + "=" + escape(cookieValue) + path + expires;
document.cookie = theCookie;
}
Save this and reload the page, and you now have a way to set cookies through JavaScript.
javascript:setCookie("faveDrink", "Harvey Wallbanger");
Your browser should have a way of looking at cookies. In Safari, go into the security preferences pane to “Show Cookies”, and search on “filecookies” to see all local cookies. In Firefox, go to the privacy pane to show cookies, and search on the cookie’s name—in this case, “faveDrink”. You should find the cookie and be able to see that it’s value is “Harvey Wallbanger”.
We also need a function to retrieve the cookie and its value.
//get a cookie's value if it exists
function getCookie(cookieName) {
//get a list of all cookies
var allCookies = document.cookie;
if (allCookies) {
//if there are multiple cookies, they're separated by semicolons
allCookies = allCookies.split("; ");
for (var cookie=0;cookie<allCookies.length;cookie++) {
//cookies have the format name=value, so split on the equal sign
var cookieParts = allCookies[cookie].split("=");
if (cookieParts[0] == cookieName) {
return unescape(cookieParts[1]);
}
}
}
return false;
}
This function lets us retrieve a cookie’s value. Try it in your browser’s URL bar:
javascript:window.alert(getCookie("faveDrink"));
The next step is to remember it. The best place to do this is in verifyOrder, since that happens on submit. Right above the line that says “return true”, add code to set the cookie if the customer has chosen a drink:
var drink = radioValue(form, "drinks");
if (drink) {
setCookie("faveDrink", drink);
}
return true;
Try choosing some drinks, submitting the form, and then checking the value of faveDrink:
javascript:window.alert(getCookie("faveDrink"));
Now we’re pretty much done. We need a function to set the drinks radio button, and we need to call it when the window loads.
function rememberDrink() {
var drink = getCookie('faveDrink');
if (drink) {
markSpecial('drinks', drink);
}
}
window.onload=rememberDrink;
That’s it! The menu form should now remember the last submitted drink selection whenever the page loads.
So far, we’ve used the Date object to get the current date and time. But we can also pass the Date class a number of milliseconds to have it create the date and time represented by those milliseconds.
So far, the only thing we’ve used Date objects for is for comparison purposes, and we’ve used the valueOf method for that. Another very useful method is toGMTString. The Internet is built on reliable timestamps, and toGMTString provides a standard format for specifying the date and time in a universal format (in Greenwich Mean Time).
Cookies are stored as part of the HTTP headers. These headers are a lot like the headers that you see in your e-mail, and there are special rules that need to be followed for some special characters. The “escape” function in JavaScript ensures that those characters are “safe” by encoding them with a percentage sign and a number corresponding to the special character. Some special characters include the equal sign and the semicolon. Without escaping the value, extraneous equals and semicolons would mess up the retrieval of cookies.
The opposite of escape is unescape, and you can see that in getCookie we unescape the value that we earlier escaped.
The opposite of joining an array is splitting a string. In getCookie, we split the list of cookies, because they’re separated by semicolons and spaces, and we split each cookie on the equal sign, because the cookies are listed as “name=value”. Splitting on the equal sign gives us an array of the cookie’s name as the first item and its value as the second.
Not all browsers have JavaScript. Some non-visual browsers won’t use it. And you cannot rely on JavaScript existing even in visual browsers. Even if the viewer leaves JavaScript turned on in their browser, there’s a very good chance that some functionality will be turned off. Mostly, this is because JavaScript is commonly abused by scammers.
Many people have pop-up blocking turned on, for example, so that they don’t get advertisements popping up on their computer; most browsers have this option built-in because the problem is so widespread.
Some browsers let the visitor choose exactly what JavaScript functionality to allow, from the ability to resize windows on.
When going over this tutorial in early 2007, I discovered that the very simple first example didn’t function at all in two out of three of the then-major browsers. I’d chosen setting the text in the status bar as the first example because it required only a single line and because its result was so obvious. No longer; most likely the functionality was abused by phishing sites. As far as I can tell, the ability to see changed status text is no longer available in most browsers.
Browsers will also attempt to detect whether your script is consuming too many resources on the client computer. If the browser detects this, it will either automatically stop your script, or present the viewer with a dire warning that the script is likely doing something wrong, and do they want to cancel? Most likely they will.
You cannot trust JavaScript at all. Not only can the viewer turn JavaScript off, but they can also change it. A JavaScript file is just like a web page: it gets downloaded to the client computer and then “displayed”. The viewer has full control over the file since it is on their computer, and malicious scripters can take advantage of this if you trust the “output” of JavaScript.
JavaScript should be used to assist the visitor, not to assist the server (or the webmaster). It should not be used to perform authentication, nor should it be used to calculate things that are then stored on the server. You would never want to calculate prices using JavaScript and then charge a customer based on that calculation, for example: you’ll end up giving some people a pretty hefty discount when they realize they can manipulate the calculation themselves. This does not mean that you cannot use JavaScript to show the viewer a quick summary of their prices or shopping cart total. It just means that you should, once they submit their purchase, calculate the prices on the server end as well. Remember that on the Internet, it only takes one person to take advantage of security flaws in your web site.
JavaScript is a great feature for making your web pages easier to use. But it should not be used in place of server-side programming. Your pages should always be accessible to people who do not use JavaScript (it is difficult to imagine what a JavaScript would look like through a translator or a voice reader, for example), and you should not rely on the JavaScript calculations coming to your end intact and trustworthy.
Different web browsers, and different versions of web browsers, will often treat the same JavaScript slightly differently. This will be more of an issue the more complex your JavaScript becomes. Try to keep your JavaScript standard, try to test on a wide variety of browsers and versions, and make sure your web pages work if your viewers end up having to turn JavaScript off to bypass inadvertent bugs in your JavaScript. Remember that just because your code works now, there is no guarantee that it will work with tomorrow’s browsers. Keep things simple, and especially try not to “take advantage” of bugs in a browser’s JavaScript implementation. Someday that bug will probably get fixed.
If you look at other people’s web pages, you’ll notice that sometimes they’ll put JavaScript right inside their web pages, instead of putting it into a separate file as we’ve done here. I recommend against this. By putting your JavaScript into a separate JavaScript (.js) file, you can call the same file from different web pages. If a new browser version necessitates changing your JavaScript code to overcome a new bug, you’ll be able to make the change once, instead of looking for all the web pages you’ve used something like that code in. You’ll always miss at least one.
Separating your JavaScript into its own file also makes it much harder for your JavaScript to interfere with your HTML in browsers that don’t implement JavaScript, or don’t implement it the way you expect it to work.
You can put more than one <script src="…"> in your web pages, to reference more than one set of JavaScripts. Just make sure your JavaScript functions all have unique names.
Write down what you wish to accomplish. Then break it down into smaller parts. Try to find the simplest part, and implement just that part. If you can’t get that simple part to work, see if you can break it down into even simpler parts.
If you can’t break it down any further, move on to the next problem. Perhaps by the time you finish the problem you can solve, you’ll have some insight into the related problem that you couldn’t.
Learn to love your browser’s reload button. Whenever you make a change that might affect your web page, test immediately. Don’t make a whole bunch of changes before testing; if your web page no longer works, you won’t necessarily know which change caused it to fail. Write your programs a step at a time and test often.
Test things that you don’t even expect to happen: try to think up weird scenarios and come up with a means of testing what happens to your page under those scenarios. This will give you valuable information about what your code is really doing.
Also, make extensive use of the “window.alert()” function to let you know the value of variables at troublesome points.
JavaScript, as a programming language, is much less forgiving than HTML or even XHTML. Commands end with semi-colons. Upper and lower case are important. Curly brackets enclose blocks of JavaScript code. You can’t play around with those rules and expect to get a working script.
First, name your variables intelligently. Your variable names should describe what kind of data you expect the variable to contain.
You will notice that I “indent” parts of JavaScript code. Usually, anything inside of curly brackets gets indented by one tab more than the line just above it.
This indentation isn’t necessary. If you leave it out, your scripts will work just fine—if you don’t make any mistakes. Indenting makes it much easier to not make mistakes.
A good text editor (I use Peter Borg’s Smultron for Mac OS X) will help you avoid mistakes. It will color code functions and keywords, as well as strings of text. It will automatically indent for you when you open and close curly brackets, and it will show you where a particular bracket or quote begins or ends.
You should almost never repeat the same basic code more than once. If you need the same routine a second time, seriously consider moving it into a subroutine.
For example, if you wanted to put the date into your “Current Time:” line, we already have the code that creates a date. Unfortunately, if you call it directly you’ll end up with “Today” as the string, because that’s what that subroutine does. Rather than duplicating the portion of the code that creates the actual date, move it out of the “formatDate()” subroutine. Call it something like “makeDate()”. Then, you can call that subroutine both from “formateTime()” and from “formatDate()”.
Another example might be the code we used for prepending a zero to numbers that are smaller than 10. We probably should have created a subroutine that would do that for us, and then call that subroutine every time we need to prepend zeros.
But consider the things you might want to do with a subroutine at the moment you create it. Might we want to prepend something other than zeros? Might we want to pad to three or even four characters instead of just to two? An appropriate subroutine might be called with “thishour = leftpad(thishour, "0", 2);” to ensure that “thishour” has at least two characters, and prepend a zero if it does not. One could then use “indexline = leftpad(pagenumber, ".", 4);” to prepend periods and ensure four characters in the “indexline” string. The function might look something like:
function leftpad(theItem, thePad, minSize) {
newItem = new String(theItem);
while (newItem.length < minSize) {
newItem = thePad + newItem;
}
return newItem;
}
Once you have a hammer, all problems start to look like nails. It can be easy, once you start programming JavaScript, to look at every web page problem as a problem with a JavaScript solution. Look for simpler HTML solutions first. HTML is faster and more reliable than JavaScript, and will last longer.
Some problems will have to be solved with server-side programming, either using server-side includes or server-side programming such as with Perl or PHP. Trying to solve these problems with client-side JavaScript is prone to errors, sometimes dangerous ones if money or privacy is involved.
The most useful book I’ve seen for JavaScript programmers is JavaScript: The Definitive Guide, from O’Reilly. Nowadays I tend to use the web more often, however. Some of the web pages I’ve used while writing this tutorial are the w3schools HTML DOM pages at http://www.w3schools.com/HTMLDOM/ and Daniel Crook’s JavaScript DOM pages at http://krook.org/jsdom/.
“The best book on programming for the layman is Alice in Wonderland; but that’s because it’s the best book on anything for the layman.”
Version 1.1, March 2000
Copyright (C) 2000 Free Software Foundation, Inc. 59 Temple Place, Suite 330, Boston, MA 02111-1307 USA Everyone is permitted to copy and distribute verbatim copies of this license document, but changing it is not allowed.
The purpose of this License is to make a manual, textbook, or other written document "free" in the sense of freedom: to assure everyone the effective freedom to copy and redistribute it, with or without modifying it, either commercially or noncommercially. Secondarily, this License preserves for the author and publisher a way to get credit for their work, while not being considered responsible for modifications made by others.
This License is a kind of "copyleft", which means that derivative works of the document must themselves be free in the same sense. It complements the GNU General Public License, which is a copyleft license designed for free software.
We have designed this License in order to use it for manuals for free software, because free software needs free documentation: a free program should come with manuals providing the same freedoms that the software does. But this License is not limited to software manuals; it can be used for any textual work, regardless of subject matter or whether it is published as a printed book. We recommend this License principally for works whose purpose is instruction or reference.
This License applies to any manual or other work that contains a notice placed by the copyright holder saying it can be distributed under the terms of this License. The "Document", below, refers to any such manual or work. Any member of the public is a licensee, and is addressed as "you".
A "Modified Version" of the Document means any work containing the Document or a portion of it, either copied verbatim, or with modifications and/or translated into another language.
A "Secondary Section" is a named appendix or a front-matter section of the Document that deals exclusively with the relationship of the publishers or authors of the Document to the Document's overall subject (or to related matters) and contains nothing that could fall directly within that overall subject. (For example, if the Document is in part a textbook of mathematics, a Secondary Section may not explain any mathematics.) The relationship could be a matter of historical connection with the subject or with related matters, or of legal, commercial, philosophical, ethical or political position regarding them.
The "Invariant Sections" are certain Secondary Sections whose titles are designated, as being those of Invariant Sections, in the notice that says that the Document is released under this License.
The "Cover Texts" are certain short passages of text that are listed, as Front-Cover Texts or Back-Cover Texts, in the notice that says that the Document is released under this License.
A "Transparent" copy of the Document means a machine-readable copy, represented in a format whose specification is available to the general public, whose contents can be viewed and edited directly and straightforwardly with generic text editors or (for images composed of pixels) generic paint programs or (for drawings) some widely available drawing editor, and that is suitable for input to text formatters or for automatic translation to a variety of formats suitable for input to text formatters. A copy made in an otherwise Transparent file format whose markup has been designed to thwart or discourage subsequent modification by readers is not Transparent. A copy that is not "Transparent" is called "Opaque".
Examples of suitable formats for Transparent copies include plain ASCII without markup, Texinfo input format, LaTeX input format, SGML or XML using a publicly available DTD, and standard-conforming simple HTML designed for human modification. Opaque formats include PostScript, PDF, proprietary formats that can be read and edited only by proprietary word processors, SGML or XML for which the DTD and/or processing tools are not generally available, and the machine-generated HTML produced by some word processors for output purposes only.
The "Title Page" means, for a printed book, the title page itself, plus such following pages as are needed to hold, legibly, the material this License requires to appear in the title page. For works in formats which do not have any title page as such, "Title Page" means the text near the most prominent appearance of the work's title, preceding the beginning of the body of the text.
You may copy and distribute the Document in any medium, either commercially or noncommercially, provided that this License, the copyright notices, and the license notice saying this License applies to the Document are reproduced in all copies, and that you add no other conditions whatsoever to those of this License. You may not use technical measures to obstruct or control the reading or further copying of the copies you make or distribute. However, you may accept compensation in exchange for copies. If you distribute a large enough number of copies you must also follow the conditions in section 3.
You may also lend copies, under the same conditions stated above, and you may publicly display copies.
If you publish printed copies of the Document numbering more than 100, and the Document's license notice requires Cover Texts, you must enclose the copies in covers that carry, clearly and legibly, all these Cover Texts: Front-Cover Texts on the front cover, and Back-Cover Texts on the back cover. Both covers must also clearly and legibly identify you as the publisher of these copies. The front cover must present the full title with all words of the title equally prominent and visible. You may add other material on the covers in addition. Copying with changes limited to the covers, as long as they preserve the title of the Document and satisfy these conditions, can be treated as verbatim copying in other respects.
If the required texts for either cover are too voluminous to fit legibly, you should put the first ones listed (as many as fit reasonably) on the actual cover, and continue the rest onto adjacent pages.
If you publish or distribute Opaque copies of the Document numbering more than 100, you must either include a machine-readable Transparent copy along with each Opaque copy, or state in or with each Opaque copy a publicly-accessible computer-network location containing a complete Transparent copy of the Document, free of added material, which the general network-using public has access to download anonymously at no charge using public-standard network protocols. If you use the latter option, you must take reasonably prudent steps, when you begin distribution of Opaque copies in quantity, to ensure that this Transparent copy will remain thus accessible at the stated location until at least one year after the last time you distribute an Opaque copy (directly or through your agents or retailers) of that edition to the public.
It is requested, but not required, that you contact the authors of the Document well before redistributing any large number of copies, to give them a chance to provide you with an updated version of the Document.
You may copy and distribute a Modified Version of the Document under the conditions of sections 2 and 3 above, provided that you release the Modified Version under precisely this License, with the Modified Version filling the role of the Document, thus licensing distribution and modification of the Modified Version to whoever possesses a copy of it. In addition, you must do these things in the Modified Version:
1. Use in the Title Page (and on the covers, if any) a title distinct from that of the Document, and from those of previous versions (which should, if there were any, be listed in the History section of the Document). You may use the same title as a previous version if the original publisher of that version gives permission.
2. List on the Title Page, as authors, one or more persons or entities responsible for authorship of the modifications in the Modified Version, together with at least five of the principal authors of the Document (all of its principal authors, if it has less than five).
3. State on the Title page the name of the publisher of the Modified Version, as the publisher.
4. Preserve all the copyright notices of the Document.
5. Add an appropriate copyright notice for your modifications adjacent to the other copyright notices.
6. Include, immediately after the copyright notices, a license notice giving the public permission to use the Modified Version under the terms of this License, in the form shown in the Addendum below.
7. Preserve in that license notice the full lists of Invariant Sections and required Cover Texts given in the Document's license notice.
8. Include an unaltered copy of this License.
9. Preserve the section entitled "History", and its title, and add to it an item stating at least the title, year, new authors, and publisher of the Modified Version as given on the Title Page. If there is no section entitled "History" in the Document, create one stating the title, year, authors, and publisher of the Document as given on its Title Page, then add an item describing the Modified Version as stated in the previous sentence.
10. Preserve the network location, if any, given in the Document for public access to a Transparent copy of the Document, and likewise the network locations given in the Document for previous versions it was based on. These may be placed in the "History" section. You may omit a network location for a work that was published at least four years before the Document itself, or if the original publisher of the version it refers to gives permission.
11. In any section entitled "Acknowledgements" or "Dedications", preserve the section's title, and preserve in the section all the substance and tone of each of the contributor acknowledgements and/or dedications given therein.
12. Preserve all the Invariant Sections of the Document, unaltered in their text and in their titles. Section numbers or the equivalent are not considered part of the section titles.
13. Delete any section entitled "Endorsements". Such a section may not be included in the Modified Version.
14. Do not retitle any existing section as "Endorsements" or to conflict in title with any Invariant Section.
If the Modified Version includes new front-matter sections or appendices that qualify as Secondary Sections and contain no material copied from the Document, you may at your option designate some or all of these sections as invariant. To do this, add their titles to the list of Invariant Sections in the Modified Version's license notice. These titles must be distinct from any other section titles.
You may add a section entitled "Endorsements", provided it contains nothing but endorsements of your Modified Version by various parties—for example, statements of peer review or that the text has been approved by an organization as the authoritative definition of a standard.
You may add a passage of up to five words as a Front-Cover Text, and a passage of up to 25 words as a Back-Cover Text, to the end of the list of Cover Texts in the Modified Version. Only one passage of Front-Cover Text and one of Back-Cover Text may be added by (or through arrangements made by) any one entity. If the Document already includes a cover text for the same cover, previously added by you or by arrangement made by the same entity you are acting on behalf of, you may not add another; but you may replace the old one, on explicit permission from the previous publisher that added the old one.
The author(s) and publisher(s) of the Document do not by this License give permission to use their names for publicity for or to assert or imply endorsement of any Modified Version.
You may combine the Document with other documents released under this License, under the terms defined in section 4 above for modified versions, provided that you include in the combination all of the Invariant Sections of all of the original documents, unmodified, and list them all as Invariant Sections of your combined work in its license notice.
The combined work need only contain one copy of this License, and multiple identical Invariant Sections may be replaced with a single copy. If there are multiple Invariant Sections with the same name but different contents, make the title of each such section unique by adding at the end of it, in parentheses, the name of the original author or publisher of that section if known, or else a unique number. Make the same adjustment to the section titles in the list of Invariant Sections in the license notice of the combined work.
In the combination, you must combine any sections entitled "History" in the various original documents, forming one section entitled "History"; likewise combine any sections entitled "Acknowledgements", and any sections entitled "Dedications". You must delete all sections entitled "Endorsements."
You may make a collection consisting of the Document and other documents released under this License, and replace the individual copies of this License in the various documents with a single copy that is included in the collection, provided that you follow the rules of this License for verbatim copying of each of the documents in all other respects.
You may extract a single document from such a collection, and distribute it individually under this License, provided you insert a copy of this License into the extracted document, and follow this License in all other respects regarding verbatim copying of that document.
A compilation of the Document or its derivatives with other separate and independent documents or works, in or on a volume of a storage or distribution medium, does not as a whole count as a Modified Version of the Document, provided no compilation copyright is claimed for the compilation. Such a compilation is called an "aggregate", and this License does not apply to the other self-contained works thus compiled with the Document, on account of their being thus compiled, if they are not themselves derivative works of the Document.
If the Cover Text requirement of section 3 is applicable to these copies of the Document, then if the Document is less than one quarter of the entire aggregate, the Document's Cover Texts may be placed on covers that surround only the Document within the aggregate. Otherwise they must appear on covers around the whole aggregate.
Translation is considered a kind of modification, so you may distribute translations of the Document under the terms of section 4. Replacing Invariant Sections with translations requires special permission from their copyright holders, but you may include translations of some or all Invariant Sections in addition to the original versions of these Invariant Sections. You may include a translation of this License provided that you also include the original English version of this License. In case of a disagreement between the translation and the original English version of this License, the original English version will prevail.
You may not copy, modify, sublicense, or distribute the Document except as expressly provided for under this License. Any other attempt to copy, modify, sublicense or distribute the Document is void, and will automatically terminate your rights under this License. However, parties who have received copies, or rights, from you under this License will not have their licenses terminated so long as such parties remain in full compliance.
The Free Software Foundation may publish new, revised versions of the GNU Free Documentation License from time to time. Such new versions will be similar in spirit to the present version, but may differ in detail to address new problems or concerns. See http://www.gnu.org/copyleft/.
Each version of the License is given a distinguishing version number. If the Document specifies that a particular numbered version of this License "or any later version" applies to it, you have the option of following the terms and conditions either of that specified version or of any later version that has been published (not as a draft) by the Free Software Foundation. If the Document does not specify a version number of this License, you may choose any version ever published (not as a draft) by the Free Software Foundation.

Three simple tutorials guide you through the basics of JavaScript, including intercepting click events, creating a slide show with fade effects, and creating a form that remembers what visitors use it for.