Permission is granted to copy, distribute and/or modify this document under the terms of the GNU Free Documentation License, Version 1.1. A copy of the license is included in the section entitled “GNU Free Documentation License”
HTML uses “tags” that have some form of meaning. A headline tag says that this is a headline for what follows. A paragraph tag says that this text forms a unified thought. A table header tag says that this cell is a header for a row or column.
Cascading style sheets provide no meaning. They allow you to change how an HTML tag displays, but not what an HTML tag means. In general, when you create web pages using HTML and CSS, the HTML should describe your web page, and your CSS should describe its presentation. The page should remain readable in a wide variety of browsers and browser types without any of the CSS.
You can find the latest version of this tutorial, as well as the resources archive, at http://www.hoboes.com/NetLife/CSS/.
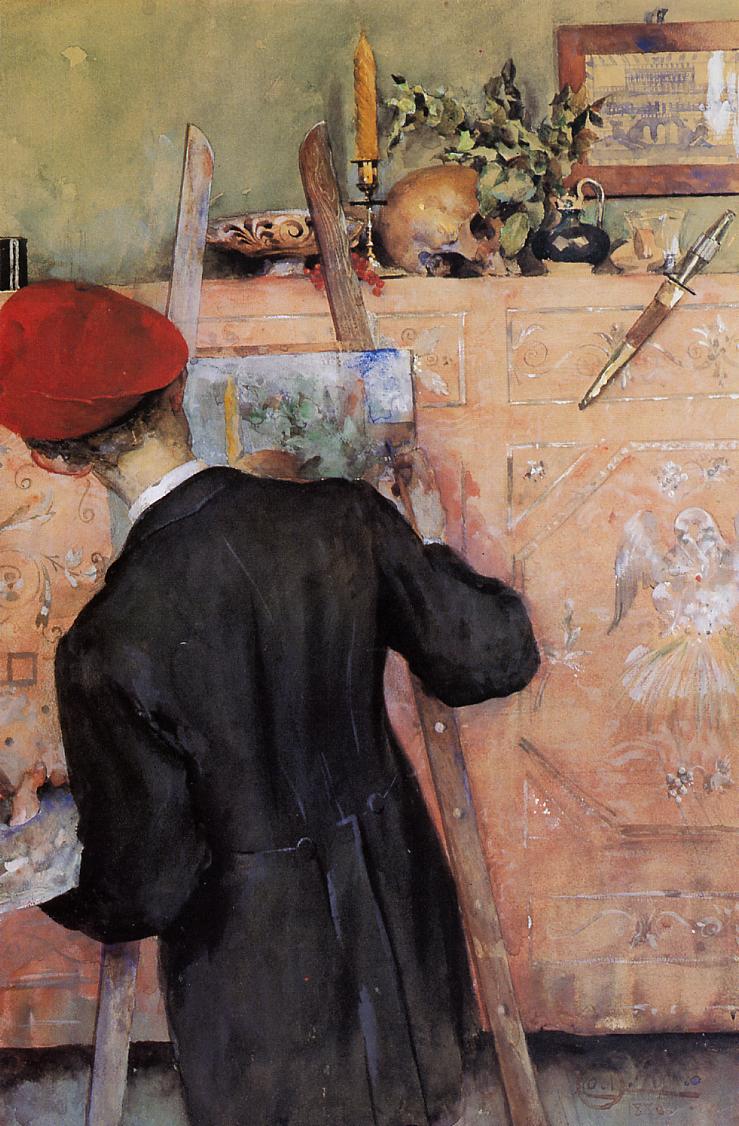
The Still Life Painter, by Swedish painter Carl Larsson. He was also an interior designer and worked within the turn-of-the-century Arts and Crafts movement.
The back cover is Emilie Preyer’s Still Life of Fruit, modified by me to transition from old photo to dynamic color. What’s the fly doing? It’s waiting for the spider.
I found both of them on Wikimedia Commons.
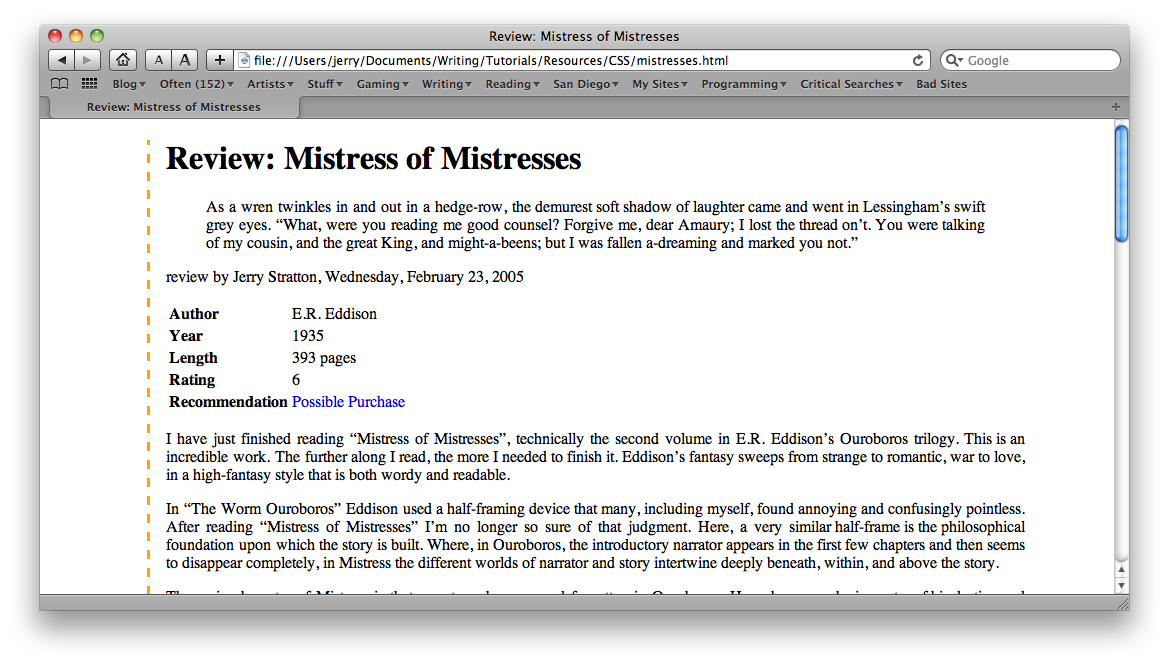
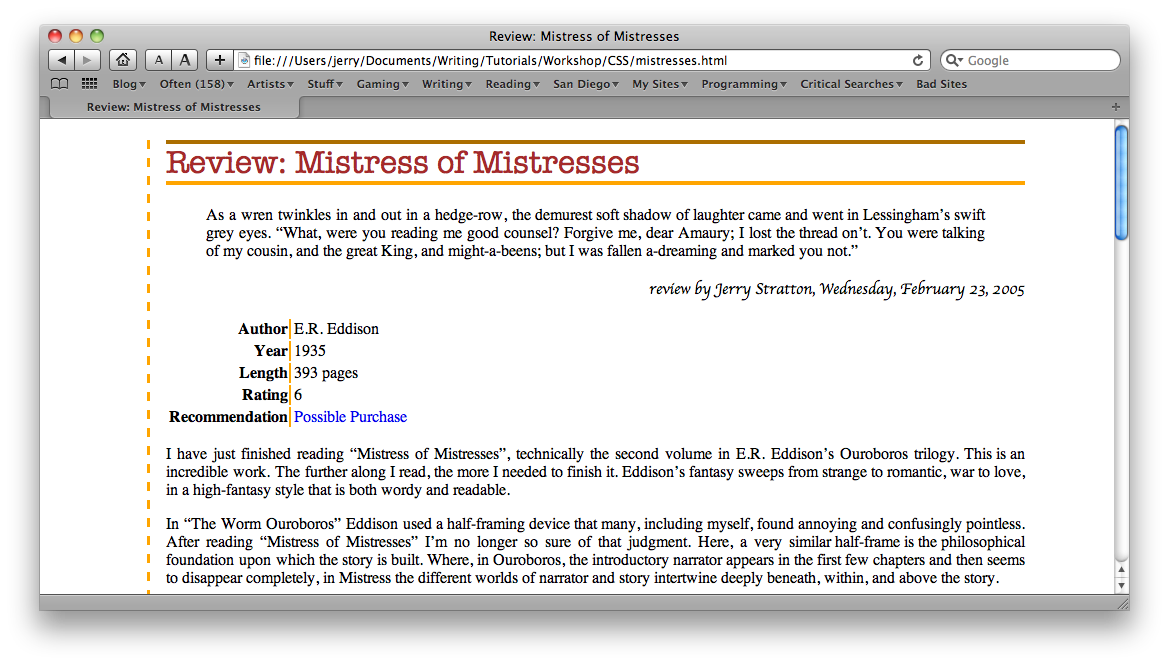
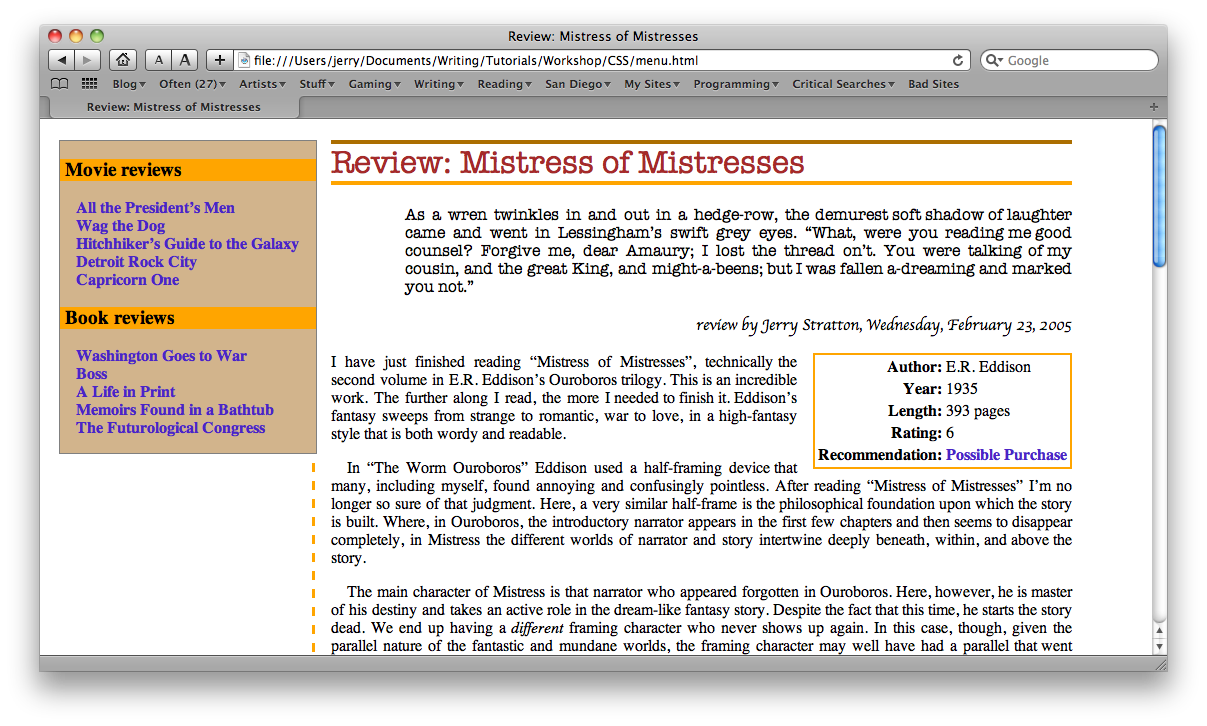
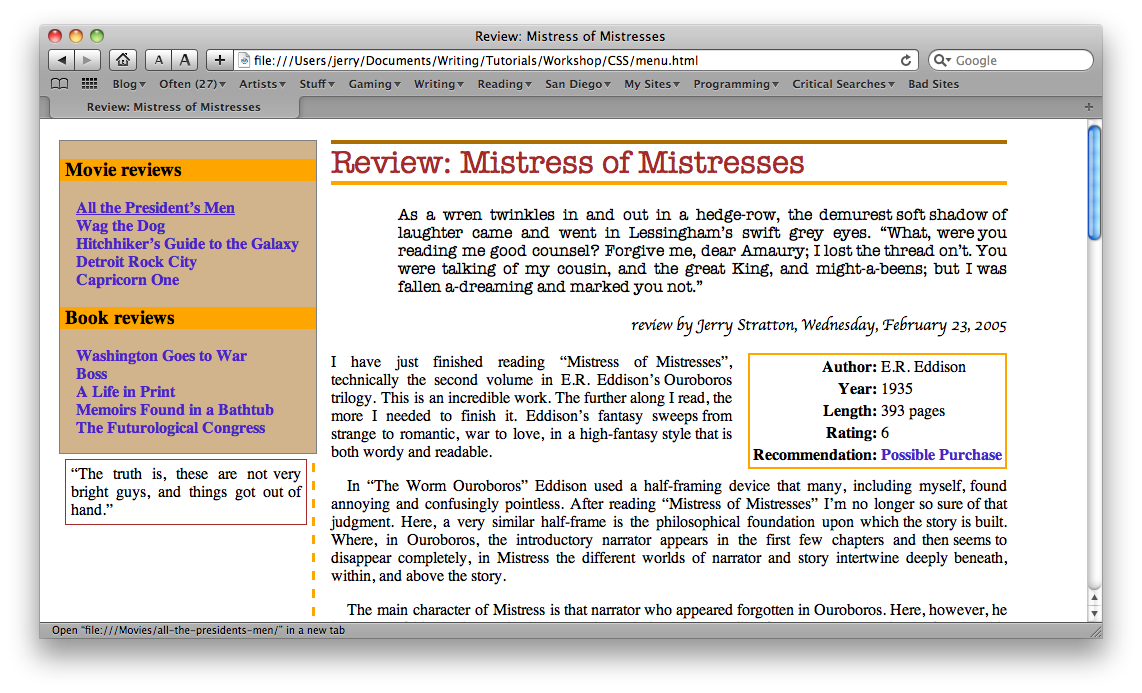
We are going to use a CSS-free review of E.R. Eddison’s Mistress of Mistresses as an example. Open the file “mistress.html” in your browser. As it stands, it is a perfectly readable page, but it does not draw the reader’s attention as it should. The headlines do not stand out from the body, and the recommendations lie lifeless on the left of the page along with everything else.
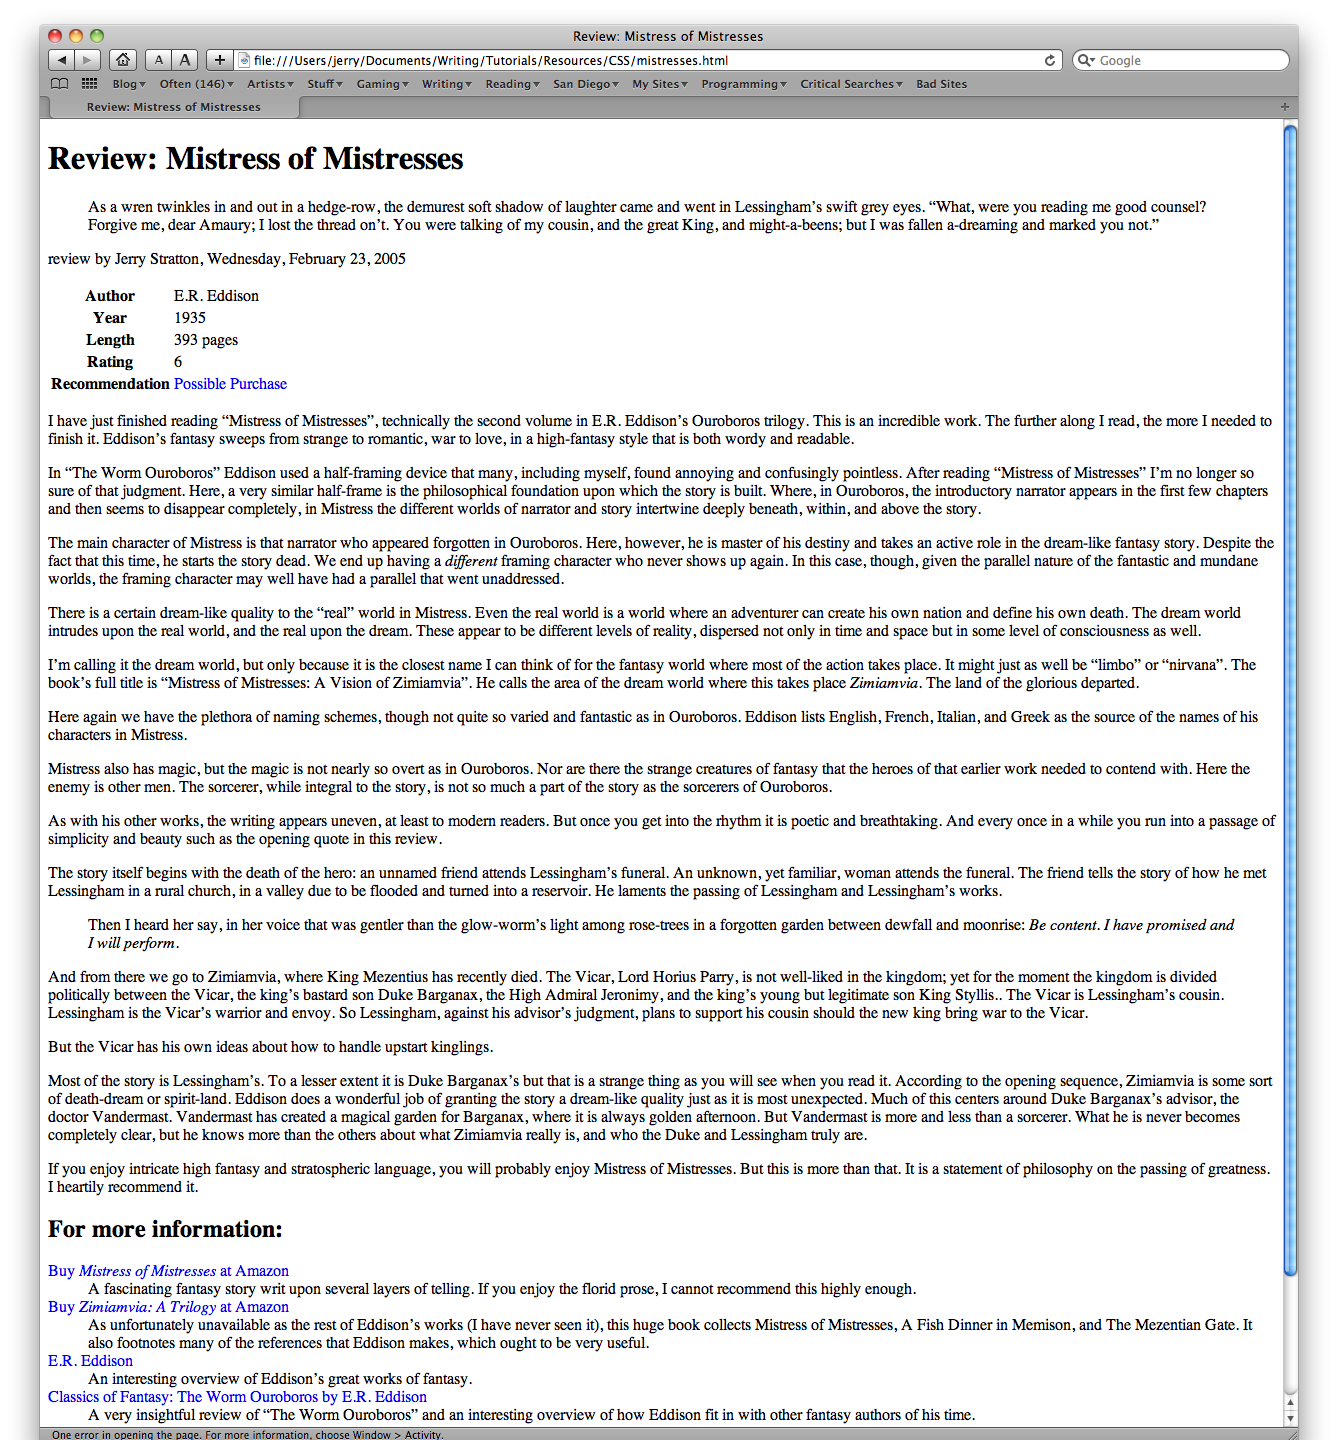
Over the course of this tutorial we’re going to provide a layout to this page. We’ll make it more readable on the screen, and when we’re done we’ll also make it more readable on paper.
If you open mistresses.html in a text editor (such as Fraise on Mac OS X), you’ll see that it references a file called “reviews.css”:
<link rel="StyleSheet" href="reviews.css" type="text/css" media="all" />
This is how you include a stylesheet in your web page. Often, you’ll have several web pages all referencing the same style sheet. This way, if we have hundreds of book reviews, we can change the appearance of all of our reviews by changing a single style sheet.
In this case, that style sheet is called “reviews.css” and is in the same folder as “mistresses.html”—or it will be, once we create it.
When you create the HTML for your web page, you’ll want to create it structurally, without regard for layout. There are many different kinds of browsers reading your page; the HTML is not read just by browsers that render the HTML to the screen. Put the elements of your page in the order that they should be read, not in the order that they should be rendered to the screen.
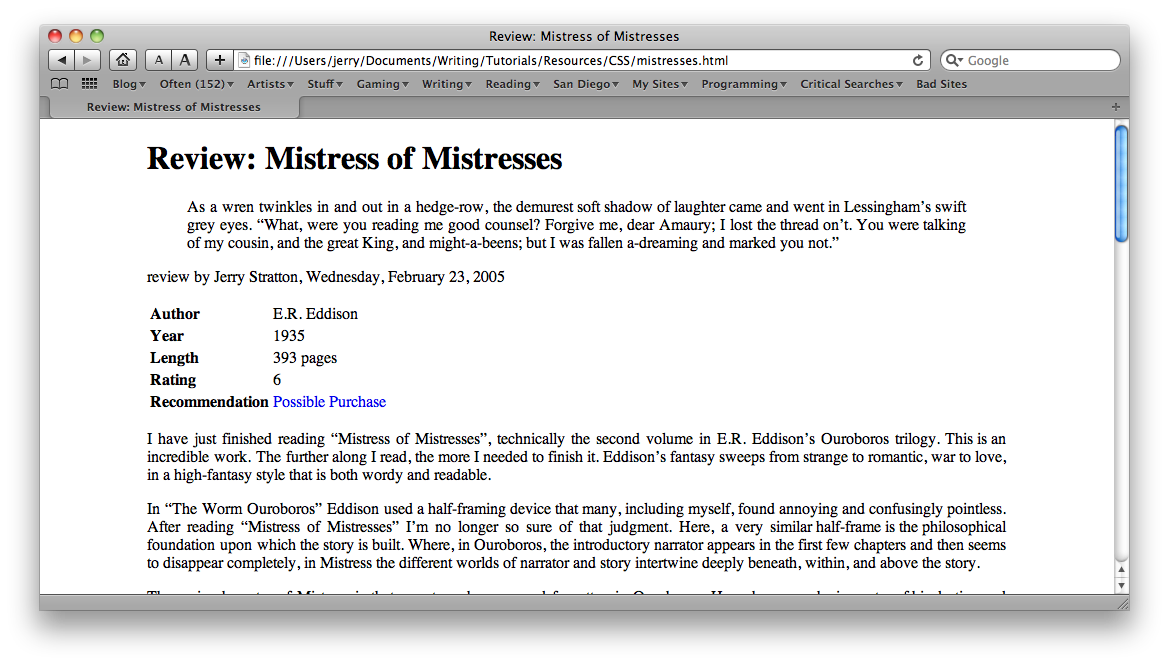
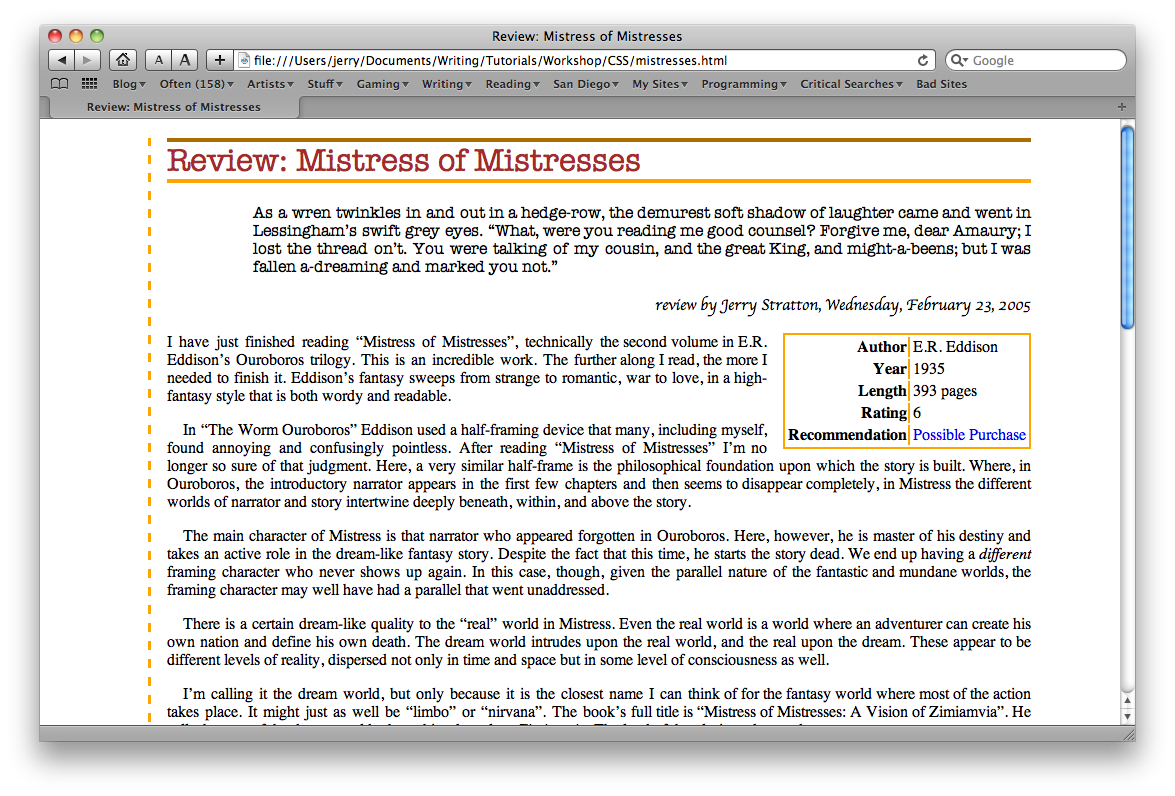
For our first trick, we’ll add a nice margin on the left and right so that our text is not flush left and crowded. Use a text editor to create a style sheet called “reviews.css” in the same folder as your new web page. In that style sheet, add the following CSS:
body {
width: 80%;
margin-left: 10%;
text-align: justify;
}
This makes the web page 80% of the browser’s width, and makes a left margin of 10% of the browser width. Then, it fully justifies all text on the page.
When we specify widths and heights of blocks in percentages, we are specifying a percentage of the containing item. In this case, the body is contained by the html tag, which is the browser itself. If we had a paragraph inside of a table, and we specified that the table was 50% width and the paragraph was 50% width, the paragraph will be 50% the width of the table, which will be 25% of the width of whatever contains the table.
Now, I think that looks quite a bit better already, but that left margin is kind of empty. Let’s add a border to our left margin:
body {
width: 80%;
margin-left: 10%;
text-align: justify;
border-left-style: dashed;
border-left-color: orange;
border-left-width: .2em;
}
This adds a dashed orange border directly to the left of the text. The border is “.2em” in width, which is to say, 20% of the upper-case font size. The border will thus change in width proportionally to any changes in font size that the reader requires.
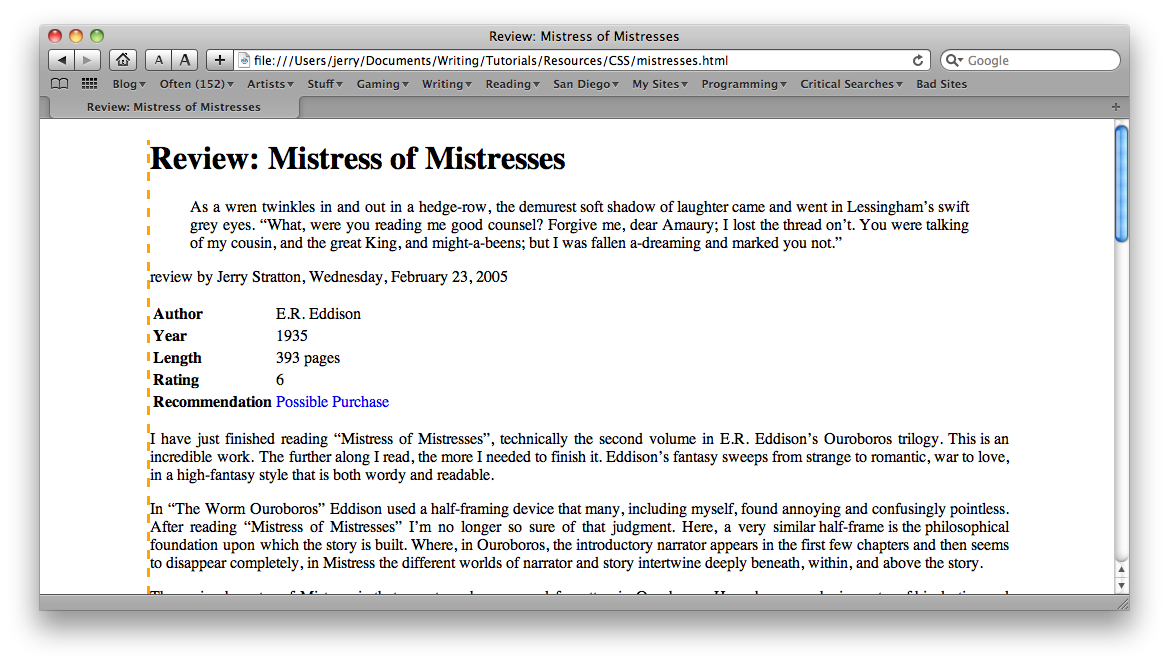
Our border is much too close to our text. It’s the same problem that we had when our text was flush left to the side of the browser. We can move the border further away from the text that it belongs to using padding. Add one more line to your CSS:
body {
width: 80%;
margin-left: 10%;
text-align: justify;
border-left-style: dashed;
border-left-color: orange;
border-left-width: .2em;
padding-left: 1em;
}
This adds a padding between the border and the text of one “em” width.
Block-level HTML tags, such as paragraphs, blockquotes, and lists, are boxes with margins and padding. If you were to draw a box around a tag’s contents, the margins are outside of the box and the padding is inside of the box. When you add borders to an HTML tag, the borders go between the padding and the margin.
The padding goes inside the box, and the margins go outside the box.
So, when we added a border on the left of the body of our web page, the border is indented by 10% because that’s the margin we gave the body. When we add padding to the body, that pushes the text further in without moving the border.
You can more clearly see the margins vs. the padding by adding a background color to the tag that contains the body tag, and specifically setting the body’s background to white:
body {
width: 80%;
margin-left: 10%;
text-align: justify;
border-left-style: dashed;
border-left-color: orange;
border-left-width: .2em;
padding-left: 1em;
background-color: white;
}
html {
background-color: tan;
}
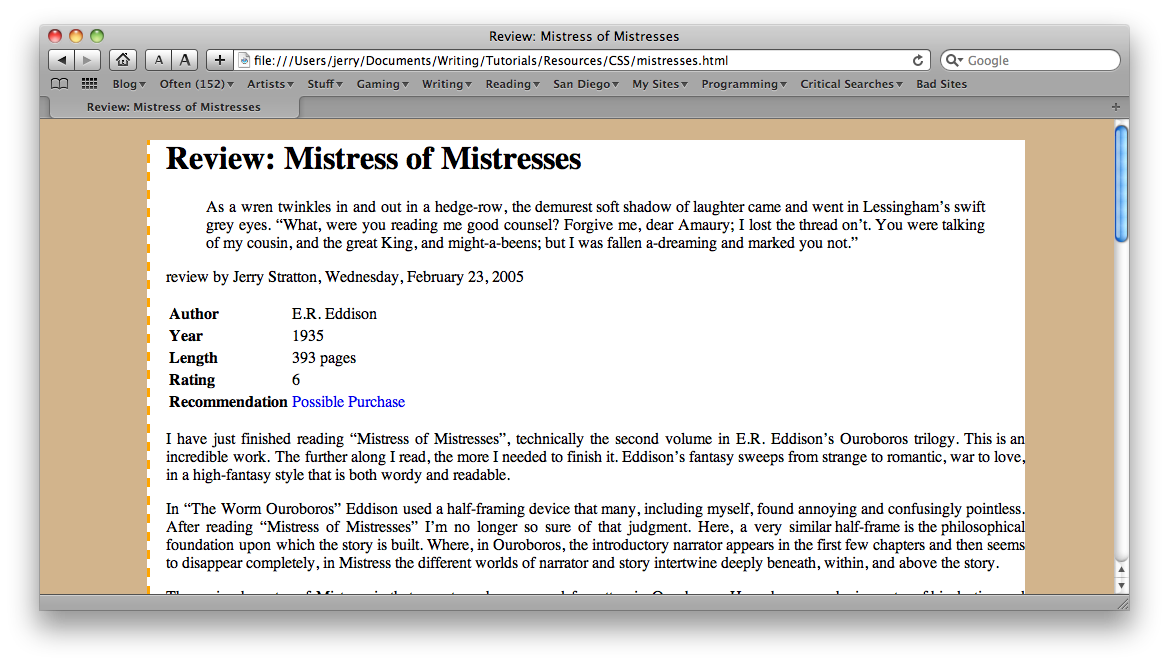
Once you see the tan margins around the body of your document, go ahead and remove the “html” section of your CSS file.
Style sheet syntax is fairly simple: the name of the HTML tag you wish to modify, a space, an opening curly bracket, and then a list of modifiers and a closing curly bracket.
The modifiers themselves are a name, a colon, and then a value, followed by a semicolon.
tagname {
modifiername: value;
}
You can have as many tag names and modifier names as you want. If two modifiers conflict with each other, the last modifier takes precedence. For example, if you set all margins to 10%, and then set margin-left to 20% later, the left margin will be 20% and the rest of the margins will be 10%. But if you do it in the reverse order: first specify the margin-left and then specify all margins, then all margins will be 10%.
The last modifier you specify is the one that takes effect.
Let’s say that you want all of your headlines to have an indented border on the top and bottom. You can specify multiple tag names in for your style sheet definition by separating them with commas.
Add the following definition below the body definition that we already have:
h1, h2 {
border-top-style: inset;
border-bottom-style: inset;
border-width: .15em;
border-color: orange;
color: brown;
}
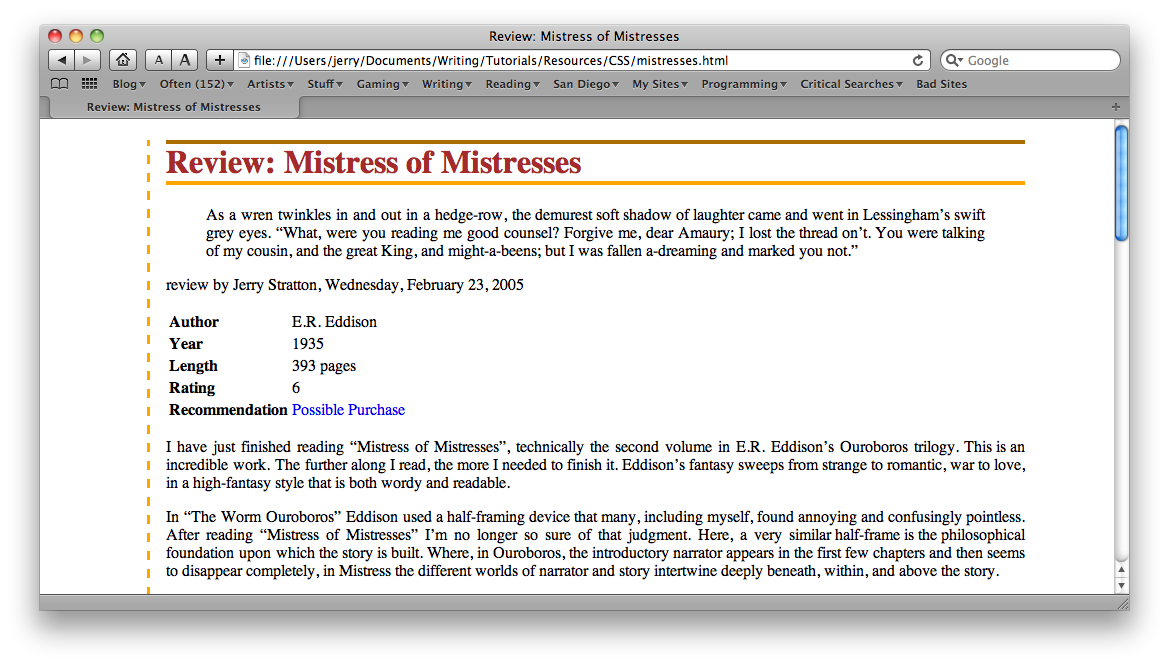
This changes the appearance of all of our h1 and our h2 tags. They get a border on the top and bottom, and their color changes to brown.
The most common measurements used with style sheets are the percentage and the em-width, which we’ve already seen, and the pixel (px) and point (pt) which we haven’t. You should be very careful using static measurements such as pixels, points, and picas. They do not adjust themselves to the browser.
| % | a percentage of the element or an enclosing element, depending on context. |
|---|---|
| em | the height of the current font (upper-case characters) |
| ex | the height of the current font (lower-case characters) |
| mm | millimeters |
| cm | centimeters |
| in | inches |
| pc | picas: a pica is one sixth of an inch |
| pt | points: a point is 1/72nd of an inch |
| px | pixels |
When you use “0”, you don’t need to specify a measurement: zero is the same no matter what the measurement is.
Often you will want to differentiate between two different classes of the same tag. You might, for example, want to have the paragraph that displays the author of this review display differently than the rest of the paragraphs.
Use your text editor to change one line in mistresses.html from:
<p>review by Jerry Stratton, Wednesday, February 23, 2005</p>
to:
<p class="byline">review by Jerry Stratton, Wednesday, February 23, 2005</p>
We’ve added the class “byline” so that we can differentiate between byline paragraphs and other paragraphs.
Inside your style sheet file, add:
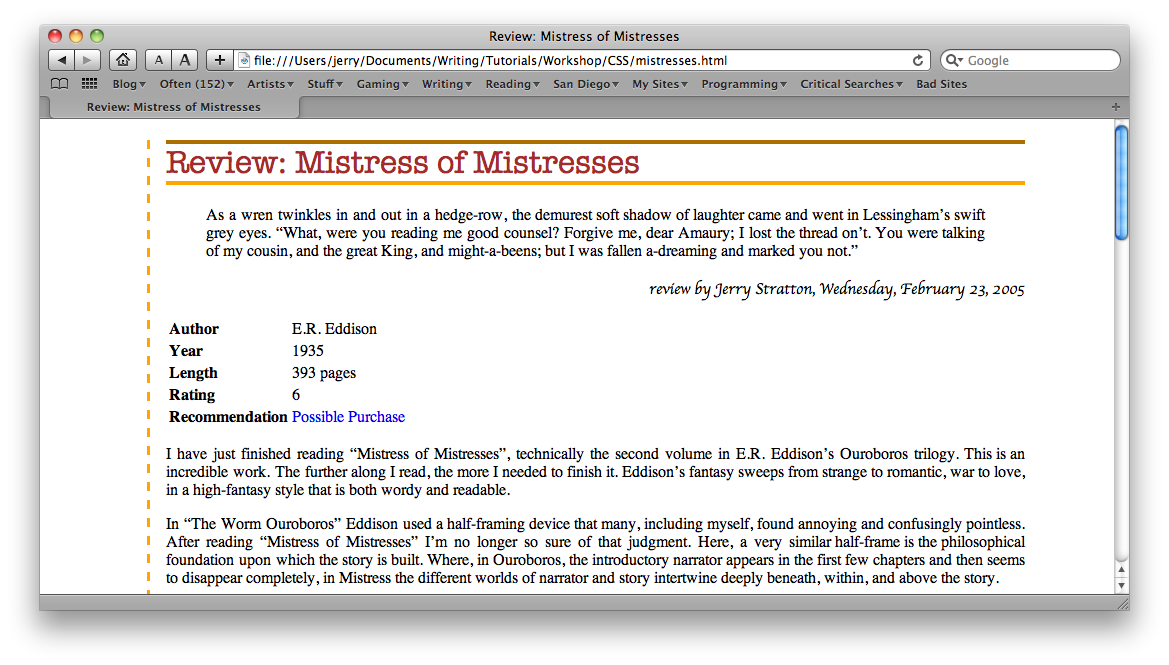
p.byline {
text-align: right;
font-family: cursive;
}
Here, we’ve specified that for paragraphs of the class “byline”, align them to the right and give them a cursive font. You could also specify simply “.byline” instead of “p.byline” and then the definition would apply to any tag of the class byline.
I prefer to always specify the tag as well as the class in the CSS file; it helps remind me what this class is for. In this case, paragraphs.

You can have as many classes as you want in the class="class1 class2 classetc." attribute of the HTML tag. Each class name is separated by a space. The order of the classes in the HTML doesn’t matter. Only the order of the class definitions in the style sheet matters. For example, class="byline jerry" is exactly the same as writing class="jerry byline". Any conflicts will be resolved by the order of the definitions in the css files, not by the order of the class names in the class="" attribute.
Fonts are often unavailable on the computer of the person reading your web page. For this reason, CSS allows you to specify multiple fonts, and to specify generic font types. The first font that matches an available font is used by the browser.
You have five generic font families: serif, sans-serif, cursive, monospace, and fantasy. You can specify multiple font names, and should usually specify a generic family as the last choice. You don’t know what fonts your visitor’s browser has. The generic font family tells the browser what kind of font to use if the specific fonts are unavailable.
In the above example, we specified the generic font family cursive, and let the browser choose which cursive font to use.
Add font-weight and font-family to your h1, h2 style definition:
h1, h2 {
border-top-style: inset;
border-bottom-style: inset;
border-width: .15em;
border-color: orange;
color: brown;
font-family: VTypewriter RoyalDeLuxe, American Typewriter, Courier, sans-serif;
font-weight: normal;
}
If the browser has VTypewriter RoyalDeluxe, that’s what it will use to display level 1 and 2 headlines. Otherwise, it will look for American Typewriter, and if that isn’t available it will look for Courier. Finally, if none of those are available, it will use its standard sans-serif font.
We also set the font-weight to normal. By default, most browsers will set headlines to bold, but if they don’t have the font they need in a bold version, they’ll skip to the next font in the list.
You have a number of ways of focussing in on specific tags. One of the most common is to try to affect only tags that are contained in other tags. For example, you might have a specific table class, and want to affect the header cells in that table.
Change the table tag from:
<table>
to:
<table class="bookinfo">
Add the following to your style sheet:
table.bookinfo th {
text-align: right;
border-right-style: solid;
border-right-width: .15em;
border-right-color: orange;
}
This definition will only affect “th” tags that appear inside of tables with the class “bookinfo”. This is specified by placing the “th” in the definition after the “table.bookinfo”, separated by a space.
Earlier, we separated different tags by a comma to apply the same definition separately to each of those tags. Hear, we are separating tags by spaces to apply the definition to the final tag, only if it is contained by the previous tag(s). You can have as many tags as you want in the chain. For example:
td blockquote em {
font-style: normal;
font-weight: bold;
}
This will remove the italics from emphasized text and make that emphasized text bold, but only if the emphasized text occurs within a blockquote, and only if the blockquote occurs within a table’s data cell.
You’ve learned how to add a style sheet to a web page, how to apply styles to HTML elements, how to create classes of HTML elements, and how to target elements that are parts of other elements.
That covers most of what you’ll do with style sheets. For more advanced CSS, we’ll learn how to look at adjacent elements, how to detach elements so that other elements wrap around them, and how to use special “pseudo-elements”.
Besides singling out elements that are children of other elements, such as table cells inside of tables, we can also single out elements that follow other elements.
For example, our review includes a quote from the book immediately following a level one headline. If all our book quotes do the same, we can give that quote a unique appearance without going through each review and giving that blockquote element a special class.
Specify adjacent elements with the plus sign. The selector “h1+blockquote” means any blockquote element that follows an h1 element.
h1+blockquote {
font-family: VTypewriter RoyalDeLuxe, American Typewriter, Courier, sans-serif;
margin-right: 0;
margin-left: 10%;
}
This specifies a special font for that blockquote, as well as reduced its right margin from the default to zero, and set its left margin to 10% of the body’s width.
We might also want to give paragraphs an indent, but this is commonly only done for paragraphs that follow other paragraphs. Paragraphs that follow a headline or a quote don’t get indented. By selecting for “p+p”, we can apply our style properties only to paragraphs that follow a paragraph.
p+p {
text-indent: 1em;
}

Some information is best presented, visually, as a sidebar. Rather than presented sequentially, items can be “detached” from their location on the page and “floated off” elsewhere. The easiest way to do this is with the float property. Elements can be floated to the right or the left.
The table of information about our book would make a great sidebar. Let’s float that off to the right and let text wrap around it on its left. The table of book information already has a special class, “bookinfo”, so that we can apply styles to this kind of table without accidentally applying it to other tables that might show up in our book reviews.
table.bookinfo {
float: right;
border-style: solid;
border-width: .15em;
border-color: orange;
margin: 0;
margin-left: 1em;
margin-bottom: .1em;
}
We told the web browser to float any table with the class “bookinfo” off to the right, give it a solid orange border, and a margin only on its left and bottom.
Our sidebar of book information would look a lot better if we had colons in the row headers. We can use style sheets to add them. There is a special kind of selector called a “pseudo-element”. This is an element that sort of exists, and we can modify it. Two of these are the before and after pseudo-elements. The “before” pseudo-element is a fake element that appears inside of the element and just before any of the true content of that element. The same for “after” except that it appears just after any of the true content.
We can use the after pseudo-element to put text, such as a colon, into our th elements.
table.bookinfo th:after {
content: ":";
}
We no longer need the vertical orange bars to separate our row headers from our row content, so remove the border properties from our th element’s style so that it reads:
table.bookinfo th {
text-align: right;
}
Note that the colon is bold, just as all of the real content in the “th” element is. Pseudo-elements inherit the styles of the elements they are part of.
Pseudo-elements are specified with a colon between the element name and the pseudo name.

If we want to change the properties of linked text, we can apply our changes directly to the “a” element:
a {
color: orange;
}
However, doing that will make linked text always orange. Applying styles to the “a” element does not distinguish between visited and unvisited links. For that, we have the pseudo-elements “link” and “visited”. Replace the “a” style we just made with:
a:link {
color: rgb(74, 36, 199);
font-weight: bold;
}
a:visited {
color: orange;
}
This specifies orange for visited links, but “rgb(74, 36, 199)” for unvisited links. Besides named colors, we can create custom colors with a specific amount of red, green, and blue. Color numbers go from 0 to 255. You can also use 0% to 100%, but most color pickers will give you the 0-255 range rather than percentages. Here, we’ve specified a red of 74, a green of 36, and a blue of 199.
We can provide feedback to visitors with the hover and active pseudo-elements. Active usually makes sense only for elements that do something when clicked, but hover can be used for any element.
a:hover {
border-style: outset;
border-width: .15em;
border-color: orange;
background-color: rgb(90%, 90%, 90%);
}
a:active {
border-style: inset;
border-width: .15em;
border-color: orange;
background-color: rgb(40%, 40%, 40%);
}
This tells the browser to turn any link into an outset button when the mouse moves over it. When a visitor chooses the link, the browser will “inset” the button, so that it looks like it is being depressed.
Most visitor feedback focuses on mouse feedback. Remember as you design it that many computers don’t have mice: audio readers and touch-screen devices, for example, don’t use mice, and don’t currently do anything based on “hover”.
This is a garish effect, and not one I’d recommend. I use it here because it makes hover and active more obvious. A better effect might be to drop active completely, but change hover from a border to an underline. I’ve never been a fan of underlined links on a page: they remind me too much of High School English class.
Turn off underlines on links using:
a {
text-decoration: none;
}
Cause hovered links to underline by replacing the a:hover and the a:active styles with:
a:hover {
text-decoration: underline;
}
This gives our visitor some feedback that, yes, this bit of colored text is a link, and it may be worth your while to follow it—but without being garish and distracting.
In the resources folder, there’s an HTML file called “menu.html”. Open this up in your text editor and look at it: it’s a simple list of movie reviews and book reviews. For a review site, it would be nice to let visitors navigate around our recent reviews.
Add an “id” attribute to the top-most tag, a UL tag.
<ul id="menu">
Sometimes it is useful to be able to choose a specific tag out of all of the tags on a page. The “id” attribute lets us do this. An id attribute is a lot like the class attribute, except that there can be only one id of any given name per page. When we add the id of “menu” to this unordered list, we’re telling the browser that this is the only element of any kind on this page identified as “menu”.
The browser doesn’t care what the name is, only that it’s unique: it doesn’t know that this is a menu just because we named it “menu”, for example.
The id attribute can be targeted in both CSS and Javascript. In CSS, we target a unique element just like we target classes of elements, but by using a pound or hash symbol (“#”) instead of a period or dot.
Copy the entire list—all of the HTML in menu.html—and paste it into mistresses.html before the closing body tag and after the last closing dl tag.
</dl>
<ul id="menu">
<li>
<h3>Movie reviews</h3>
<ol>
<li>
<a href="/Movies/all-the-presidents-men/">All the President’s Men</a>
<p>“The truth is, these are not very bright guys, and things got out of hand.”</p>
</li>
<li>
<a href="/Movies/WagDog/">Wag the Dog</a>
<p>“It doesn’t have to prove out, we just gotta distract ‘em…”</p>
</li>
<li>
<a href="/Movies/hitchhikers-guide/">Hitchhiker’s Guide to the Galaxy</a>
</li>
<li>
<a href="/Movies/detroit/">Detroit Rock City</a>
<p>“Don’t be a fembot.”</p>
</li>
<li>
<a href="/Movies/CapricornOne/">Capricorn One</a>
<p>“See, I told you. Tell me about the lonely plight of a dedicated journalist…”</p>
</li>
</ol>
</li>
<li>
<h3>Book reviews</h3>
<ol>
<li>
<a href="/Books/washington-goes-war/">Washington Goes to War</a>
<p>“It was still possible in 1941 to walk through the White House gate…”</p>
</li>
<li>
<a href="/Books/boss/">Boss</a>
<p>“Daley’s election board members looked innocent throughout the…”</p>
</li>
<li>
<a href="/Books/mike-royko-life-print/">A Life in Print</a>
<p>“Stork also sought advice from Jimmy Breslin, who told her…”</p>
</li>
<li>
<a href="/Books/memoirs-found-bathtub/">Memoirs Found in a Bathtub</a>
</li>
<li>
<a href="/Books/futurological-congress/">The Futurological Congress</a>
<p>“The chemicals of evil were beginning to resist and push back…”</p>
</li>
</ol>
</li>
</ul>
</body>
Save the page and reload it in your browser, and you should see a couple of simple lists at the bottom of the page with quotes from most of the movies and books.
There are three basic kinds of elements, as far as style sheets are concerned: block, inline, and list-item. Block elements are elements such as paragraphs, headlines, and div. Elements that are what in a word processor we’d call character-level styles, are inline elements. You can use the display property to change an element from one to another. You can also use the display property to hide an element, by settings its display to “none”.
When used in conjunction with hover or active pseudo-elements, this can be used to create pull-down or pop-down menus or other information. When used with printing, it can be used to show or hide certain information when the document is printed.
For example, the following style sheet properties will cause the movie quotes in the menu to disappear:
ul#menu p {
display: none;
}
Reload the page, and the movie quotes are no longer visible.
So let’s make this menu look a little nicer before we put it at the top of the page.
ul#menu {
background-color: tan;
border: solid .1em grey;
}
ul#menu h3 {
background-color: orange;
}
That’s starting to look interesting, but our list bullets are getting in the way.
ul#menu li {
list-style-type: none;
}
ul#menu {
background-color: tan;
border: solid .1em grey;
padding-left: 0;
}
Lists are usually displayed with padding on the left by default, so this gets rid of the padding on the top-level list, pushing the headline all the way to the right. The big deal, though, is that we’ve set the list-style-type to none to get rid of the bullets and numbering for any list item that is below the ul identified as “menu”.
List style types can also be discs, circles, squares, and decimals. And for “letters”, they can be lowercase or uppercase roman, latin, greek, and alpha(betical): lower-roman, upper-latin, lower-alpha, for example.
If we want to position this menu on the side of the page, it can’t have a width that goes all the way across the page.
 Add a width to ul#menu:
ul#menu {
background-color: tan;
border: solid .1em grey;
padding-left: 0;
width: 16em;
}
And while we’re at it, let’s reduce the padding on the inner list:
ul#menu ol {
padding-left: 1em;
}
And add some padding to the headlines:
ul#menu h3 {
background-color: orange;
padding-left: .3em;
}
That’s starting to look perfectly reasonable as a menu. The next thing to do is to move it up the page.
In order to position elements, we need to say what kind of positioning we’re using. In this case, the positioning will be absolute. And then, we need to align the element relative to its top, its left, its bottom and/or its right.
ul#menu {
background-color: tan;
border: solid .1em grey;
padding-left: 0;
width: 16em;
position: absolute;
top: 0;
left: 0;
}
This places the element at the very top of the page, with its top at the very top of the page, and its left side at the very left of the page (right: 0 would put its right side at the very right of the page).
While we’re doing this, let’s adjust the margins and padding on the element:
ul#menu {
background-color: tan;
border: solid .1em grey;
padding-left: 0;
width: 16em;
position: absolute;
top: 0;
left: 0;
margin-top: 0;
padding-bottom: 1em;
}
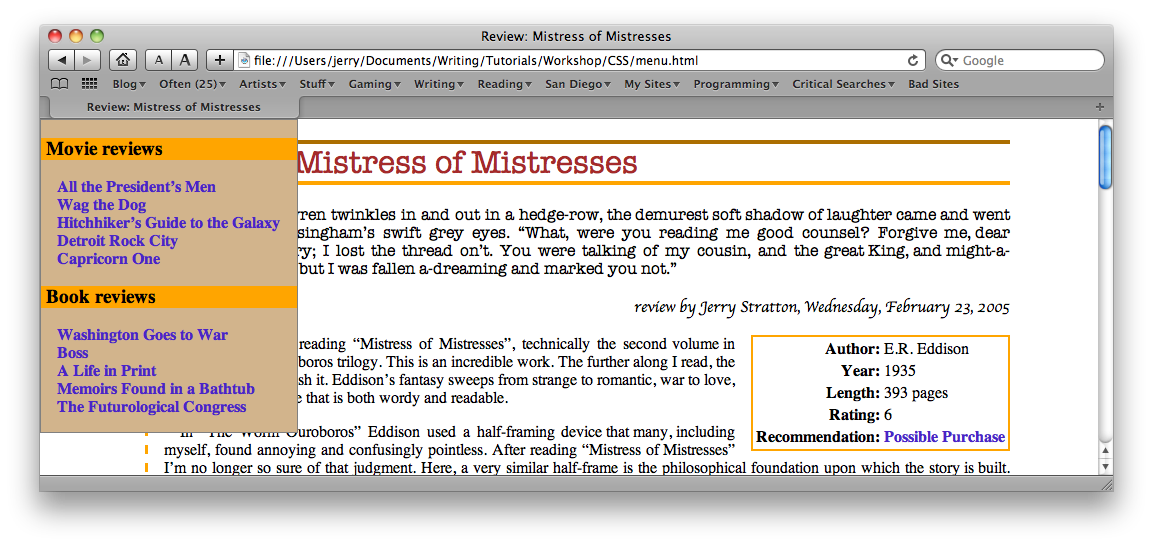
That’s starting to get useful. We could have done the same thing by floating the navigation menu, but that would require putting the navigation menu at the top of the review text. The menu is not more important than the review—people don’t come to our page for the navigation. They come to read our review. Positioning allows us to adjust the page structure for semantic importance. It makes our pages more accessible to alternative browsers, such as browsers for the blind and search engines.
Currently, the menu is positioned relative to the browser window. The way that positioning directives work is that they are relative to the nearest parent that also has positioning other than static, which is the default that all elements have.
Currently, there is no element that has positioning, other than the menu itself. Add a positioning directive to the body tag.
body {
width: 80%;
margin-left: 10%;
text-align: justify;
border-left-style: dashed;
border-left-color: orange;
border-left-width: .2em;
padding-left: 1em;
position: relative;
}
The left side of the menu now jumps over to the dashed border, while the top drops down to exactly the top of the main headline.
This is not exactly what we want; but to get what we want we’re going to have to modify the way the margin is created: we want the menu to be a specific number of characters wide. But the gutter is currently set by percentages: 10% on the left.
Remove the width from the body tag, change margin-left to 17 em, and make the menu’s left side by negative 16 em:
body {
width: 80%;
margin-left: 17em;
margin-right: 5em;
text-align: justify;
border-left-style: dashed;
border-left-color: orange;
border-left-width: .2em;
padding-left: 1em;
position: relative;
}
ul#menu {
background-color: tan;
border: solid .1em grey;
padding-left: 0;
width: 16em;
position: absolute;
top: 0;
left: -16em;
margin-top: 0;
padding-bottom: 1em;
}
In real life, there would probably be a lot more in the left gutter, such as more reviews, information about the reviewers, and perhaps some advertisements or contact information.
Don’t forget about that review quote we hid earlier. Now that we know both hover and position, we can make the quote paragraph show up when a visitor hovers over one of the review links. We have the space for it on the left.
ul#menu ol li:hover p {
display: block;
margin-top: 0;
padding: 2%;
position: absolute;
top: 102%;
left: 2%;
border: solid .1em brown;
width: 90%;
}
By setting the top to 102%, we are aligning the top of the paragraph to the bottom of the menu: 100% of the menu’s height is its bottom. Another 2% gives us a little space.
And, again, remember that hovering only works in browsers where hovering makes sense.
Often, you’ll want different styles for printing than for display on a computer screen. There are many different places your page can “display”, and you can have different styles for each of them.
At the top of this page, in the head section of the HTML, we have:
<link rel="StyleSheet" href="reviews.css" type="text/css" media="all" />
Add a new line immediately after this and change the “all” to “print”, and the “reviews.css” to “print.css”:
<link rel="StyleSheet" href="print.css" type="text/css" media="print" />
You can use this to hide (display: none) items that are pointless to print. For example, navigation menus are often set to not print. They waste space on the paper, since you can’t click on links on paper.
ul#menu {
display: none;
}
In our case, we have a wide left margin. We can reduce that margin on printing by putting the following as our print.css file:
body {
margin-left: 0;
width: 90%;
border-style: none;
}
This will also remove the border on the left side of the page.
When printing our page out, people cannot click on the links: there isn’t anything to click on paper. But we can display the URL of links when printing. To your print.css, add:
dt a:after {
content: " (" attr(href) ")";
}
This takes the text of the href attribute of the link in question, and places that as the content after the link. You will now see, on printing, the URL in parentheses after each link that is in a definition term. You will also notice that the definition terms are horribly justified! This is because the URL is generally quite long, and we earlier specified that all text on our page is justified. Add the following snippet to de-justify dt text:
dt {
text-align: left;
}
We added the print style sheet after the general style sheet above because order in style sheets matters. Style definitions that take place last will take precedence over earlier ones. This allows us to have otherwise-conflicting styles. The last one takes effect. When not printing, only the “all” style sheet is used. When printing, the “print” style sheet is used in addition to the “all” sheet. Any conflicting styles are resolved in favor of the “print” sheet, because we put it second.
More important than order, however, is specificity. The more specific a style definition is, the higher its precedence. A style definition for “table.bookinfo” will always take precedence over one for “table”, because “table.bookinfo” is more specific than “table”.
Identifiers are more specific than classes. There can only be one of any identifier in a document; they can’t be duplicated. So identifiers (the “id” attribute of an HTML tag) take precedence over classes. Select by identifier in your style sheet by using the pound symbol (#) instead of the period.
Be careful, when making changes, that you are not relying on some settings that are not CSS dependent. For example, when setting a foreground or background color, you should also set the other. Otherwise you run the risk that the user has a foreground color that matches your background color, or vice-versa.
Another example is setting block text to some character-level formatting. If you make blockquotes italic, for example, what happens to emphasized text inside the blockquote? It will also be italic, rendering it indistinguishable from the blockquoted text. If that’s a problem, you should fix it. For example:
blockquote {
font-style: italic;
}
blockquote em {
font-style: normal;
}
This turns any emphasized text inside of a blockquote to normal instead of italic. Since it also sets blockquoted text to italic, the emphasized text once again stands out.
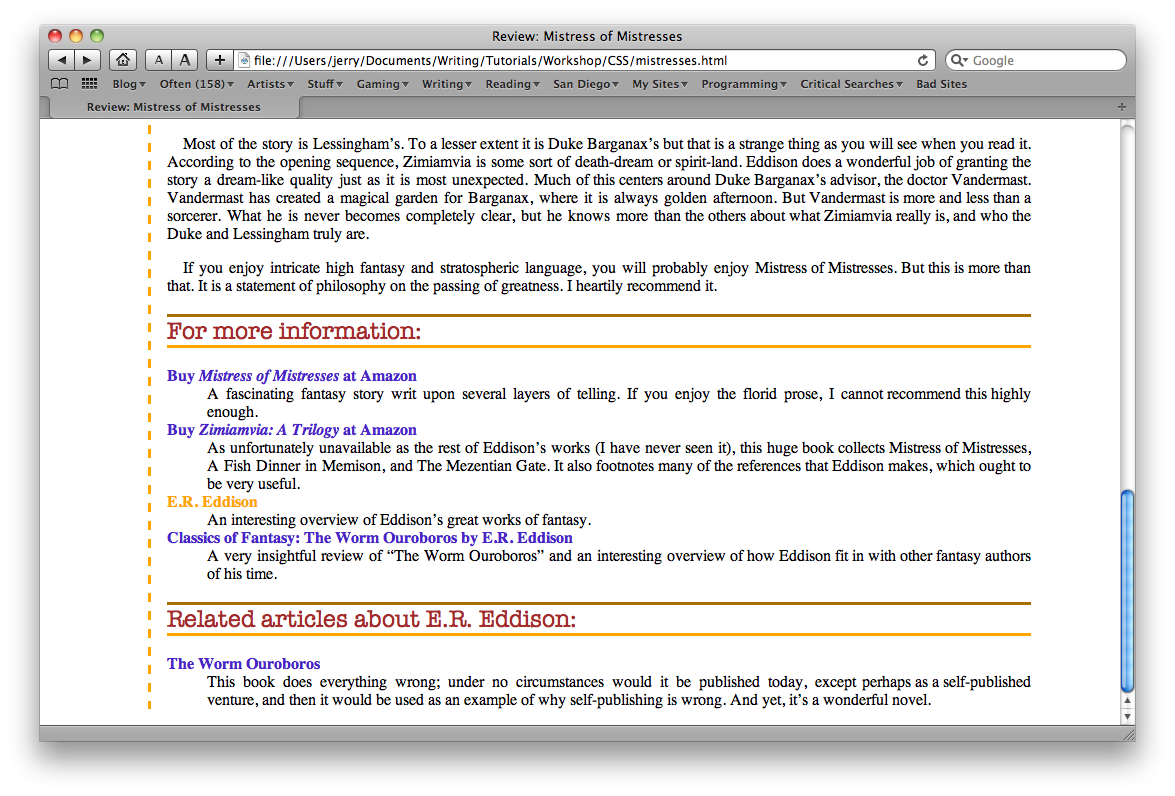
Much of this is useful even with poorly designed web pages. But well-designed web pages make it much easier to take advantage of style sheets later on. Because we know that a blockquote following a level 1 headline is always a special quote, we can change the special quote’s appearance in all reviews, without making any changes to our HTML files at all. Only a small change in the single CSS file is required. But if we don’t know that, we need to add a class to each blockquote that is our “special” headlining quote. It is easier to add such classes from the start than it is to go through later and change all files.
Always validate your web pages. Browsers are very good at guessing what you mean. But you will get much more reliable results if you ensure that your pages contain valid HTML or XHTML. This also makes it easier for you to find some of the more annoying errors.
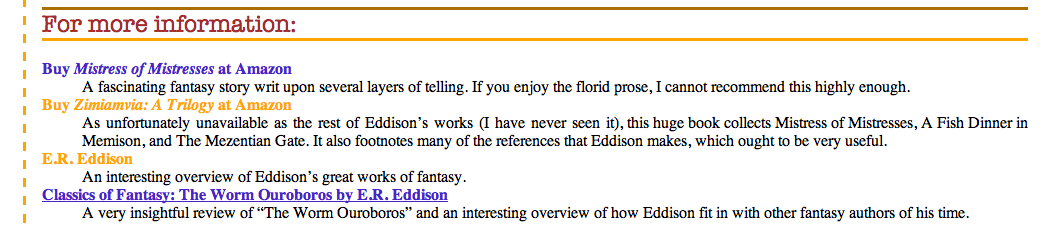
The most useful book I’ve seen for HTML is HTML & XHTML: The Definitive Guide, from O’Reilly. Nowadays I tend to use the web more often, however. Some of the web pages I’ve used while writing this tutorial are the w3schools HTML and XHTML pages.
| CSS: The Definitive Guide | http://www.hoboes.com/Mimsy/hacks/cascading-style-sheets-1/ |
| Fraise | http://www.fraiseapp.com/ |
| Cascading Style Sheets tutorial | http://www.hoboes.com/NetLife/CSS/ |
| w3c Markup Validation Service | http://validator.w3.org/ |
| Standalone Markup Validator for OS X | http://habilis.net/validator-sac/ |
| w3c CSS home page | http://www.w3.org/Style/CSS/ |
“The best book on programming for the layman is Alice in Wonderland; but that’s because it’s the best book on anything for the layman.”
Version 1.1, March 2000
Copyright (C) 2000 Free Software Foundation, Inc. 59 Temple Place, Suite 330, Boston, MA 02111-1307 USA Everyone is permitted to copy and distribute verbatim copies of this license document, but changing it is not allowed.
0. Preamble
The purpose of this License is to make a manual, textbook, or other written document "free" in the sense of freedom: to assure everyone the effective freedom to copy and redistribute it, with or without modifying it, either commercially or noncommercially. Secondarily, this License preserves for the author and publisher a way to get credit for their work, while not being considered responsible for modifications made by others.
This License is a kind of "copyleft", which means that derivative works of the document must themselves be free in the same sense. It complements the GNU General Public License, which is a copyleft license designed for free software.
We have designed this License in order to use it for manuals for free software, because free software needs free documentation: a free program should come with manuals providing the same freedoms that the software does. But this License is not limited to software manuals; it can be used for any textual work, regardless of subject matter or whether it is published as a printed book. We recommend this License principally for works whose purpose is instruction or reference.
1. Applicability and Definitions
This License applies to any manual or other work that contains a notice placed by the copyright holder saying it can be distributed under the terms of this License. The "Document", below, refers to any such manual or work. Any member of the public is a licensee, and is addressed as "you".
A "Modified Version" of the Document means any work containing the Document or a portion of it, either copied verbatim, or with modifications and/or translated into another language.
A "Secondary Section" is a named appendix or a front-matter section of the Document that deals exclusively with the relationship of the publishers or authors of the Document to the Document's overall subject (or to related matters) and contains nothing that could fall directly within that overall subject. (For example, if the Document is in part a textbook of mathematics, a Secondary Section may not explain any mathematics.) The relationship could be a matter of historical connection with the subject or with related matters, or of legal, commercial, philosophical, ethical or political position regarding them.
The "Invariant Sections" are certain Secondary Sections whose titles are designated, as being those of Invariant Sections, in the notice that says that the Document is released under this License.
The "Cover Texts" are certain short passages of text that are listed, as Front-Cover Texts or Back-Cover Texts, in the notice that says that the Document is released under this License.
A "Transparent" copy of the Document means a machine-readable copy, represented in a format whose specification is available to the general public, whose contents can be viewed and edited directly and straightforwardly with generic text editors or (for images composed of pixels) generic paint programs or (for drawings) some widely available drawing editor, and that is suitable for input to text formatters or for automatic translation to a variety of formats suitable for input to text formatters. A copy made in an otherwise Transparent file format whose markup has been designed to thwart or discourage subsequent modification by readers is not Transparent. A copy that is not "Transparent" is called "Opaque".
Examples of suitable formats for Transparent copies include plain ASCII without markup, Texinfo input format, LaTeX input format, SGML or XML using a publicly available DTD, and standard-conforming simple HTML designed for human modification. Opaque formats include PostScript, PDF, proprietary formats that can be read and edited only by proprietary word processors, SGML or XML for which the DTD and/or processing tools are not generally available, and the machine-generated HTML produced by some word processors for output purposes only.
The "Title Page" means, for a printed book, the title page itself, plus such following pages as are needed to hold, legibly, the material this License requires to appear in the title page. For works in formats which do not have any title page as such, "Title Page" means the text near the most prominent appearance of the work's title, preceding the beginning of the body of the text.
2. Verbatim Copying
You may copy and distribute the Document in any medium, either commercially or noncommercially, provided that this License, the copyright notices, and the license notice saying this License applies to the Document are reproduced in all copies, and that you add no other conditions whatsoever to those of this License. You may not use technical measures to obstruct or control the reading or further copying of the copies you make or distribute. However, you may accept compensation in exchange for copies. If you distribute a large enough number of copies you must also follow the conditions in section 3.
You may also lend copies, under the same conditions stated above, and you may publicly display copies.
3. Copying in Quantity
If you publish printed copies of the Document numbering more than 100, and the Document's license notice requires Cover Texts, you must enclose the copies in covers that carry, clearly and legibly, all these Cover Texts: Front-Cover Texts on the front cover, and Back-Cover Texts on the back cover. Both covers must also clearly and legibly identify you as the publisher of these copies. The front cover must present the full title with all words of the title equally prominent and visible. You may add other material on the covers in addition. Copying with changes limited to the covers, as long as they preserve the title of the Document and satisfy these conditions, can be treated as verbatim copying in other respects.
If the required texts for either cover are too voluminous to fit legibly, you should put the first ones listed (as many as fit reasonably) on the actual cover, and continue the rest onto adjacent pages.
If you publish or distribute Opaque copies of the Document numbering more than 100, you must either include a machine-readable Transparent copy along with each Opaque copy, or state in or with each Opaque copy a publicly-accessible computer-network location containing a complete Transparent copy of the Document, free of added material, which the general network-using public has access to download anonymously at no charge using public-standard network protocols. If you use the latter option, you must take reasonably prudent steps, when you begin distribution of Opaque copies in quantity, to ensure that this Transparent copy will remain thus accessible at the stated location until at least one year after the last time you distribute an Opaque copy (directly or through your agents or retailers) of that edition to the public.
It is requested, but not required, that you contact the authors of the Document well before redistributing any large number of copies, to give them a chance to provide you with an updated version of the Document.
4. Modifications
You may copy and distribute a Modified Version of the Document under the conditions of sections 2 and 3 above, provided that you release the Modified Version under precisely this License, with the Modified Version filling the role of the Document, thus licensing distribution and modification of the Modified Version to whoever possesses a copy of it. In addition, you must do these things in the Modified Version:
1. Use in the Title Page (and on the covers, if any) a title distinct from that of the Document, and from those of previous versions (which should, if there were any, be listed in the History section of the Document). You may use the same title as a previous version if the original publisher of that version gives permission.
2. List on the Title Page, as authors, one or more persons or entities responsible for authorship of the modifications in the Modified Version, together with at least five of the principal authors of the Document (all of its principal authors, if it has less than five).
3. State on the Title page the name of the publisher of the Modified Version, as the publisher.
4. Preserve all the copyright notices of the Document.
5. Add an appropriate copyright notice for your modifications adjacent to the other copyright notices.
6. Include, immediately after the copyright notices, a license notice giving the public permission to use the Modified Version under the terms of this License, in the form shown in the Addendum below.
7. Preserve in that license notice the full lists of Invariant Sections and required Cover Texts given in the Document's license notice.
8. Include an unaltered copy of this License.
9. Preserve the section entitled "History", and its title, and add to it an item stating at least the title, year, new authors, and publisher of the Modified Version as given on the Title Page. If there is no section entitled "History" in the Document, create one stating the title, year, authors, and publisher of the Document as given on its Title Page, then add an item describing the Modified Version as stated in the previous sentence.
10. Preserve the network location, if any, given in the Document for public access to a Transparent copy of the Document, and likewise the network locations given in the Document for previous versions it was based on. These may be placed in the "History" section. You may omit a network location for a work that was published at least four years before the Document itself, or if the original publisher of the version it refers to gives permission.
11. In any section entitled "Acknowledgements" or "Dedications", preserve the section's title, and preserve in the section all the substance and tone of each of the contributor acknowledgements and/or dedications given therein.
12. Preserve all the Invariant Sections of the Document, unaltered in their text and in their titles. Section numbers or the equivalent are not considered part of the section titles.
13. Delete any section entitled "Endorsements". Such a section may not be included in the Modified Version.
14. Do not retitle any existing section as "Endorsements" or to conflict in title with any Invariant Section.
If the Modified Version includes new front-matter sections or appendices that qualify as Secondary Sections and contain no material copied from the Document, you may at your option designate some or all of these sections as invariant. To do this, add their titles to the list of Invariant Sections in the Modified Version's license notice. These titles must be distinct from any other section titles.
You may add a section entitled "Endorsements", provided it contains nothing but endorsements of your Modified Version by various parties—for example, statements of peer review or that the text has been approved by an organization as the authoritative definition of a standard.
You may add a passage of up to five words as a Front-Cover Text, and a passage of up to 25 words as a Back-Cover Text, to the end of the list of Cover Texts in the Modified Version. Only one passage of Front-Cover Text and one of Back-Cover Text may be added by (or through arrangements made by) any one entity. If the Document already includes a cover text for the same cover, previously added by you or by arrangement made by the same entity you are acting on behalf of, you may not add another; but you may replace the old one, on explicit permission from the previous publisher that added the old one.
The author(s) and publisher(s) of the Document do not by this License give permission to use their names for publicity for or to assert or imply endorsement of any Modified Version.
5. Combining Documents
You may combine the Document with other documents released under this License, under the terms defined in section 4 above for modified versions, provided that you include in the combination all of the Invariant Sections of all of the original documents, unmodified, and list them all as Invariant Sections of your combined work in its license notice.
The combined work need only contain one copy of this License, and multiple identical Invariant Sections may be replaced with a single copy. If there are multiple Invariant Sections with the same name but different contents, make the title of each such section unique by adding at the end of it, in parentheses, the name of the original author or publisher of that section if known, or else a unique number. Make the same adjustment to the section titles in the list of Invariant Sections in the license notice of the combined work.
In the combination, you must combine any sections entitled "History" in the various original documents, forming one section entitled "History"; likewise combine any sections entitled "Acknowledgements", and any sections entitled "Dedications". You must delete all sections entitled "Endorsements."
6. Collections of Documents
You may make a collection consisting of the Document and other documents released under this License, and replace the individual copies of this License in the various documents with a single copy that is included in the collection, provided that you follow the rules of this License for verbatim copying of each of the documents in all other respects.
You may extract a single document from such a collection, and distribute it individually under this License, provided you insert a copy of this License into the extracted document, and follow this License in all other respects regarding verbatim copying of that document.
7. Aggregation with Independent Works
A compilation of the Document or its derivatives with other separate and independent documents or works, in or on a volume of a storage or distribution medium, does not as a whole count as a Modified Version of the Document, provided no compilation copyright is claimed for the compilation. Such a compilation is called an "aggregate", and this License does not apply to the other self-contained works thus compiled with the Document, on account of their being thus compiled, if they are not themselves derivative works of the Document.
If the Cover Text requirement of section 3 is applicable to these copies of the Document, then if the Document is less than one quarter of the entire aggregate, the Document's Cover Texts may be placed on covers that surround only the Document within the aggregate. Otherwise they must appear on covers around the whole aggregate.
8. Translation
Translation is considered a kind of modification, so you may distribute translations of the Document under the terms of section 4. Replacing Invariant Sections with translations requires special permission from their copyright holders, but you may include translations of some or all Invariant Sections in addition to the original versions of these Invariant Sections. You may include a translation of this License provided that you also include the original English version of this License. In case of a disagreement between the translation and the original English version of this License, the original English version will prevail.
9. Termination
You may not copy, modify, sublicense, or distribute the Document except as expressly provided for under this License. Any other attempt to copy, modify, sublicense or distribute the Document is void, and will automatically terminate your rights under this License. However, parties who have received copies, or rights, from you under this License will not have their licenses terminated so long as such parties remain in full compliance.
10. Future Revisions of this License
The Free Software Foundation may publish new, revised versions of the GNU Free Documentation License from time to time. Such new versions will be similar in spirit to the present version, but may differ in detail to address new problems or concerns. See http://www.gnu.org/copyleft/.
Each version of the License is given a distinguishing version number. If the Document specifies that a particular numbered version of this License "or any later version" applies to it, you have the option of following the terms and conditions either of that specified version or of any later version that has been published (not as a draft) by the Free Software Foundation. If the Document does not specify a version number of this License, you may choose any version ever published (not as a draft) by the Free Software Foundation.

This simple tutorial shows you how to take basic HTML documents and spice them up in screen-based browsers using Cascading Style Sheets.