
Permission is granted to copy, distribute and/or modify this document under the terms of the GNU Free Documentation License, Version 1.1. A copy of the license is included in the section entitled “GNU Free Documentation License”
If you’re going to use MySQL to display information on the web or in another application, you will eventually need to understand the structure of your database and how to construct SQL queries.
Two of the most common applications you’ll use with MySQL are PHP and Dreamweaver. PHP is a programming language. As soon as you start using MySQL with PHP, you run into the mysql_query() function. PHP has no built-in MySQL functionality. You construct a MySQL query, give that to PHP, and PHP hands it, intact, to the MySQL server.
Dreamweaver will insulate you from MySQL queries for the first few minutes. But as soon as you start doing anything out of the ordinary, you’ll run up against the “advanced” section of your recordset window. That “SELECT… FROM… WHERE” phrase in the advanced window is nearly a pure MySQL query.
Much of this is inter-related. If you click the “code” button on a Dreamweaver page you’ve added a recordset to, you’ll see PHP code. Dreamweaver creates the PHP code for you.
MySQL is a way of storing databases. Each database contains tables. Each table contains rows and each row contains columns. Rows and columns might be more familiar to you as records and fields.
MySQL is only a database application. It contains no user interface of its own. It does ship with a sample command-line application, but this is really meant as a programming sample so that programmers can write better interfaces for MySQL.
The on-line documentation for MySQL is available at http://dev.mysql.com/doc/mysql/. The on-line documentation is very comprehensive and useful. If you want print documentation, I recommend the New Riders book, “MySQL” by Paul DuBois. It is a well-written reference to using MySQL that covers the issues most likely to arise.
If you are using Mac OS X, I strongly recommend the Sequel Pro application. It is a fairly simple and reliable means of connecting to a MySQL database without having to use the command line. We’ll do a little bit of command line work in this tutorial in case you need to import or work with data from behind a firewall, but only a little. If at all possible, I recommend using Sequel Pro or a program similar to it, to manage your MySQL databases.
Download Sequel Pro from http://www.sequelpro.com/. It requires Mac OS X 10.5 or higher.
If you are not using Sequel Pro, you’ll need to use some other interface to MySQL, or use the command-line “mysql” application that comes with MySQL. With the Mac OS X installation, the mysql install is in /usr/local/mysql. You’ll use the mysql command line by going to the terminal (in your Utilities folder) and typing:
/usr/local/mysql/bin/mysql –h localhost –u username –p
Replace “username” with the username you created or were given by your database administrator.
The big difference between the statements in this tutorial and what you’ll type is that you need to always end your statements with semicolons.
We’ll be installing the full MySQL server on your desktop computer. This portion of the tutorial is geared pretty much exclusively to the Macintosh. Installation of MySQL on Mac OS X is quick and easy.
If you are using Linux, you may well have MySQL already installed on your system. Look at your instructions or manual (depending on your installation) to see how to enable it or access it.
MySQL is free software. You can download it at http://dev.mysql.com/downloads/. As I write this, the current recommended version is MySQL 5.1. Click on that. If you are going to install the Mac OS X version, scroll down to the Mac OS X downloads section, and download the Package Format version for your version of OS X.
For the Mac OS X install, you have just downloaded a file whose name ends in “.dmg”. Double-click this file to “mount” the dmg file, and then double-click the new disk icon to open the installation.
There are three files in the installation as I write this: a ReadMe file, which you should read; a “MySQLStartupItem.pkg” file, which you would use only if you want MySQL to start up every time you start your computer; and the “mysql-standard-xxxxx.pkg” file. The latter will install MySQL on your computer. Double-click it and follow the instructions.
You will need to give the installer your administrative username and password. After that, you can just follow the defaults and install MySQL. When the software is successfully installed, close the installer program, drag the mysql-standard disk to the eject button, and you are ready to start using MySQL!
If you installed the startup item, MySQL will start automatically every time you start your computer. Otherwise, you will need to go to the command line of an administrative account and type:
sudo /usr/local/mysql/bin/mysqld_safe
After you type your administrative password, mysqld will be running on your computer. If MySQL starts up correctly, type CTRL-Z, then “bg” and return, and then you can exit out of the terminal.
When you want to shut down MySQL, go back to the command line and type:
/usr/local/mysql/bin/mysqladmin -h localhost -u root -p shutdown
It will ask for your MySQL root password. Type it, and MySQL will shut down.
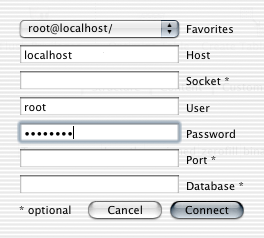
In Sequel Pro, if it is not showing you a “Connecting…” window, pull down the “File” menu and choose “New”. Leave everything blank except for Host and User. Set Host to “localhost” and User to “root”. Click “Connect” and you will be connected to your MySQL server.
If you are using the command line, type:
/usr/local/mysql/bin/mysql –h localhost –u root –p
In Sequel Pro, go to the “Custom Query” tab. Type “select version()” to see the version of MySQL you are using. (Command-line users, remember to add a semicolon at the end of every line!)
By default, root does not have a password. This means that anyone can connect to your MySQL database server from anywhere on the net, and gain root access—the ability to do anything whatsoever to any database on your server.
So the very first thing you want to do is change your root password.
Click on “Custom Query” in Sequel Pro. Type the following command:
set password = password(‘newpassword’)
This sets the password for the current user.
Something very important to remember in MySQL, however, is that users are not just described by name, they are also described by where they are coming from. In this way, a user on the web server can be given different access as the same user on the rest of the Internet.
When we set up our server, the server set up two root users. One for localhost, and one for the name of our computer. We need to change the root password for each root user.
1. Click back on the “Content” tab.
2. Pull down the “Databases” menu and choose “mysql”.
3. Click on the “user” table.
4. You should see a password for localhost root, but not for the other root.
5. Double-click, to select, the localhost root’s password.
6. Copy the password.
7. Double-click the other root’s blank password.
8. Paste the password into the blank field.
9. Click in the white area to put the password in.
10. Click “Flush Privileges”.
This will ensure that both root users have a password.
If you are using the command line, type:
use mysql;
update user set Password=password("newpassword") where User="root";
flush privileges;
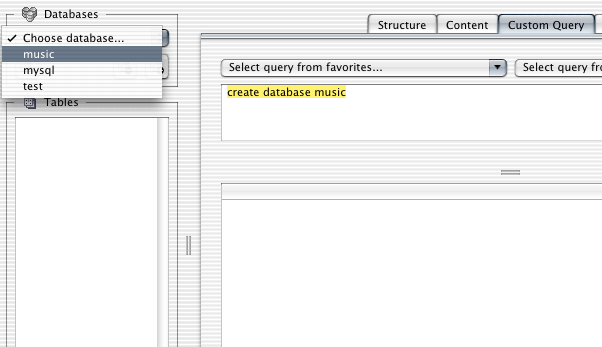
In the Custom Query tab, type “create database DatabaseName”. This will create a new, empty database. If you refresh the Databases menu or type “show databases” you will see your new database in the list of databases.
Create a database called “music”.
You do not want to work as root for normal usage. If you make a mistake as root, you can destroy not only your entire database but every database on the system. You want to limit the damage a typo can do.
grant alter, create, delete, drop, index, insert, select, update on DatabaseName.* to User@localhost identified by "Password"
For DatabaseName, specify the same database that you just created. For User, specify the username you wish to use to connect normally. Your username should not contain any spaces or other non-alphanumeric characters. Your password can (and probably should) contain special characters.
grant alter, create, delete, drop, index, insert, select, update on music.* to User@localhost identified by "Password"
This will allow you to connect but only from “localhost”, which is the same computer the server is on. Since we are installing this test server on our workstations, this will allow us to connect only from our workstation.
The “.*” in Databasename.* means that we have access to every table in that database.
The privileges we’re allowing this user are to alter tables, create tables, delete records, drop tables, index columns, insert records, and update records.
Finally, we need to set this user up with a password.
set password for User@localhost = password("Password")
Now that you have a user created, go ahead and quit using root. In Sequel Pro, close the window. From the command-line, type “quit” and press return.
Until you need some other computer to be able to access your MySQL database, you should make sure that no one outside your computer can access it. Make sure that your firewall is turned on, and make sure that it is not allowing entry by port 3306. On Mac OS X, this is easy: go to your System Preferences, into the Security preference, start the firewall on the firewall tab, and make sure that the access list does not contain 3306 or MySQL.
If you are using Sequel Pro, go to the “Query” tab. If you are using the command line, make sure you are in the mysql command line, and remember to end your statements with semicolons.
From this point on, I’m assuming that you have access to a MySQL database and that your username and password have been set up to let you work on that database.
If you are not connected to your MySQL server, connect to your server the same way you did earlier.
It is a good idea to change your password regularly. Usually, your initial password is sent to you by way of e-mail. E-mail is notoriously insecure, so it is always a good idea to change your password as soon as you connect the first time.
set password = password(‘newpassword’)
In Sequel Pro, you’ll choose your database from the pull-down menu in the upper left. On the command line, you’ll choose your database by typing “use databasename;” and pressing the return key on your keyboard.
Choose the “music” database.
All of your data in MySQL is stored in tables. When you view tables, they look a lot like spreadsheets. Each table consists of rows and columns. A row is one record; it is one set of data. A column is a field: it is one piece of data that each record has.
For example, if you are keeping a database of your record albums, you will have a row for Alice Cooper’s “Brutal Planet”. You will have a column for the artist’s name (“Alice Cooper”) and the album name (“Brutal Planet”).
In MySQL, you must specify what kind of data will go into columns. The two field types you’ll use most often are probably varchar and int. These are strings or text, and numbers. The title of an album and the artist is an example of text. If you also keep track of the year that the album came out, this is a number.
With varchar, you need to specify the maximum size of the text. If you specify a size that is too low, extra text will be truncated. You can always go back and change your mind, however.
Dates are another common field type. You will enter dates as Year-Month-Day. For example, you might keep track of the day you purchased each album. If you bought Brutal Planet on January 3, 2005, you would enter this into your MySQL date column as 2005-1-3.
We’re going to keep track of albums and tracks. We’ll create the albums table first. Before creating a table, it is a good idea to think of what you will need in that table. For our albums table, we will want:
| Field Purpose | Field Name | Field Contains | MySQL Field Type |
|---|---|---|---|
| album title | album | text, up to 80 characters | varchar(80) |
| artist | artist | text, up to 60 characters | varchar(60) |
| year made | year | small number | smallint |
| rating | rating | tiny number | tinyint |
| date purchased | purchasedate | date | date |
In the “tables” area of Sequel Pro, create a new table called “albums”.
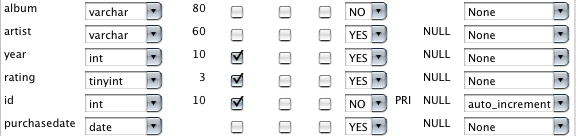
In the “structure” tab of Sequel Pro, add new columns one by one. We’re going to specify “NOT NULL” for the “album” column. This means that the “album” column can never be empty. Every album must have a name.
If you are using the command-line version, use the following commands:
create table albums (album varchar(80) not null);
alter table albums add column artist varchar(60);
alter table albums add column year int unsigned;
alter table albums add column rating tinyint unsigned;
alter table albums add column purchasedate date;
A “tinyint” is a number from 0 to 255. A “smallint” is a n umber from 0 to 65,535. “Unsigned” means that the numbers cannot be negative. If you let the numbers be negative, then the maximum has to drop to make room for the negatives. A “signed” tinyint goes from –127 to +127, for example.
It is always a good idea to have an auto incrementing ID field. This ID field will ensure that if we choose to access this data for other users, we have a unique field with which to identify each record. The unique ID will never change; even if the title, artist, or year purchased gets updated, the unique ID will remain the same. This makes it possible for us to add data in other tables, and link those other tables to this one.
Sequel Pro made an ID field for us, but it does not automatically increment by default.
| Field Purpose | Field Name | Field Contains | MySQL Field Type |
|---|---|---|---|
| identifier | id | number | int |
For our ID field, we must tell MySQL to “auto increment” the column. When we do this, Sequel Pro will tell us that auto increment fields need to be indexed; do we want to make this our primary key? Click the okay button and Sequel Pro will make an index for us. We’ll talk about indexes later.

If you are using the command-line, use the following commands:
alter table albums add column id int unsigned not null auto_increment primary key;
We have two sets of sample data. The one we’re looking at right now is the albums.txt file. This file is a tab-delimited list of albums, artists, years, and date purchased.
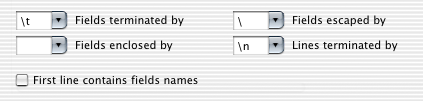
In Sequel Pro, pull down the “File” menu, go to the “Import” submenu, and choose “CSV file…”. Because different computers have different line endings, and because different export options will use different things to separate fields, you need to tell Sequel Pro that fields are terminated by tabs (“\t”), that the fields are not enclosed by anything, and that the first line does not contain field names.
Next, you’ll need to choose which items in the file go to which field. One of the first things you’ll notice is that we have an extra field. This data contains what looks to be the format of the album: if you scroll through the data you can see values of CD, Vinyl, or Cassette. We aren’t keeping track of that data, so choose “Do not import”.
Because Sequel Pro does not let you import the same data into two different fields, you will need to also use “Do not import” temporarily for one or two of the others.
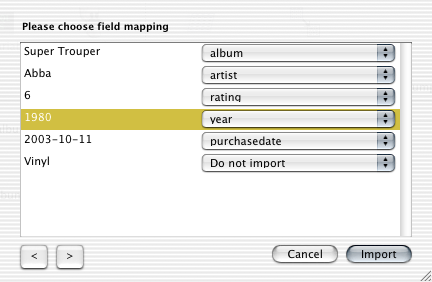
You will notice that the date is in MySQL format. Often when transferring data in bulk you will find it easier to convert date and time while exporting, into a format that the destination understands.
Click the “refresh” button in Sequel Pro to see your changes.

On the command line, you’ll need to make sure that you are in the same directory as the albums.txt file (or that it is in the same directory as you) and import it using the MySQL statement:
load data local infile "albums.txt " into table albums (album, artist, rating, year, purchasedate);
You need to list the columns in the order that they appear in the import file.
You can use Sequel Pro’s pull-down menu to look at the data, but this is a lot like the simple view in Dreamweaver. If you need to do anything special, you will need to understand the select command.
Let’s look for all albums that were released in 1979. Go to Custom Query and type:
select * from albums where year=1979
You should get a list of 20 rows.

Usually, we’ll want our records to be sorted a specific way. We want them in a specific order.
select * from albums where year=1979 order by rating
If we want to order by more than one column, we list all columns in the order we want them to matter.
select * from albums where year=1979 order by rating, artist, purchasedate
Finally, we also will usually only want some of the columns, not all of them. The asterisk means “give me all columns”. But usually we don’t want all columns, and in many applications, such as web pages, we could easily be receiving several requests every second. By reducing the number of columns we ask for, we can speed up whatever web pages or other applications are using our data.
select album, artist, purchasedate
from albums where year=1979 order by purchasedate, artist, album

SQL statements can often look a lot like English. Don’t let this fool you: SQL statements have a very strict syntax. The spelling, choice of words, and order of parts cannot usually be modified. For example, “where” always comes before “order by”.
Sometimes you want to find records where a value contains some piece of text. For example, we might want to look for albums whose name begins with the word “the”.
select album, artist from albums where album like "the %" order by album
The keyword “like” is pretty much just like the equals sign for strings, except that it tells MySQL to search inside the search string for percent symbols. Wherever it finds a percent symbol, any text can be present in the actual records. In this case, we’ve told it to look for values of “album” that start with “the ” and then have any text.
We can have more than one percent in the search string. We might want to look for all of our “best of” albums, but we don’t know where “best of” appears in the album name.
select album, artist from albums where album like "%best of %"
Suppose we want a list of all of the artists whose albums we own and who came out with one of those albums in the seventies.
select artist from albums where year between 1970 and 1979 order by artist
You’ll see a lot of duplicate data. If we were displaying this on a web page, or importing it into some other document, we probably would not want the same artist listed multiple times. This is what the distinct keyword is for.
select distinct artist from albums where year between 1970 and 1979 order by artist
“Distinct” applies to all of the fields selected. It throws out any records that are exactly like a previous record. If we choose both artist and year, we will start seeing duplicate artists again, because the row is not duplicated when the same artist has albums in different years.
select distinct artist, year
from albums where year between 1970 and 1979 order by artist, year
It will, however, remove duplicate rows, where the artist came out with more than one album in a single year. If you remove distinct from the statement, you’ll see two entries for Alice Cooper in 1971. With distinct, there will be only one.
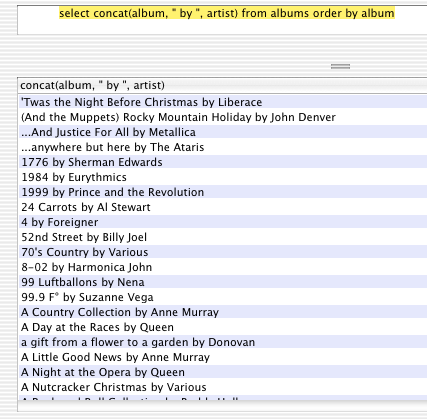
You can combine multiple fields, or combine a field with some static text, using the concat function.
select concat(album, " by ", artist) from albums order by album
The concat() function takes a comma-delimited list of items and glues them together. Here, we glued together the album name, a comma and a space, and the artist name.
Now, the title of the column is not very useful. When using concat or other functions, it is often useful to specify a title for a column when it is displayed.
select concat(album, " by ", artist) as Attribution from albums order by album
The column will now be titled “Attribution”. This will make it easier to use that data in a program like Dreamweaver or a programming language such as PHP.
The dates that MySQL gives you are formatted to be easy to enter and easy to store. They are not, however, the best format for displaying them to humans. We can format dates with the date_format() function, and times with the time_format() function. While we do not have any times in this table, the time_format() function works exactly like the date_format() function.
select album, artist, date_format(purchasedate, "%W, %M %D, %Y") as date
from albums order by artist, album, purchasedate

The _format() function use a special string of text to format the date. Any letter preceded by a percent sign will be replaced with some value based on the date. In this example, %W becomes the day of the week, %M becomes the full month name, %D becomes the day of the month with suffix, and %Y is the four-digit year. There are many such codes, and any good book on MySQL will give you the full table. Here are a few samples:
| Code | Replacement |
|---|---|
| %S | second, two digits |
| %i | minute, two digits |
| %l | hour |
| %p | AM or PM |
| %W | weekday name |
| %a | weekday name, abbreviated |
| %e | day of the month |
| %D | day of the month, with English suffix |
| %M | month name |
| %b | month name, abbreviated |
| %c | month number |
| %Y | year |
| %% | a percent sign |
You must backup your data regularly. You should perform a backup as often as you change data. In Sequel Pro, this is performed from the Export menu item under the File menu. On the command line, you can do the same with:
/usr/local/mysql/bin/mysqldump --lock-tables=FALSE -h localhost -u Username -p music > music.bak_date
The –lock-tables=FALSE turns off lock-tables. If your username has permission to lock tables, you don’t need that.
You can also place that command line in a crontab file if you are familiar with cron. This will back up your data on a regular basis. Make sure you are not overwriting previous information, or you are likely to overwrite good information with bad information at precisely the time you needed your backup. Always archive your backups.
There are several statistical functions available. Some of the simplest are max(), min(), avg(), and count(), for the maximum value, minimum value, average value, and number of values in a set of records.
For example, if we want to find out the most recent purchase date, we can use:
select max(purchasedate) from albums
On March 31, 2005, we purchased something. Now, what is the earliest album we bought?
select min(purchasedate) from albums
The earliest purchase date is “0000-00-00”. Even if we’re really into the oldies that seems an awfully long time ago.
What happened is that, for some of our albums, we didn’t know what the purchase date was, and when we imported the records, somewhere in the import the data went from empty to zeros. Display those albums with:
select album, artist, purchasedate from albums where purchasedate="0000-00-00"
We did not buy any albums on the first Christmas. We don’t want our unknown dates to affect our minimums, our maximums, or even our counts. MySQL, as it turns out, has a special value that stands for nothing. This is the NULL value. We should replace the zero date with NULL in this case so that albums without purchase dates do not affect date calculations.
update albums set purchasedate=NULL where purchasedate="0000-00-00"
select max(purchasedate), min(purchasedate) from albums
Now, our earliest known purchase date is April 1, 1989. This is most likely the date that we started collecting this information.
Let’s take a look at grouping data. For example, we know how to find out the average year of all of the albums we purchased, but what about the same information for a single artist?
We can select out only the data we’re interested in by using a where clause in our select statement:
select min(year), max(year), avg(year) from albums where artist="Alice Cooper"
But what if we want to see all artists in our list? That’s what the group by clause is for. We can group our data by a field or set of fields. In this case, let’s group by artist.
select artist, min(year), max(year), count(album) from albums group by artist
Our Abba albums came out between 1974 and 1980. Our Alice Cooper albums came out between 1971 and 2003, and there were 22 of them.
Who do we have the most albums of? We can give any function a name and than sort by that name.
select artist, count(album) as albumcount
from albums group by artist order by albumcount desc, artist
Alice Cooper and Elton John top the list at 22 and 21 albums, respectively. That “desc” means descending. By default, sorting goes from least to greatest. When we specify desc it will go from greatest to least. In this case, it puts the artists with the most albums on top of the list.
Sometimes you’ll want to replace text inside of other text. You’ll use the “update” statement for this as well, using the body() function. For example, if you want to replace all occurrences of “Beetles” in your album names with “Beatles”, whether the word occurs on its own or inside some title such as “The Beetles at Carnegie Hall”, you would do this:
update albums set album=replace(album, "Beetles", "Beatles")
Since there is no where portion of the statement, this will affect all records in the albums table.
Where modern databases start to get both more confusing and more useful is when you start making multiple tables and link them together. For example, we now have a list of all of our albums, why not a list of all of the songs as well?
Create a new table called “songs”. This one will have a field for song, length, artist, album, year, rating, track, and genre. Set up the ID as an auto increment field as we did for albums.
New for this table is the “time” field type. Our song length is going to be a time.
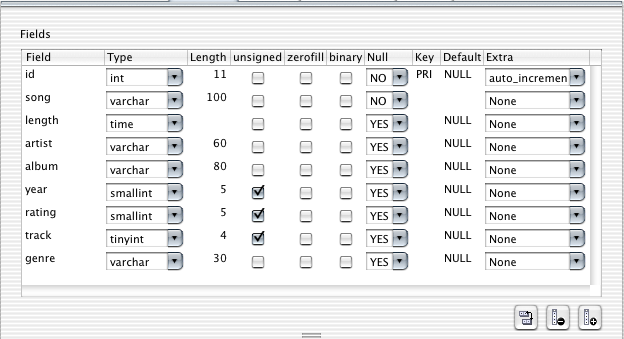
Import “songs.txt” as you earlier imported “albums.txt”. Note that there is an extra field in songs.txt that we are not importing: a combined date and time field.
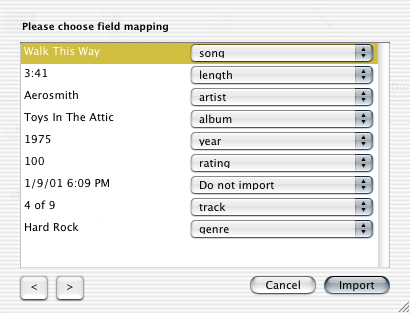
Once you’ve imported the songs, scroll through them to see if there are any obvious inconsistencies. You might notice that, in the import screen, the track says “x of y”, i.e., “4 of 9” in the above example. But “4 of 9” is not a number. When MySQL imports text into a numeric field, it will grab the first characters if the first characters are numbers, and then toss the rest.
You should end up with something like this:

Now that we have songs, we can look up, for example, how many songs we have in each genre.
select genre, count(*) as songcount from songs group by genre
We can do everything in this table that we could in the other one, just on different data.
So we have a song table with song information, and an album table with album information. Suppose we want to combine the two on our display? We need to have a field that joins the two tables. In this case, the item that is the same is likely to be the album name.
select song, songs.artist, songs.album, purchasedate, songs.rating/10 as "Song Rating", albums.rating as "Album Rating"
from songs join albums on songs.album=albums.album order by artist limit 10
I’ve chosen to “limit 10” so that I only see ten rows. Otherwise, the screen would fill up with several thousand rows. When you are testing queries, it is useful to limit the number of records you ask for.
This is how you join tables: the main table on the left, the word join, the table you want to combine it with on the right, and a description of what you want to join it on. Here, we’re joining it on “when the album column in the songs table is equal to the album column in the albums table.” The “on” part of the query often ends up looking a lot like a “where” section.
If you have large databases, or if you have complex select statements, searches can be slow. This is because MySQL has to re-index the columns every time you execute the statement. If you are willing to slow down adding data, however, you can pre-index columns. Generally, you don’t want to pre-index any column that is not searched on, related to, or sorted by.
That last query took 545 milliseconds on the computer I’m using to test this. We are sorting it by artist and checking the songs album against the albums album. Let’s add an index for each of those three columns and see if that speeds things up.
There are three basic kinds of indexes you’ll use most often: a primary index, a unique index, and a normal, non-unique index.
A primary index is a unique index, and is usually your id field. You can only have one primary index per table.
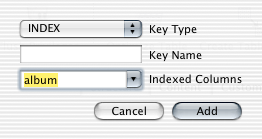
Since artists and album names can occur more than once, make all of these be an “index”, a non-unique index.
Here is how the index area of your Structure tab should look for the songs table. Your albums table should look the same, but without the artist index.

After making these three indexes, the same query now took 0.7 milliseconds on this computer. That’s over seven hundred times as fast. If this were a web page, that would be critical.
Let’s take another look at that query.
select song, songs.artist, songs.album, purchasedate, songs.rating/10 as "Song Rating", albums.rating as "Album Rating"
from songs join albums on songs.album=albums.album order by artist limit 10
For the from portion of the statement, we have “from songs join albums”. This is the part that combines the two tables. However, we also need to restrict the combined table, because by default MySQL combines the tables in every possible way. If we had a table with the records “2” and “3”, and another table with the records “3” and “6”, a simple combine would give us four rows: “2, 3”, “2, 6”, “3, 3”, and “3, 6”.
So, to the on portion of the statement, we add a restriction that matches a column in one table to the same column in the other: “where songs.album=albums.album”.
Once we have more than one table, it is possible—often even likely—that one or more columns will have the same name. We differentiate between the two columns by prefacing the column name with the table name, and separating the two with a period. So, “songs.album” is the album column from the songs table, and “albums.album” is the album column from the albums table.
We do the same thing in the select portion of the statement. We have two choices for artist, and we choose the artist column from the songs table. Similarly for the album column. for the rating column, we choose to display each one (although we modify the rating column in songs to make it comparable to the rating column in albums) and give them each a special name.
We’re asking MySQL for all songs whose album name matches an album name in the albums table. What if a song doesn’t have an album name?
select * from songs where album=""
There are five songs with no album. Let’s try and find one in the above query:
select song, songs.artist, songs.album, purchasedate, songs.rating/10 as "Song Rating", albums.rating as "Album Rating"
from songs join albums on songs.album=albums.album
where song="Eddie Fisher" order by artist limit 10
Nothing. That’s because there is no album with no name in the albums table. The same thing will happen if we have some songs with an album name that does not match any album name in the albums table. If we want to see all songs, even ones with no matching album, we need to join the tables together with a left join. A left join is like a normal join, but it does not throw any records out on the left. In this case, the left table is “songs”, so a left join will show all songs, even ones with no album.
select song, songs.artist, songs.album, purchasedate, songs.rating/10 as "Song Rating", albums.rating as "Album Rating"
from songs left join albums on songs.album=albums.album
where song="Eddie Fisher" order by artist limit 10
Now, we find our Eddie Fisher record.
What if we wanted a list of all songs with no matching album? Notice that in the above example, purchasedate and Album Rating are both NULL for Eddie Fisher. That’s because those columns are in the albums table, and there is no matching record for Eddie Fisher in the albums table. We can use that to our advantage.
select song, songs.artist, songs.album
from songs left join albums on songs.album=albums.album
where albums.album is NULL order by artist
There are 1,198 songs that don’t have a matching album. If this were important data, we might want to figure out why. Most likely, some album names have been spelled differently in one table than they are in the other. Depending on the source of the data and the nature of the differences, you might make your fixes in MySQL using the update statement, or in the original source and re-import.
One of the “bad” albums is Aerosmith’s “Rocks”. The title of the album in albums has quotes in it, whereas the title of the album in songs does not. Let’s assume that the title with quotes is the correct one. We need to update the songs table and give it the new title.
select * from albums where album='"Rocks"'
I always try to do a select before I do an update, using the same where that I’ll be using in the update. This reduces the risk of completely destroying my data. Look at that where statement. Because the text that we’re looking for contains double quotes, we cannot use double quotes to surround the text. MySQL supports single quotes as well as double quotes to get around this.
If we surround the text with double quotes, we should avoid double quotes in the text. If we surround the text with single quotes, we should avoid single quotes in the text.
If our text has both double quotes and single quotes in it, we can “backquote” the offending quotes. For example, we could have used:
select * from albums where album="\"Rocks\""
Finally, go ahead and update that album.
update songs set album="\"Rocks\"" where album="Rocks"
If you redo the NULL check, there will now be only 1,189 songs without a matching album.
We’ve set up each table with a unique ID. We should be using those rather than album names to relate our tables together. Otherwise, when we change an album name in one table, we also need to change it in the other. By adding a reference to the unique ID, which never changes and never has to change, we only have to update the album name in one place.
The way to do this is to duplicate our table, with an added field.
create table newSongs select songs.*, albums.id as albumID
from songs left join albums on songs.album=albums.album
Once we’ve verified that the new table has what we want, we can rename the old one to “oldSongs” and the new one to “songs”.
Remember that our new table will contain a bunch of songs with no albumID:
select * from newSongs where albumID is NULL
For real data, we would need to go through these records and find out why, fixing those that can be fixed. Once we do fix it, we could get rid of the “album” column in the newSongs table.
One other thing to fix in newSongs is the ID column: it was not transferred over as auto increment. So go ahead and switch the ID column to auto increment.
First, it tells you “invalid default value for ID”. Switch “Null” to YES and the default value to NULL. Then, you’ll get a different error.

Try the following:
select * from newSongs where id=7185
This is the Time Warp from the Rocky Horror Picture Show. It’s in there twice. How many items do we have like this?
select id, artist, song, album, count(*) as idCount
from newSongs group by id having idCount > 1
Having is a form of where that often works better after group by. If you can use where, however, it is almost always a better choice.
Looks like we have 61 songs that ended up getting duplicated. Why?
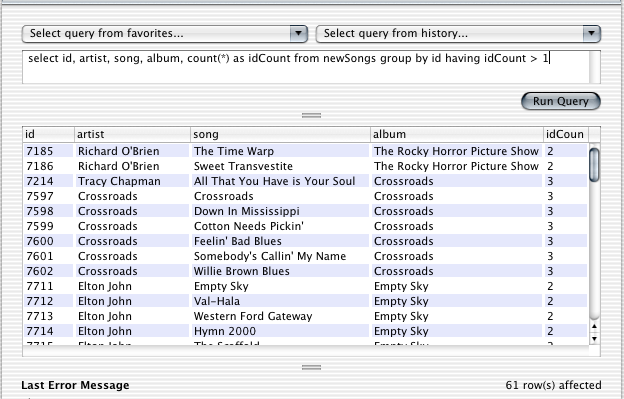
It turns out that different artists occasionally release albums of the same name. Tracy Chapman released an album called “Crossroads”; and there was a movie called “Crossroads”. Our select statement couldn’t tell the difference.
One solution would be to check the artist as well as the album when doing the transfer. But while it would solve this problem, it will exacerbate the problem of different spellings: instead of only different spellings for album mattering, different spellings for either album or artist will matter.
These are the sorts of problems you run into when you try to reconcile data from multiple sources. Sometimes you can fix the problem at the source; other times, you’ll need to do the work to reconcile them in MySQL. If it is important data, however, it is almost always worth the time now to fix the data, rather than spending more time later after problems have had a chance to build up.
Our songs table includes a genre column. Suppose you wanted to add a description and a history for each genre. You could go ahead and add two new columns to the songs table, but this would mean duplicating the same description and history for each genre across every record that contains that genre.
select count(*) from songs where genre="Rock"
The “rock” genre alone has 2,289 songs in it. That’s a lot of work. In general, you don’t want to have to duplicate more than one column across all of your records. When the only genre column was the genre itself, separating that into a different table wouldn’t have saved much. But now that genre is also going to be tied to a description and a history, it will be a lot less work and a lot more reliable to separate the genres into their own table.
What we really need to do is create a new table, much like we did above. Since we’ll be creating it from almost scratch this time, we won’t have the same problems we had above.
The first thing to do is make a new table with all the genres in it. We know how to make a table from data in an existing table. First, we find the select statement we’re going to need.
select distinct genre from songs
That shows us the 29 genres we’re going to have in our new genre table.
create table genres select distinct genre from songs
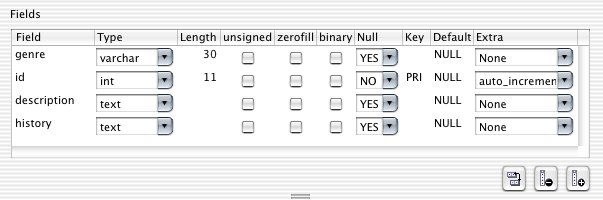
That creates a very simple one-column table with our genre names in it. The next step is to add the rest of the columns we need: an auto increment ID column, and the two text columns for description and history, respectively.
You already know how to create the ID column. But our current text column type, the variable length character column, is really designed for small pieces of text. If your text is going to contain more than 255 characters, varchar will not suffice. For longer text, we have the text column type. Text columns can contain up to 65,535 characters. (If that isn’t enough for you, there is also mediumtext which can contain up to 16,777,215 characters!)
Make the description and history columns be text types.
Now, go ahead and set up some content for the description and history of a few of the genres. For example:
update genres set description="Rock and roll is a form of popular music, usually featuring vocals (often with vocal harmony), electric guitars and a strong back beat; other instruments, such as the saxophone, are common in some styles. Rock's social impact on the world is unparalleled by any other kind of music. It has been credited with ending wars and spreading peace and tolerance, as well as corrupting the innocent and spreading moral rot."
where genre="Rock"
update genres set history="Rock and roll emerged as a defined musical style in America in the 1950s, though elements of rock and roll can be heard in rhythm and blues records as far back as the 1920s. Early rock and roll combined elements of blues, boogie woogie, jazz and rhythm and blues, and is also influenced by traditional Appalachian folk music, gospel and country and western. Going back even further, rock and roll can trace a foundational lineage to the old Five Points district of mid-19th century New York City, the scene of the first fusion of heavily rhythmic African shuffles and sand dances with melody driven European genres, particularly the Irish jig.\nRocking was a term first used by gospel singers in the American South to mean something akin to spiritual rapture. By the 1940s, however, the term was used as a double entendre, ostensibly referring to dancing, but with the hidden subtextual meaning of sex; an example of this is Roy Brown's \"Good Rocking Tonight\". This type of song was usually relegated to \"race music\" (the music industry code name for rhythm and blues) outlets and was rarely heard by mainstream white audiences. In 1951, Cleveland, Ohio disc jockey Alan Freed would begin playing this type of music for his white audience, and it is Freed who is credited with coining the phrase \"rock and roll\" to describe the rollicking R&B music that he brought to the airwaves."
where genre="Rock"
I pulled this information off of Wikipedia (http://en.wikipedia.org/). You may find it easier to go there and copy some of this text out. Remember to watch out for quotes! You cannot surround your text with the same kind of quotes that the text contains unless you backquote the quotes in the text, as I’ve done with the history of rock above.
The final step is to replace the genres in the songs table with the genre ID we’ve just created. First, create an unsigned integer column in songs called “genreID”.

Since we’ll be searching on this genreID, you’ll want to create a standard index for the column as well.

Now, let’s set the genre ID to the correct ID from the genres table. First, we test the where we’re going to use.
select song, artist, songs.genre, genres.genre, genres.id
from songs join genres on songs.genre=genres.genre
If that shows you what you’d expect to see, backup your data (always backup your data before making a potentially data-threatening change such as this!) and convert that select into an update:
update songs join genres on songs.genre=genres.genre set genreID=genres.id
This may take a while! It has 7,000 records to update.
You should now be able to get genre information for any songs whose genre you’ve entered information for. You’ll only have to enter that information once for all songs of that genre; and if you alter the name of the genre that alteration will follow through as long as the genre ID stays the same.
select song, artist, description
from songs left join genres on songs.genreID=genres.id
where song like "%chain%" order by artist
This will show all songs whose name contains “chain”, along with the artist and the description of the genre.
Once you’ve verified that this works, you’ll want to remove the extraneous genre column in the songs table. In Sequel Pro you can just choose the column in the structure tab and delete it. In the mysql command line utility use:
alter table songs drop column genre;
You no longer need that column.
Most of the work we do with MySQL is for the web. Whether you use Dreamweaver or PHP or any other means of displaying MySQL data on the web, your username and password must be embedded in your web files and readable to the web server.
This means that your username and password are readable by anybody who shares access to your server. Because of this, most web hosting providers that give you MySQL access will give you multiple passwords. You are likely to receive one or more of these:
• a password that can do anything to your database, from anywhere on the net. Sometimes, you’ll need to enable it for anywhere on the net. Safeguard this password carefully. Anybody who acquires it will be able to see your data, modify it, and even modify the structure of your database. You should never, ever use this password for your web pages.
• a password that can only see your database, and only from the web server. If your web page only displays data, this is the password you want to use. If someone acquires this password without getting access to your web server, they can’t use it. If someone hacks into your server and gets your password, they can only use the password to see your data, not to change it.
• a password that can see your database and insert records, but cannot change records, and only from the web server. If your web page is displaying and collecting data, but is not modifying data, this is the password to use: a hacker who gains access to both it and your server can see data, and can add data, but cannot modify existing data.
• a password that can see and modify data, only from the web server. If your web pages need to modify data, you’ll use this password for your web files. It means that anyone who acquires that password can modify data, but at least they cannot modify the structure of your tables.
You should ensure that the level of security you have on your server matches the level of security that you need. Remember that in any scenario other people who have accounts on your server will be able to do anything to your records that your web page can. You should only store information in your database that you are comfortable with, knowing that this is true.
If you are at a university, working on a departmental web page, often every other department has access to the same web server that you do. Whoever the other departments let work on their files, can see your files and thus can see your password.
If you are at a university, working on a personal or professional web page, or hosting your web pages on a third-party hosting provider, usually everyone else at the provider will have access to the same web server. Every one of them will be able to access your files and thus see your password. Store information only to the extent that you trust those others and you would not mind them seeing—or changing that information.
Because of this, regular backups are essential. You should make backups as often as you change data.
MySQL is often used with other applications to display data. For data on the web, Dreamweaver, PHP, Python, and Perl are probably the most common methods used. The PHP, Python, and Perl examples here assume that you already know how to use those programming languages.
Dreamweaver makes it fairly easy to make simple web pages using MySQL and PHP. The screenshots on this page are from Dreamweaver MX 2004.
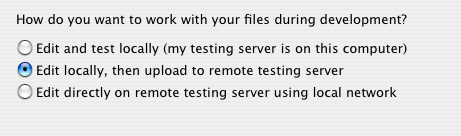
The first thing you need to do is tell Dreamweaver that your site is a dynamic site using PHP/MySQL server technology.
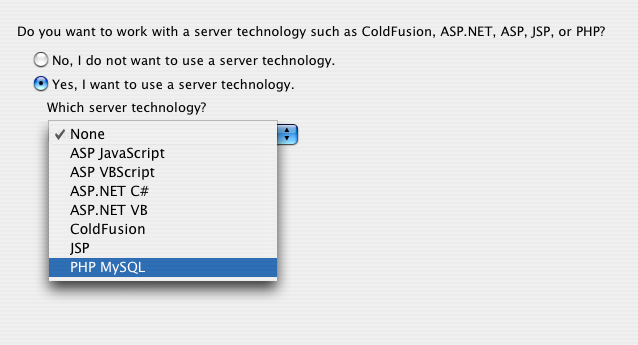
Then, you’ll need to tell it where you want your “test server” to be. Normally, you’ll edit locally, then upload to a remote testing server (as I’ve shown below). In this case, however, we’ll want to edit and test locally. We set up our database on “this computer”.
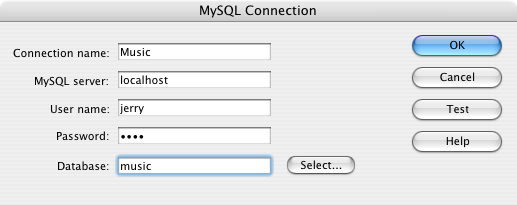
You’ll also need to tell Dreamweaver how to connect to MySQL. Go to the Applications toolbar and choose the Databases tab. Click on the “+” and make a new database connection.
If this were a live database, you would have a special username and password just for use on the web, and you would put that information into the “MySQL Connection” window. In this case, we’ll use the username and password we set up for this class.
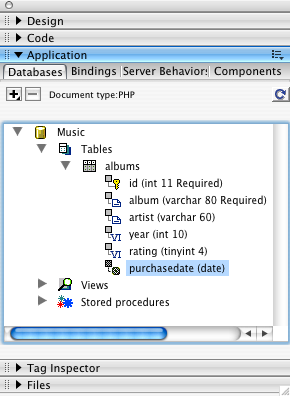
If all goes well, Dreamweaver can now list the tables in your database and the fields in those tables.
Now, in the Bindings tab, we need to make a new record set.
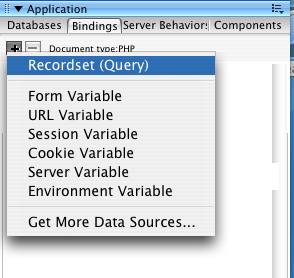
A record set is a select statement. For simple uses, Dreamweaver can create the select statements for us; all we have to choose are the fields we want to display and the order we want them displayed in.
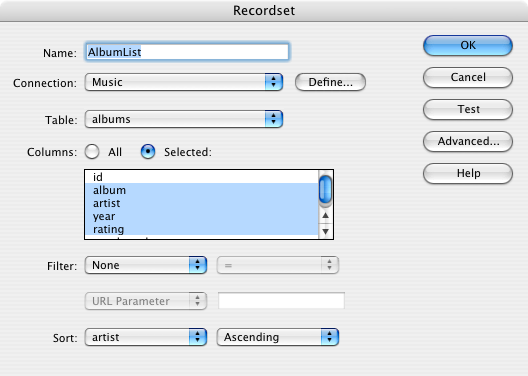
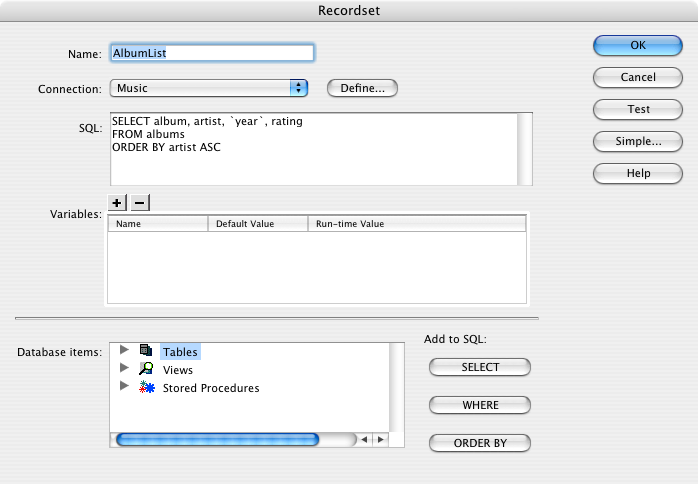
If you want to take over from Dreamweaver, you can click the “Advanced…” button and see—and modify—the select statement that Dreamweaver created.
Now that we have a select statement, we need to display the resulting rows on our web page. The most obvious way of showing a bunch of rows is to make a table.
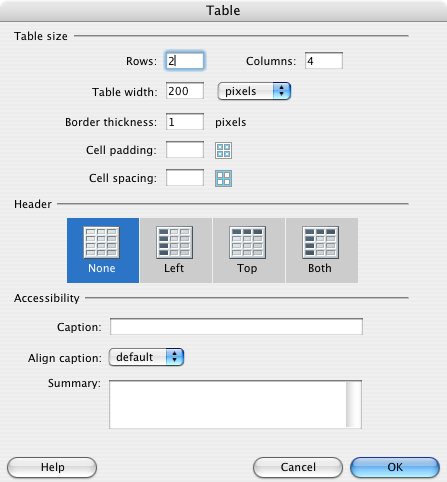
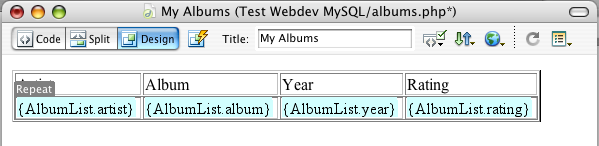
Give the table two rows, and one column for each field we’ll be displaying. Here, I assume we’ll be displaying the artist, the album, the year, and the rating.
Set up the headers and drag fields over from the “Databases” tab.
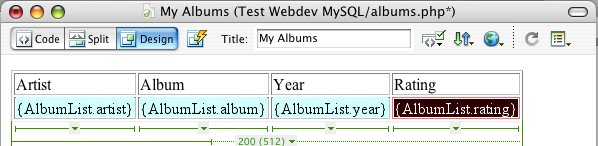
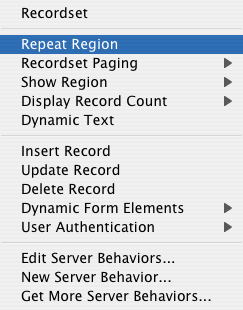
As it currently stands, if we publish this page and view it, we’ll only see the first record. We need to tell Dreamweaver to repeat the second row for every record. First, highlight the entire row. Then, choose “Repeat Region” from the Server Behaviors tab.
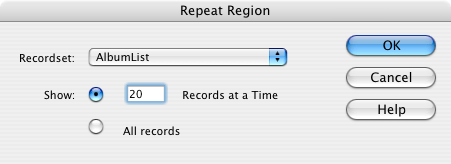
Specify the record set that is going to be repeated, and how many records you want to show at one time. For small result sets, you can simplify things by showing all records. In this case, we have hundreds of albums, so we’ll show twenty at a time.
You’ll know that the row is a repeat region by the gray “Repeat” tab on its upper left.
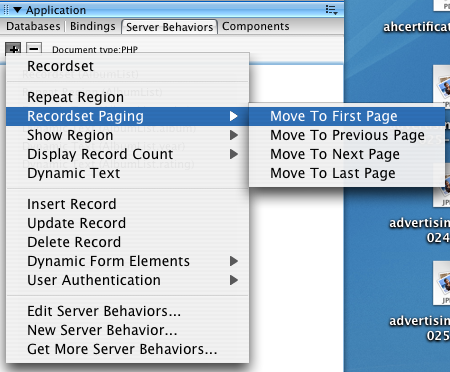
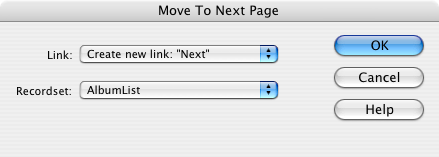
Now, Dreamweaver shows us the first twenty records. We need a way for our readers to page through the list of albums. In the Server Behaviors tab, we also have “Recordset Paging”. There is one each for first page, previous page, next page, and last page. Go ahead and add one of each.
Each time, you’ll get a simple configuration window. Make sure you choose the correct record set and that the link is what you expect it to be. You can always cancel if it isn’t right.
Once you’ve done that, you should have a page that looks something like this, with one header row and one repeating row, and a couple of simple navigation links on the bottom of the page.
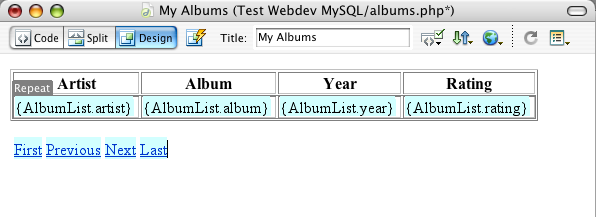
On the web, this will be displayed as:
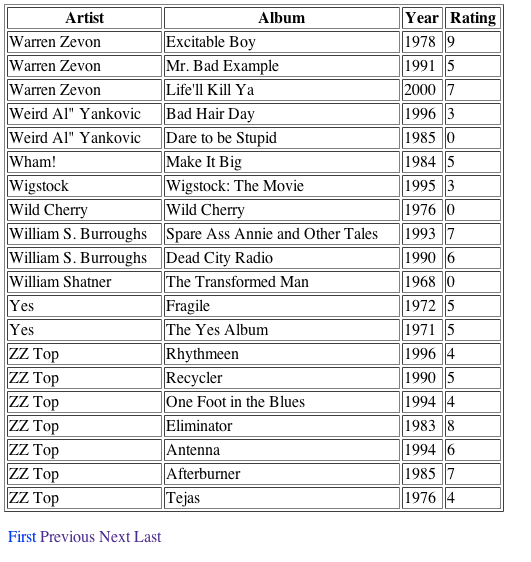
This, for example, is the last page of albums.
There is a whole lot more you can do with MySQL in Dreamweaver, such as make forms and link the forms to a database. That’s a whole other tutorial, however.
If you’re programming directly in PHP, here’s a simple example of displaying records using PHP in HTML. This PHP is for PHP 5.1 and later, and requires the mysql PDO module be installed. Most web providers that provide PHP will include the mysql module.
<html>
<head>
<title>My Albums</title>
</head>
<body>
<h1>My Albums</h1>
<table>
<tr><th>Album</th><th>Artist</th><th>Year</th><th>Rating</th></tr>
<?
$host = '127.0.0.1'; //or $host = 'localhost';
$user = 'Username';
$pass = 'Password';
$database = 'music';
$query = "SELECT album, artist, year, rating FROM albums ORDER BY artist";
try {
$dbh = new PDO("mysql:host=$host;dbname=$database", $user, $pass);
$dbh->setAttribute(PDO::ATTR_ERRMODE, PDO::ERRMODE_EXCEPTION);
$results = $dbh->query($query);
while ($album = $results->fetch()) {
albumRow($album);
}
$dbh = null;
} catch (PDOException $error) {
echo "Problem connecting to $host: ", $error->getMessage();
die();
}
function albumRow($albumInfo) {
$album = $albumInfo['album'];
$artist = $albumInfo['artist'];
$year = $albumInfo['year'];
$rating = $albumInfo['rating'];
echo "\t\t\t<tr>";
echo "<th>$album</th><td>$artist</td><td>$year</td><td>$rating</td>";
echo "</tr>\n";
}
?>
function albumRow($albumInfo) {
$album = $albumInfo['album'];
$artist = $albumInfo['artist'];
$year = $albumInfo['year'];
$rating = $albumInfo['rating'];
echo "\t\t\t<tr>";
echo "<th>$album</th><td>$artist</td><td>$year</td><td>$rating</td>";
echo "</tr>\n";
}
?>
</table>
</body>
</html>
The mysql_connect() function connects your page to the database, the mysql_select_db() function selects the database you want, and the mysql_query() function performs your query. The mysql_free_result() function tells PHP that you’re finished with that query and the mysql_close() function tells PHP that you’re finished with that connection.
The important parts are mysql_error(), which tells you the last error that occurred, and mysql_fetch_array(), which gives you the next row from the database. Items in the row can be pulled out by their name.
Python requires the MySQLdb module. You can get it from the project’s web page at http://sourceforge.net/projects/mysql-python/ if you do not already have it. You can find out if you type “python” and then try to “import MySQLdb”. Python is case sensitive.
#!/usr/bin/python
import MySQLdb
class album:
def __init__(self, albumInfo):
self.album = albumInfo["album"]
self.artist = albumInfo["artist"]
self.year = albumInfo["year"]
self.rating = albumInfo["rating"]
def tableRow(self):
rowHTML = "<tr>"
for cell in [self.album, self.artist, self.year, self.rating]:
rowHTML += self.tableCell(cell)
rowHTML += "</tr>\n"
return rowHTML
def tableHeader(self):
rowHTML = "<tr>"
for header in ["Album", "Artist", "Year", "Rating"]:
rowHTML += self.tableCell(header, "th")
rowHTML += "</tr>\n"
return rowHTML
def tableCell(self, cellData, cellType="td"):
return "<" + cellType + ">" + str(cellData) + "</" + cellType + ">"
class albums:
def __init__(self, user, password, host="localhost"):
self.db = 'music'
self.query = 'SELECT album, artist, year, rating FROM albums ORDER BY artist'
self.sql = MySQLdb.connect(host=host, user=user, passwd=password, db=self.db)
self.cursor = self.sql.cursor(MySQLdb.cursors.DictCursor)
self.nextAlbum = None
def __destroy__(self):
if self.sql:
self.cursor.close()
self.sql.close()
def table(self):
if self.sql:
albums = None
try:
self.cursor.execute(self.query)
albums = self.cursor.fetchall()
except MySQLdb.Error, e:
print "Error %d: %s" % (e.args[0], e.args[1])
if albums:
tableRows = [album.tableHeaders()]
for albumInfo in albums:
currentAlbum = album(albumInfo)
tableRows.append(currentAlbum.tableRow())
table = "<table>\n"
table += "\n".join(tableRows)
table += "</table>\n"
else:
table = "<p>Unable to acquire albums</p>\n"
else:
table = "<p>Unable to connect to database " + self.db + ".</p>\n";
return table
def page(self):
page = "<html>\n"
page += "<head><title>My Albums</title></head>\n"
page += "<body>\n"
page += "<h1>My Albums</h1>\n"
page += self.table()
page += "</body>\n"
page += "</html>\n"
return page
albumList = albums('Username', 'Password')
print albumList.page()
Perl requires the DBI database interface to connect to MySQL. You can get it from CPAN:
perl -MCPAN -e shell
install dbi
install DBD::mysql
This will get you the DBI interface and the MySQL information it needs to work.
The DBI interface is object-oriented, and returns handles to various objects or arrays. In Perl, queries must be “prepared” before they are executed. The fetchrow_hashref() method is the equivalent of PHP’s mysql_fetch_array() function. It returns a handle to an associative array. You need to dereference the handle using double dollar signs.
#!/usr/bin/perl
use DBI;
$driver = "mysql";
$host = "localhost";
$port = 3306;
$user = "Username";
$pass = "Password";
$database = "music";
$query = "SELECT album, artist, year, rating FROM albums ORDER BY artist";
$dataSource = "DBI:$driver:database=$database;host=$host;port=$port";
print "<html>\n";
print "<head><title>My Albums</title></head>\n";
print "<body>\n";
print "<h1>My Albums</h1>\n";
print "<table>\n";
print "<tr><th>Album</th><th>Artist</th><th>Year</th><th>Rating</th></tr>\n";
if ($databaseHandle = DBI->connect($dataSource, $user, $pass)) {
if ($queryHandle = $databaseHandle->prepare($query)) {
if ($queryHandle->execute) {
while ($rowHandle = $queryHandle->fetchrow_hashref()) {
$album = $$rowHandle{'album'};
$artist = $$rowHandle{'artist'};
$year = $$rowHandle{'year'};
$rating = $$rowHandle{'rating'};
print "<tr>";
print "<th>$album</th><td>$artist</td><td>$year</td><td>$rating</td>";
print "</tr>\n";
}
} else {
print "Unable to execute query $query: $!\n";
}
$queryHandle->finish;
} else {
print "Unable to prepare query $query: $!\n";
}
$databaseHandle->disconnect;
} else {
print "Unable to connect to data souce $dataSource: $!\n";
}
print "</table>\n";
print "</body>\n";
print "</html>\n";
The most useful book I’ve seen for MySQL is the Paul DuBois book. The MySQL web page has gotten much better over the last few years, however, and you may be able to get by with that.
| MySQL | http://dev.mysql.com/doc/mysql/ |
| MySQL book by Paul DuBois | http://hoboes.com/paul-mysql |
| Sequel Pro | http://www.sequelpro.com/ |
| MySQL on Negative Space | http://www.hoboes.com/Search/tags/MySQL/ |
“The best book on programming for the layman is Alice in Wonderland; but that’s because it’s the best book on anything for the layman.”
Version 1.1, March 2000
Copyright (C) 2000 Free Software Foundation, Inc. 59 Temple Place, Suite 330, Boston, MA 02111-1307 USA Everyone is permitted to copy and distribute verbatim copies of this license document, but changing it is not allowed.
The purpose of this License is to make a manual, textbook, or other written document "free" in the sense of freedom: to assure everyone the effective freedom to copy and redistribute it, with or without modifying it, either commercially or noncommercially. Secondarily, this License preserves for the author and publisher a way to get credit for their work, while not being considered responsible for modifications made by others.
This License is a kind of "copyleft", which means that derivative works of the document must themselves be free in the same sense. It complements the GNU General Public License, which is a copyleft license designed for free software.
We have designed this License in order to use it for manuals for free software, because free software needs free documentation: a free program should come with manuals providing the same freedoms that the software does. But this License is not limited to software manuals; it can be used for any textual work, regardless of subject matter or whether it is published as a printed book. We recommend this License principally for works whose purpose is instruction or reference.
This License applies to any manual or other work that contains a notice placed by the copyright holder saying it can be distributed under the terms of this License. The "Document", below, refers to any such manual or work. Any member of the public is a licensee, and is addressed as "you".
A "Modified Version" of the Document means any work containing the Document or a portion of it, either copied verbatim, or with modifications and/or translated into another language.
A "Secondary Section" is a named appendix or a front-matter section of the Document that deals exclusively with the relationship of the publishers or authors of the Document to the Document's overall subject (or to related matters) and contains nothing that could fall directly within that overall subject. (For example, if the Document is in part a textbook of mathematics, a Secondary Section may not explain any mathematics.) The relationship could be a matter of historical connection with the subject or with related matters, or of legal, commercial, philosophical, ethical or political position regarding them.
The "Invariant Sections" are certain Secondary Sections whose titles are designated, as being those of Invariant Sections, in the notice that says that the Document is released under this License.
The "Cover Texts" are certain short passages of text that are listed, as Front-Cover Texts or Back-Cover Texts, in the notice that says that the Document is released under this License.
A "Transparent" copy of the Document means a machine-readable copy, represented in a format whose specification is available to the general public, whose contents can be viewed and edited directly and straightforwardly with generic text editors or (for images composed of pixels) generic paint programs or (for drawings) some widely available drawing editor, and that is suitable for input to text formatters or for automatic translation to a variety of formats suitable for input to text formatters. A copy made in an otherwise Transparent file format whose markup has been designed to thwart or discourage subsequent modification by readers is not Transparent. A copy that is not "Transparent" is called "Opaque".
Examples of suitable formats for Transparent copies include plain ASCII without markup, Texinfo input format, LaTeX input format, SGML or XML using a publicly available DTD, and standard-conforming simple HTML designed for human modification. Opaque formats include PostScript, PDF, proprietary formats that can be read and edited only by proprietary word processors, SGML or XML for which the DTD and/or processing tools are not generally available, and the machine-generated HTML produced by some word processors for output purposes only.
The "Title Page" means, for a printed book, the title page itself, plus such following pages as are needed to hold, legibly, the material this License requires to appear in the title page. For works in formats which do not have any title page as such, "Title Page" means the text near the most prominent appearance of the work's title, preceding the beginning of the body of the text.
You may copy and distribute the Document in any medium, either commercially or noncommercially, provided that this License, the copyright notices, and the license notice saying this License applies to the Document are reproduced in all copies, and that you add no other conditions whatsoever to those of this License. You may not use technical measures to obstruct or control the reading or further copying of the copies you make or distribute. However, you may accept compensation in exchange for copies. If you distribute a large enough number of copies you must also follow the conditions in section 3.
You may also lend copies, under the same conditions stated above, and you may publicly display copies.
If you publish printed copies of the Document numbering more than 100, and the Document's license notice requires Cover Texts, you must enclose the copies in covers that carry, clearly and legibly, all these Cover Texts: Front-Cover Texts on the front cover, and Back-Cover Texts on the back cover. Both covers must also clearly and legibly identify you as the publisher of these copies. The front cover must present the full title with all words of the title equally prominent and visible. You may add other material on the covers in addition. Copying with changes limited to the covers, as long as they preserve the title of the Document and satisfy these conditions, can be treated as verbatim copying in other respects.
If the required texts for either cover are too voluminous to fit legibly, you should put the first ones listed (as many as fit reasonably) on the actual cover, and continue the rest onto adjacent pages.
If you publish or distribute Opaque copies of the Document numbering more than 100, you must either include a machine-readable Transparent copy along with each Opaque copy, or state in or with each Opaque copy a publicly-accessible computer-network location containing a complete Transparent copy of the Document, free of added material, which the general network-using public has access to download anonymously at no charge using public-standard network protocols. If you use the latter option, you must take reasonably prudent steps, when you begin distribution of Opaque copies in quantity, to ensure that this Transparent copy will remain thus accessible at the stated location until at least one year after the last time you distribute an Opaque copy (directly or through your agents or retailers) of that edition to the public.
It is requested, but not required, that you contact the authors of the Document well before redistributing any large number of copies, to give them a chance to provide you with an updated version of the Document.
You may copy and distribute a Modified Version of the Document under the conditions of sections 2 and 3 above, provided that you release the Modified Version under precisely this License, with the Modified Version filling the role of the Document, thus licensing distribution and modification of the Modified Version to whoever possesses a copy of it. In addition, you must do these things in the Modified Version:
1. Use in the Title Page (and on the covers, if any) a title distinct from that of the Document, and from those of previous versions (which should, if there were any, be listed in the History section of the Document). You may use the same title as a previous version if the original publisher of that version gives permission.
2. List on the Title Page, as authors, one or more persons or entities responsible for authorship of the modifications in the Modified Version, together with at least five of the principal authors of the Document (all of its principal authors, if it has less than five).
3. State on the Title page the name of the publisher of the Modified Version, as the publisher.
4. Preserve all the copyright notices of the Document.
5. Add an appropriate copyright notice for your modifications adjacent to the other copyright notices.
6. Include, immediately after the copyright notices, a license notice giving the public permission to use the Modified Version under the terms of this License, in the form shown in the Addendum below.
7. Preserve in that license notice the full lists of Invariant Sections and required Cover Texts given in the Document's license notice.
8. Include an unaltered copy of this License.
9. Preserve the section entitled "History", and its title, and add to it an item stating at least the title, year, new authors, and publisher of the Modified Version as given on the Title Page. If there is no section entitled "History" in the Document, create one stating the title, year, authors, and publisher of the Document as given on its Title Page, then add an item describing the Modified Version as stated in the previous sentence.
10. Preserve the network location, if any, given in the Document for public access to a Transparent copy of the Document, and likewise the network locations given in the Document for previous versions it was based on. These may be placed in the "History" section. You may omit a network location for a work that was published at least four years before the Document itself, or if the original publisher of the version it refers to gives permission.
11. In any section entitled "Acknowledgements" or "Dedications", preserve the section's title, and preserve in the section all the substance and tone of each of the contributor acknowledgements and/or dedications given therein.
12. Preserve all the Invariant Sections of the Document, unaltered in their text and in their titles. Section numbers or the equivalent are not considered part of the section titles.
13. Delete any section entitled "Endorsements". Such a section may not be included in the Modified Version.
14. Do not retitle any existing section as "Endorsements" or to conflict in title with any Invariant Section.
If the Modified Version includes new front-matter sections or appendices that qualify as Secondary Sections and contain no material copied from the Document, you may at your option designate some or all of these sections as invariant. To do this, add their titles to the list of Invariant Sections in the Modified Version's license notice. These titles must be distinct from any other section titles.
You may add a section entitled "Endorsements", provided it contains nothing but endorsements of your Modified Version by various parties—for example, statements of peer review or that the text has been approved by an organization as the authoritative definition of a standard.
You may add a passage of up to five words as a Front-Cover Text, and a passage of up to 25 words as a Back-Cover Text, to the end of the list of Cover Texts in the Modified Version. Only one passage of Front-Cover Text and one of Back-Cover Text may be added by (or through arrangements made by) any one entity. If the Document already includes a cover text for the same cover, previously added by you or by arrangement made by the same entity you are acting on behalf of, you may not add another; but you may replace the old one, on explicit permission from the previous publisher that added the old one.
The author(s) and publisher(s) of the Document do not by this License give permission to use their names for publicity for or to assert or imply endorsement of any Modified Version.
You may combine the Document with other documents released under this License, under the terms defined in section 4 above for modified versions, provided that you include in the combination all of the Invariant Sections of all of the original documents, unmodified, and list them all as Invariant Sections of your combined work in its license notice.
The combined work need only contain one copy of this License, and multiple identical Invariant Sections may be replaced with a single copy. If there are multiple Invariant Sections with the same name but different contents, make the title of each such section unique by adding at the end of it, in parentheses, the name of the original author or publisher of that section if known, or else a unique number. Make the same adjustment to the section titles in the list of Invariant Sections in the license notice of the combined work.
In the combination, you must combine any sections entitled "History" in the various original documents, forming one section entitled "History"; likewise combine any sections entitled "Acknowledgements", and any sections entitled "Dedications". You must delete all sections entitled "Endorsements."
You may make a collection consisting of the Document and other documents released under this License, and replace the individual copies of this License in the various documents with a single copy that is included in the collection, provided that you follow the rules of this License for verbatim copying of each of the documents in all other respects.
You may extract a single document from such a collection, and distribute it individually under this License, provided you insert a copy of this License into the extracted document, and follow this License in all other respects regarding verbatim copying of that document.
A compilation of the Document or its derivatives with other separate and independent documents or works, in or on a volume of a storage or distribution medium, does not as a whole count as a Modified Version of the Document, provided no compilation copyright is claimed for the compilation. Such a compilation is called an "aggregate", and this License does not apply to the other self-contained works thus compiled with the Document, on account of their being thus compiled, if they are not themselves derivative works of the Document.
If the Cover Text requirement of section 3 is applicable to these copies of the Document, then if the Document is less than one quarter of the entire aggregate, the Document's Cover Texts may be placed on covers that surround only the Document within the aggregate. Otherwise they must appear on covers around the whole aggregate.
Translation is considered a kind of modification, so you may distribute translations of the Document under the terms of section 4. Replacing Invariant Sections with translations requires special permission from their copyright holders, but you may include translations of some or all Invariant Sections in addition to the original versions of these Invariant Sections. You may include a translation of this License provided that you also include the original English version of this License. In case of a disagreement between the translation and the original English version of this License, the original English version will prevail.
You may not copy, modify, sublicense, or distribute the Document except as expressly provided for under this License. Any other attempt to copy, modify, sublicense or distribute the Document is void, and will automatically terminate your rights under this License. However, parties who have received copies, or rights, from you under this License will not have their licenses terminated so long as such parties remain in full compliance.
The Free Software Foundation may publish new, revised versions of the GNU Free Documentation License from time to time. Such new versions will be similar in spirit to the present version, but may differ in detail to address new problems or concerns. See http://www.gnu.org/copyleft/.
Each version of the License is given a distinguishing version number. If the Document specifies that a particular numbered version of this License "or any later version" applies to it, you have the option of following the terms and conditions either of that specified version or of any later version that has been published (not as a draft) by the Free Software Foundation. If the Document does not specify a version number of this License, you may choose any version ever published (not as a draft) by the Free Software Foundation.
MySQL is one of the most-used databases on the web. Web development environments as diverse as PHP and Dreamweaver use it to provide dynamic web sites. Most professional web hosting providers will provide MySQL databases as part of their hosting packages.
However, while programs like Dreamweaver make it easy to create simple database-driven web pages, they quickly throw you into an “advanced” mode if you want anything unique or out of the ordinary.
This guide shows you how to use MySQL to access your data, so that when Dreamweaver or any other application asks you to create your own SELECT statement, you will know what it means and how to do it.