
Permission is granted to copy, distribute and/or modify this document under the terms of the GNU Free Documentation License, Version 1.3. A copy of the license is included in the section entitled “GNU Free Documentation License”
PHP allows you to create dynamic web pages: web pages that do things differently depending on when or how someone visits your page, or that change depending on some other outside data. In this tutorial, I’m going to cover some of the very basics of using PHP to handle forms in your web pages. I’m going to assume that you know a little bit about HTML, but nothing about programming or PHP. If you aren’t familiar with HTML, you’ll want to go over the Web Writing Guide at http://hoboes.com/NetLife/Web_Writing/ first.
You’ll need a text editor of some kind; many web page editors have them built in; Dreamweaver does, for example. As I write this, you cannot use the text editor built-in to SeaMonkey. It will throw out your PHP code when you switch between WYSIWYG editing and text editing. If you want a dedicated text editor, NoteTab on Windows comes recommended by people I trust, and Fraise or Smultron on Mac OS X are great choices.
If you need to embed dynamic text into otherwise unchanging web pages, you’ll find PHP extremely useful. It was designed for this and it excels at it. You can easily create your web page as normal, with boilerplate text for the parts that need to be changed per visitor. Then, once you’ve designed the page, you can replace the boilerplate with PHP code to display the changing parts of the page.
You’ll find that PHP is very portable: if it works on one server, it will usually work on any other server that has PHP installed. Most ISPs that provide server-side scripting provide PHP automatically.
PHP is also very useful for integrating web pages with databases. It has support for SQLite built in, and it often has support for MySQL, one of the most popular SQL database servers, pre-installed.
If you’ve already done some programming, the PHP scripting language resembles JavaScript, Java, and Perl. These languages all share a common ancestor, the C programming language. Of those, PHP is most different from JavaScript. PHP is a server-side scripting language. All of the “work” is done on the server. JavaScript usually runs on the client. It has little access to the information that the server has, and mediated access to information on the client. It can do lots of things on the client that PHP cannot. PHP, however, has full access to information that the server has. It only has information about the client that the client tells the server.
Because it is on the server, PHP cannot be modified by the client. While you cannot necessarily trust the information that the client gives to PHP, you can trust that your PHP is doing what you told it to do. Because PHP is on the server end, your PHP scripts can affect your server—such as by keeping an activity log or updating a database.
PHP can work with JavaScript to provide a combination of server-side and client-side functionality that will make your web pages more useful and your visitors happier.
You can get more information about PHP, as well as the full PHP manual, at the PHP web site, http://php.net/. The PHP on-line manual is extremely useful: not only does it let you quickly look up any part of PHP, it also includes notes from people who use PHP about problems you might run into and how to fix them. When you’re looking at the official instructions for a function you’re having trouble with, do a search through the comments at the bottom of the page. Chances are, someone else has run into the same problem and has already posted a solution.
If you want more information about PHP in printed form, there is Programming PHP by Rasmus Lerdorf and Kevin Tatroe. Rasmus Lerdorf is one of the authors of the PHP language.
If you are interested in using PHP with the MySQL database there is also Web Database Applications with PHP & MySQL by Hugh E. Williams and David Lane, and MySQL by Paul DuBois. I’ve found the latter to be an extremely useful MySQL reference. You might also find my own MySQL tutorial at http://hoboes.com/NetLife/MySQL/ useful.
This depends on how your server is set up, but your PHP web pages usually need to end in the extension “php”. This lets the server know that it needs to hand this page off to the “php” module before letting the visitor see the web page.
The choice of extension is completely up to whoever sets up your server. While it will usually be “php”, it can be anything. Contact your system administrators to be sure.
 PHP code starts looking like HTML code and ends looking nothing like it. If you’ve looked at HTML code, you’ve seen things that look like “<em>” or “<h2>”. Here’s a simple web page:
<!doctype html>
<html lang="en">
<head>
<meta charset="utf-8">
<title>Time for PHP</title>
<style>
body {
margin: 10em;
padding: 2em;
border: solid .2em green;
}
h1 {
text-align: center;
}
</style>
</head>
<body>
<h1>PHP Time</h1>
<p>The current time is 9:34 AM.</p>
</body>
</html>
You can see this file in the resources archive as “time.php”. Go ahead and grab it, and save it on your web site. Of course, even by the time you first view this page the current time is probably going to be wrong, and for your visitors it will be right only one minute out of every day. This is a great example of web content that would be better served with PHP. You will put your PHP code between “<?php” and “?>”. Here’s how to display the current time:
<p>The current time is <?php echo date('h:i A')?>.</p>
If you save this file as “time.php” on your web site, and then view it, you will see the current time every time you reload your page.
At its most basic, PHP uses functions to get things done. The functions we just used are the “echo” function and the “date” function. The ‘echo’ function is simple. Whatever you give it, it ‘echoes’ to the web page. In this case, we gave it the ‘date’ function. The ‘date’ function (http://php.net/manual/function.date.php) returns the current date and time in whatever format you want. The format code we used was “h:i A”. This means we want the hour, a colon, the minute, a space, and either AM or PM. If it is currently March 9, 10:11 AM and 14 seconds, this will give us “10:11 AM”, which the “echo” function inserts as part of the web page.
You will use “echo” heavily to output text and HTML to your web page.
Rather than immediately echoing the results of functions, you can store them in containers for later use. These containers are called “variables” by programmers. If, for example, you were going to mention the time more than once on your web page, you might want to store the time in a variable and simply echo that variable everywhere on your page. Change the body of your web page to:
<h1>PHP Time</h1>
<?php
$now = date('h:i A');
?>
<p><em>Right now</em> is <?php echo $now; ?>. <?php echo $now; ?> is an important time, because <?php echo $now; ?> is the exact time you visited our wonderful page.</p>
That’s more than a little silly, but you can imagine having the date and/or time showing up in the top of your page, in the footer of your page, and somewhere in the content of your page. And other variables are even more commonly re-used; a person’s name, for example, or a price.
The two main advantages of using variables is that it reduces errors and it makes it easier to changes things later. You only type the date function with its somewhat obscure formatting codes once. And if you change your mind about the format later, you can change it in one place instead of everywhere on the page.
All variables in PHP begin with the dollar sign. In this example, we put the time in a variable called ‘$now’. Suppose later you want to change the time format to 24-hour time. You can change the format to ‘H:i’ on the line “$now = date('h:i A');” and it will change to showing the 24-hour time without the AM/PM in all three places.
PHP allows you to create your own functions as well as use built-in functions like the “date” function. Let’s give impatient people the seconds as well as the hours and minutes of the current time. If someone has visited our page within the last minute, we’ll change the format code to show seconds.
First, create a simple function that returns the time string we’ve been using:
<h1>PHP Time</h1>
<?php
//formatted current time, with seconds for impatient visitors
function currentTime() {
return date('h:i A');
}
$now = currentTime();
?>
There’s no difference here as far as the HTML is concerned. If you reload the page or view the source in the browser, you shouldn’t see anything different, other than potentially the time. This is a very simple function with only one line inside of it. That line returns the current date in the specified format.
PHP can also interact with the browser: it can ask the browser to remember a cookie, and PHP can associate that cookie with other information you choose to save. It does this most easily using sessions. Add this code to the very top of your web page, above every bit of HTML:
<?php
session_start();
?>
<!doctype html>
<html lang="en">
You must start sessions at the very top of your web page. This is because PHP makes requests to the visitor’s browser through HTTP headers, and HTTP headers can’t be sent once any HTML is sent.
We are ready to customize the time depending on how impatient our visitor is. Modify the currentTime function:
//formatted current time, with seconds for impatient visitors
function currentTime() {
$format = 'h:i A';
if (isset($_SESSION['lastVisit'])) {
$lastVisit = $_SESSION['lastVisit'];
if ($lastVisit > time()-60) {
$format = 'h:i:s A';
}
}
$_SESSION['lastVisit'] = time();
return date($format);
}
 Reload the page, and then reload it again immediately. The second time you load it, you should see the seconds. If you wait for over a minute to reload the page, the seconds should go away.
In PHP, special variables begin with a dollar sign and an underscore. We’ll see that again when we get to forms. $_SESSION is a special variable that makes it easy to remember your visitors. Once you’ve used session_start you can add values to $_SESSION and look for those values on later visits from that visitor.
The // marks a comment. PHP ignores comments, so you can write whatever you want after the two slashes. Use comments to remind yourself what this code was meant to do. You should put at least a single comment line above every function and often even above variable names.
The isset function tells you if a variable exists. For basic variables that may not seem useful—you ought to know if they exist or not—but for the special variables isset is invaluable. With $_SESSION, for example, we often try to remember bits of information from visitors, but we don’t initially know if the visitor has been here before. By using isset to verify that the information exists in $_SESSION before trying to use that information, we can avoid annoying errors.
If the variable exists, isset returns true; otherwise, it returns false.
A very important part of any programming is the if statement. This causes the enclosed code to be used only if the statement is “true”. This makes functions like isset that return true or false very useful.
The first time the visitor comes to our page, we haven’t created a session for them. So lastVisit in $_SESSION hasn’t been created either. It doesn’t yet exist, and isset returns false. The lines inside of the if from the left brace to the right brace are ignored.
The code resumes after the closing brace. The time function gets the current time in seconds. We store it in the visitor’s session using the key lastVisit. The second time a visitor comes to our page, they now do have a session and we’ve set lastVisit for them. So we use lastVisit to get the last time they visited.
Then, we have a second if inside the first: if their last visit is less than 60 seconds ago, change the $format variable. More specifically, if the value of time() from the last time they visited is greater than the current value of time() minus 60, that statement is true and the lines between the left and right braces are used.
In Unix and many other server environments, both dates and dates with times are measured in seconds from some arbitrary start time years ago. You won’t normally care when that arbitrary start time is, only how much one time (such as their last visit) differs from another time (such as the current time).
In Unix, there is no difference between dates, such as “January 5, 2012” and times, such as “July 6, 2012 5:15 PM”. They’re all stored as a number of seconds since the system’s arbitrary zero time.
In PHP, every line of PHP code ends in either a semicolon, a colon, or a curly bracket. Almost every line ends in a semi-colon.
There are two common ways of finding errors when a PHP web page doesn’t do what you expect.
First, look at the source. Often, the web page will partially display, and then stop at the offending line. You can use your browser’s “view source” menu item to look at the HTML that the PHP generated, and see where it stopped. Sometimes that’s all you need to find the error.
If the resulting page and source are completely blank, go to the command line of your server and type “php <filename>”, where <filename> is the name of the PHP file that isn’t working. For example:
php time.php
You’ll likely get an error back looking something like this:
Parse error: parse error in time.php on line 18
This means that PHP cannot find any way to understand something in line 18. Look at line 18, and see what it says. Chances are once you know which line the error is on, the error will be obvious.
Finally, if the page is sort of working but not quite, you can add some code to the top to tell the server to show you errors and warnings. By default, most production servers will not show PHP errors, because the errors can expose private information. But while you’re writing a PHP page, it’s very useful to be able to see those errors. Add these lines to the very top of your page:
<?php
ini_set('display_errors', true);
error_reporting(E_ALL);
?>
I usually put these on the top of any page I’m writing if the page contains more than a few lines of PHP code. I leave them there until I’m done testing the page, and then I remove them.
PHP’s errors are only useful if it can successfully tell you which line the error occurred on. Unfortunately, different operating systems determine what makes a line in different ways. Make sure that you are using the same line endings on both your workstation and your server. If your server is Unix, tell your text editor to use Unix line endings. Otherwise, the line that PHP tells you the error is on probably won’t be the line you see.
At regular times while programming a web page, use http://validator.w3.org/ to verify that your PHP code is generating valid HTML. Validation can often catch a small error before it becomes a big error.
Here is the final code we used for this section:
<?php
ini_set('display_errors', true);
error_reporting(E_ALL);
session_start();
?>
<!doctype html>
<html lang="en">
<head>
<meta charset="utf-8">
<title>Time for PHP</title>
<style>
body {
margin: 10em;
padding: 2em;
border: solid .2em green;
}
h1 {
text-align: center;
}
</style>
</head>
<body>
<h1>PHP Time</h1>
<?php
//formatted current time, with seconds for impatient visitors
function currentTime() {
$format = 'h:i A';
if (isset($_SESSION['lastVisit'])) {
$lastVisit = $_SESSION['lastVisit'];
if ($lastVisit > time()-60) {
$format = 'h:i:s A';
}
}
$_SESSION['lastVisit'] = time();
return date($format);
}
$now = currentTime();
?>
<p><em>Right now</em> is <?php echo $now; ?>. <?php echo $now; ?> is an important time, because <?php echo $now; ?> is the exact time you visited our wonderful page.</p>
</body>
</html>
Once you start getting into more complex code, you’ll have a lot of variables and functions. You might imagine have one variable for the current time, and then in another separate part of your page having a variable for the time that an event starts, and elsewhere a variable storing the amount of time left until some event happens. It’s not unlikely that with all that complexity you’ll end up calling different values by the same name, creating hard-to-find bugs as one value gets overwritten by unrelated values.
To keep your variables and functions in one place, and to keep them from interfering with each other, you’ll use classes. A class in PHP is a collection of functions and variables with a common purpose; when used in a class, a function is called a “method” and a variable is called a “property”. Classes have methods and properties. That’s part of what makes them useful.
Another part of what makes them useful is that they can be re-used very easily. When you use a class, you create an instance of that class. That instance is called an “object” and you can create as many objects out of that class as you need.
You can imagine a class of animals called dogs. Dogs have teeth and fur, and they growl and hunt. Teeth and fur are properties, and growl and hunt are methods. And you might have a particular instance of a dog called “fido”.
Further, you might have an overall class called Animal that Dogs inherit from, as do Cats and Buffalo. Some things all animals can do, other things are limited to a specific class of Animal. Another of the advantages of classes is that you can extend them and share common functionality—methods and properties—among classes that share a parent class.
You’ll see all of this in the next two examples.
Let’s create a page to ask people their favorite color. The basic page is in the resources as “color.php”.
<!doctype html>
<html lang="en">
<head>
<meta charset="utf-8">
<title>Your Favorite Color</title>
<style>
body {
margin: 10em;
padding: 2em;
border: solid .2em green;
}
h1 {
text-align: center;
}
</style>
</head>
<body>
<h1>PHP Color Extravaganza</h1>
<form method="post" action="color.php">
<p>
What is your favorite color?
<input type="text" name="color" value="" />
</p>
<input type="submit" />
</form>
</body>
</html>
Upload it to your server and view the page. You should see a simple form asking visitors their favorite color.
The form needs a class to manage the answers visitors give us. We will put this class in an include file. Putting functions, variables, and classes in an include file allows us to reuse that code on multiple web pages. Include files add functionality to any web page that “include” them. Your include files should not be viewable in your web site. Store them outside of your web site in an “includes” directory inside your account’s home directory.
Put this in a file called color.phpi and upload it to your includes directory:
<?php
ini_set('display_errors', true);
error_reporting(E_ALL);
//handle favorite color form submissions
class FavoriteColor {
public $value = null;
public function __construct() {
if (isset($_POST['color'])) {
$this->value = $_POST['color'];
}
}
}
?>
This is a very simple class that has one property and one method. In PHP, the __construct method is called whenever you make a new instance of that class. So, in this case, whenever we make a new instance we will set the color property on the object to be whatever color they entered in the form. $_POST contains form responses from the visitor. When they fill out your form input field named “color”, $_POST ends up with a value for “color” that we can access as $_POST['color']. $_POST is the form equivalent of $_SESSION.
In PHP, “null” is a special value meaning no value: the $value property isn’t set until $_POST brings it.
Add this to the very top of color.php:
<?php
include_once('/path/to/your/account/includes/color.phpi');
$color = new FavoriteColor();
?>
Replace /path/to/your/account/includes with the location in your account where you are going to store your include files. The path will probably look something like /home/USERNAME/includes/color.phpi. You need to create the includes directory yourself, in your account’s home directory.
The line with “new FavoriteColor()” takes the class FavoriteColor and creates a new instance of that class. It creates an object that we can use. Above the form, put:
<?php IF (isset($color->value)):?>
<p>You said your favorite color was <?php echo $color->value; ?>.</p>
<?php ENDIF; ?>
And change the form input to:
<input type="text" name="color" value="<?php echo $color->value; ?>" />
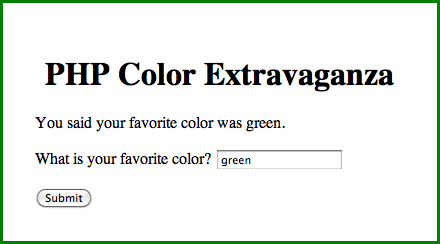 When you submit the form you’ll see that it doesn’t lose your response. That’s because we’re echoing the form response back into the form as the field’s value. We also echo the same field value into a paragraph where we tell them what they just entered.
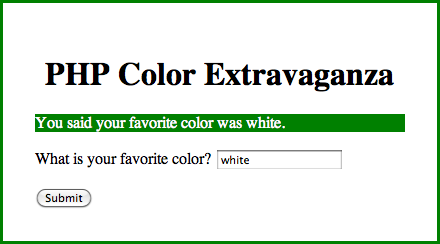
We can do more. Why not show that paragraph in the color they chose? After all, it’s their favorite! Change the “your favorite color was” line to:
<p style="color: <?php echo $color->value; ?>">
You said your favorite color was <?php echo $color->value; ?>.
</p>
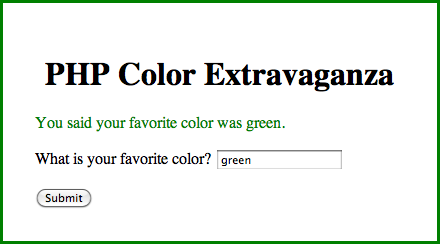 Both the form field green default, and the styling of the result to green work because PHP isn’t displayed in the browser. PHP code is replaced on the server end with whatever the PHP code “echoes”. Most of the time, you’ll echo HTML, CSS, or JavaScript, for the visitor’s browser to display. We echoed the favorite color into the form field’s “value” attribute, and into the style attribute’s “color” property. We are thus able to use PHP to alter the appearance of our HTML depending on what the visitor did.
Always put your include files outside of your normal web directory; sometimes, this is called “keeping them out of web root”. This helps keep errors and server configuration problems from exposing your code, your paths, your database passwords, and other potentially private information.
Notice how we moved between HTML and PHP in this example. We used IF: and ENDIF; to mark the beginning and end of an if section.
When programming 100% code, braces (the curly brackets { and }) are very useful, because text editors can match the opening brace to the closing brace.
Inside of HTML, however, braces can obfuscate the code. When you have an opening IF toward the top, a whole bunch of HTML, and then a bunch of closing braces, each brace has very little context around it. An ENDIF is usually more readable when interspersing HTML with PHP. This is especially true if your server supports short open tags, because then the IF/ELSE/ENDIF or (we’ll see this later) FOREACH/ENDFOREACH becomes more prominent.
<?IF ($test):?>
<p>Some HTML.</p>
<?ELSE:?>
<p>Some other HTML.</p>
<?ENDIF;?>
I say this several times throughout this tutorial: you cannot trust the data that comes in from browsers. You don’t know who is submitting, you don’t know why they’re submitting, and you don’t know how they’re submitting. You only know what they’re submitting if you make no assumptions about it.
Spammers will hit your forms in the hopes of putting spam comments on your web page, spamming your system administrators, and using your forms to send email spam. Hackers will hit your forms in the hope of gaining access to your server. Data thieves will hit your forms in the hopes of gaining access to your database’s data.
Browsers are just computer programs. They can be modified, impersonated, and rewritten from scratch to do whatever the spammer, hacker, or data thief wants.
Load the page from scratch and press the submit button. It will tell us that our favorite color was… and then leave off the favorite color. That’s because a form submission sets all fields of the form, even if the field wasn’t filled out. An empty field is sent as an empty string of text.
Rather than a broken sentence we’d like to give them instructions on using the form if they fill it out incorrectly. For this, we need a new method on our FavoriteColor class to tell us whether the form was answered.
public function answered() {
if ($this->submitted) {
if ($this->value === '') {
echo "<p>You need to enter a color!</p>\n";
} else {
return true;
}
}
return false;
}
Add a line to the __construct method:
if (isset($_POST['color'])) {
$this->submitted = true;
$this->value = $_POST['color'];
}
And add a new property:
public $value = null;
protected $submitted = false;
Then, change the web page to:
<?php IF ($color->answered()):?>
<p style="color: <?php echo $color->value; ?>">
You said your favorite color was <?php echo $color->value; ?>.
</p>
<?php ENDIF; ?>
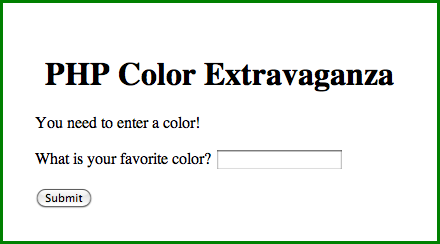 The page will now show the favorite color only if the form contained one. Otherwise it will either do nothing or show instructions.
A public function can be used outside of an instance of a class: often within a web page, as we here use the public property color. The other common type of function is the protected function. Protected functions can only be used by methods on the class, they can’t be used via the variable name on the web page.
Marking a method (or a property) protected is useful to keep from having to search hundreds of web pages for all uses of the method before making changes to the method. If the method is protected, you only need to look at the class code itself to make sure that your changes won’t disrupt existing code.
By setting the submitted property to protected, it can only be used inside the class, not outside it.
The answered method returns true if the form was submitted and the color field has something in it. Otherwise it returns false. If the form was submitted but the color has nothing in it, we echo more detailed instructions on using the form.
PHP has what’s called “loose typing”. This means that numbers and strings of text are interchangeable. In many programming languages, they’re not: the text “0” and the number 0 are different values and can’t be used in place of each other.
In PHP, they can. But that can cause problems when you’re looking at a value and want to know that the text exists, but the text is “0”. In PHP, as in most programming languages, the number zero means false. So if the visitor enters “0” as their favorite color, it looks like false if you just use “if ($this->value)” or “if ($this->value == 0)”.
The triple equals, “===”, uses strict typing. This means the values must match exactly. In web forms, empty text fields contain the empty string. So in the answered method, “if ($this->value === '')” means specifically that the value is empty and is a string of text.
So far, we’ve seen a couple of uses of “if” where “if” something is true, the lines of code between the opening and closing curly brackets are performed. You can also have an else as part of your if statements. With an else, the part between the first two curly brackets are performed if the if is true, and the part between the third and fourth curly brackets are performed if the if is false.
In this example, if the value is an empty string, it echoes a warning; else it returns true, that the form has been answered.
We’ve done a little bit of conditional HTML—HTML that only gets sent to the browser depending on other conditions, such as whether the browser submitted the form. Let’s take a closer look at this.
Try typing, as your favorite color, the color of your browser’s background. On my browser, this is white. The PHP code will display the text in white, causing it to be completely invisible against the browser’s white background. We don’t have to stand for this behavior. Let’s make sure that the example color is always visible.
Add a method to the FavoriteColor class called “background”.
public function background() {
if ($this->value == 'white') {
$color = 'green';
} else {
$color = 'white';
}
return $color;
}
 If the chosen color was white, it will provide a background color of green. Otherwise, it will provide a background color of white.
In the web page, change the paragraph style to:
<p style="color: <?php echo $color->value; ?>; background-color: <?php echo $color->background(); ?>">
Now, if you type “white” it will display the response with a green background, so that the text is visible. Otherwise, it will default to a white background.
Try something else: try a favorite color of “White” with a capital W, or “WHITE” in all-caps. The text disappears. That’s because of this line:
if ($this->value == 'white') {
PHP, like most programming languages, is very literal. “White” and “white” are not the same thing. The capitalization matters. What we need to do is clean the data as we receive it so that it matches what we expect. One of the things we expect is that the color is comparable to our internal colors, which means all lowercase.
Add a method to “clean” the incoming field. This method will only be used internally, so it’s protected.
protected function clean() {
if (isset($_POST['color'])) {
$this->submitted = true;
$value = $_POST['color'];
$value = strtolower($value);
$this->value = $value;
}
}
The strtolower function converts all text to lower case.
Then, change the __construct method to call the clean method:
public function __construct() {
$this->clean();
}
Save, upload, and reload the page, and now White and WHITE both display correctly.
But we’re not done yet. I’ve seen lots of people enter form data with spaces at the end. I don’t know where the habit comes from, but it’s common. Add a space to the end of the word “white” in the form, and the response goes back to being invisible.
Add another line to the clean method:
protected function clean() {
if (isset($_POST['color'])) {
$this->submitted = true;
$value = $_POST['color'];
$value = trim($value);
$value = strtolower($value);
$this->value = $value;
}
}
The trim function trims spaces, carriage returns, and tabs from the front and back of a string of text. Make this change, and your response should now be visible even if they type in spaces.
That works, but it’s getting tedious. Where does it end? The real problem here is that we are beginning to assume things about the browser’s state and the user’s actions that we cannot assume. We thought it would be nice to show an example of the color the viewer chose. Then we thought it might be a good idea to make sure that they can always see the example color. But on the web, we never have control over the vistor’s browser.
There are ways around this problem. We could keep a list of valid colors. If the color they choose is not in that list, do not show them an example color. This ensures that when they find a way of representing white that we haven’t anticipated, we do not end up showing them invisible text. In fact, it fixes a slew of potential problems called “cross-site scripting”. What we’re doing is inserting into “our” HTML some text that the viewer has “typed”. We are assuming that a human typed it and that they typed a color. Unfortunately we cannot assume anything about the stuff we receive from browsers.
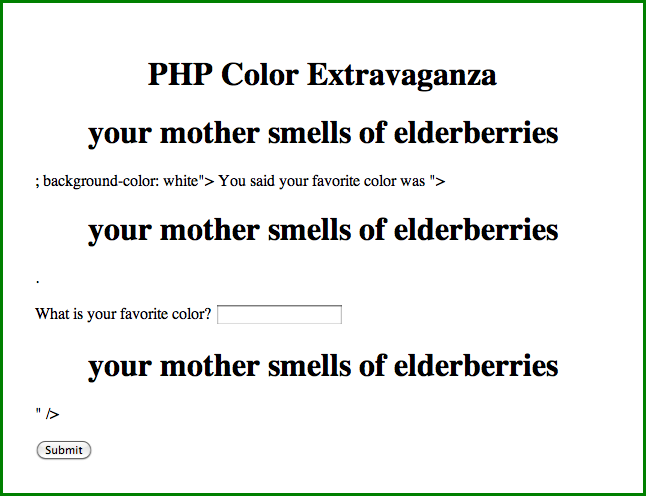 Instead of a color, type a double-quote, a greater-than symbol, and an insult in a level one headline:
"><h1>Your mother smells of elderberries</h1>
This ends up inserting external HTML into the web page. They could just as well has inserted JavaScript and ran JavaScript under your web page’s authority. In general, you want to be extremely careful about what you accept from outside of your PHP code. Form data is easily falsified. Any link on the web can lead to someone submitting to your form.
Checking against a list of colors requires knowing how to use lists in PHP, however, which we haven’t gotten to yet. We’ll get to that on the next project. But keep this in mind, because web form attacks really start to matter when you use PHP to send e-mail, as we’ll do in the final section on this project.
Whenever you display code from untrusted sources, strip or encode all HTML tags and/or ampersand-encoded entities. PHP has several functions designed specifically for this, for example, htmlentities, htmlspecialchars, and strip_tags. Let’s add htmlspecialchars to the clean method. This will convert <, >, and & characters to their ampersand-encoded entities.
$value = strtolower($value);
$value = htmlentities($value);
$this->value = $value;
Doesn’t look great, but at least it doesn’t allow HTML code injection into your web page.
One common means of collecting form data is to email it to yourself. If you don’t get many form responses and don’t need to collect that data into a database, this is a quick and simple means of accepting form responses.
When you collect form data, it’s nice to have a name to attach to the data. In order to add a name, however, we need a Name object as well as a FavoriteColor object. The two objects will act nearly the same, so rename FavoriteColor to FormField. Add a “fieldName” parameter to the __construct method and use it in the error message. This is what it will now look like:
<?php
class FormField {
public $value = null;
public $fieldName;
protected $submitted = false;
public function __construct($fieldName) {
$this->fieldName = $fieldName;
$this->clean();
}
public function answered() {
if ($this->submitted) {
if ($this->value === '') {
echo "<p>You need to enter a {$this->fieldName}!</p>\n";
} else {
return true;
}
}
return false;
}
…
protected function clean() {
if (isset($_POST[$this->fieldName])) {
$this->submitted = true;
$value = $_POST[$this->fieldName];
$value = trim($value);
$value = strtolower($value);
$value = htmlentities($value);
$this->value = $value;
}
}
}
?>
Now would be a good time to change the .phpi filename to fields.phpi. The web page will need to be changed to:
include_once('/home/USERNAME/includes/fields.phpi');
$color = new FormField('color');
Test it. Then, we can add a new field to the form to collect their name:
include_once('/home/USERNAME/includes/fields.phpi');
$color = new FormField('color');
$name = new FormField('name');
…
<?php IF ($color->answered() && $name->answered()):?>
<p style="color: <?php echo $color->value; ?>; background-color: <?php echo $color->background(); ?>">
You said your favorite color was <?php echo $color->value; ?>.
Thanks, <?php echo $name->value; ?>!
</p>
<?php ENDIF; ?>
<p>
What is your favorite color?
<input type="text" name="color" value="<?php echo $color->value; ?>" />
</p>
<p>
What is your name?
<input type="text" name="name" value="<?php echo $name->value; ?>" />
</p>
<input type="submit" />
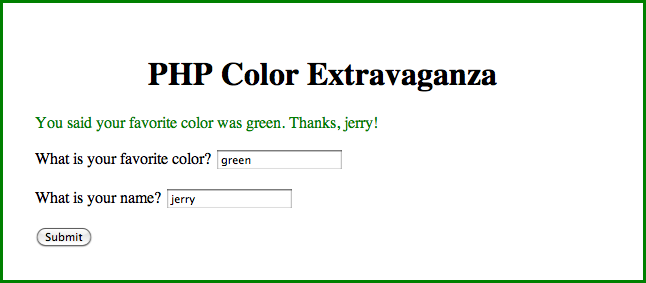 Form respondents will need to answer both the name and the color, and they will be named in the response.
However, take a good look at the FormField code. This generically-named class has a method in it specifically for dealing with colors. Further, if you look at the thanks, you’ll see the name in all lower case. We should remove the color code and the lower-case code, and create a ColorField class that inherits from FormField. Remove the background method from FormField, and remove the strtolower line from the clean method of FormField. Then, create ColorField to extend FormField with color-specific functionality:
class ColorField extends FormField {
public function background() {
if ($this->value == 'white') {
$color = 'green';
} else {
$color = 'white';
}
return $color;
}
protected function clean() {
parent::clean();
if (isset($this->value)) {
$this->value = strtolower($this->value);
}
}
}
There are two things going on here. First, because ColorField extends FormField, it has all of the functionality of FormField. We don’t have to duplicate the __construct or the answered or the clean. They’re inherited by ColorField (the child) from FormField (the parent). You’ll hear parent/child a lot when reading about classes.
We can add completely new methods, such as, in this case, the background method. It exists on ColorField but does not exist on FormField.
We can also intercept existing methods, as we do here with the clean method. We intercept it, then call clean on the parent, and then make the resulting value lower-case.
 Change the $color line in the web page to:
$color = new ColorField('color');
And when you re-run the page, you’ll get your name in the correct case, but colors will still be all lowercase.
In the above code, we use double quotes rather than single quotes around the “you need to enter a fieldname” text. Double quotes in PHP allow you to easily insert variables into the text. PHP will replace the variable names with the variable value. In this case, it will replace “{$this->fieldName}” with the value of $this->fieldName. You can also put “\n” and “\t” inside of double quotes to display new lines and tabs.
Single quotes do not do this. Anything inside of single quotes will be displayed exactly. So you’ll often use single quotes when displaying something including a dollar sign or a backslash.
It’s easy enough to send an email from PHP. You’ve already got a section of your web page where you display a message if both the color and the name were answered, so inside that section add:
<?php
$recipient = 'youraddress@example.com';
$subject = 'Favorite color of ' . $name->value;
$message = $name->value . ' said their favorite color was ' . $color->value . '.';
mail($recipient, $subject, $message);
?>
If a visitor fills out your form with the name “John Beat” and the favorite color of “green”, you’ll receive an email with the subject “Favorite color of John Beat” and the message:
John Beat said their favorite color was green.
You can format the message however you want. The “.” will combine strings of text; in programmer lingo, it will “concatenate” strings. You can have multiple lines in the message either by making a very long list of concatenations, or by having multiple lines of “$message .=”. The “.=” notation will append the new text to the old. For example, you might want to include more information about your visitors:
$message = $name->value . ' said their favorite color was ' . $color->value . '.';
$message .= "\n\n";
$message .= "Browser: " . $_SERVER['HTTP_USER_AGENT'] . "\n";
$message .= "IP Address: " . $_SERVER['REMOTE_ADDR'] . "\n";
mail($recipient, $subject, $message);
You’ll end up with an email that looks like:
John Beat said their favorite color was chartreuse.
Browser: Mozilla/5.0 (Macintosh; Intel Mac OS X 10_6_8) AppleWebKit/534.57.2 (KHTML, like Gecko) Version/5.1.7 Safari/534.57.2
IP Address: 192.168.42.3
$_SERVER, like $_POST and $_SESSION, contains information that the server is passing to your script from other places. HTTP_USER_AGENT comes from the browser. In this case, I was using Safari on Mac OS X 10.6.8. This isn’t reliable, because it comes straight from the browser, and the browser can lie.
REMOTE_ADDR comes from what the server sees as the visitor’s IP address. The IP address is usually reliable, since it is necessary for the connection between the browser and the server to work. However, IP addresses are neither unique nor static. IP addresses provide interesting information, sometimes, but you can’t rely on them staying the same for a visitor or not being shared between multiple visitors all using the same service provider.
Just as you can’t trust the data sent from a form when you display it on your web page, never send an e-mail to an address collected on an unprotected form. Remember the color lesson: you can’t trust that the person on the other end is honest—or even that they’re a person. Don’t let your forms become spam sources.
This is extremely important. Never use email addresses from forms as the recipients in your PHP-generated messages. Eventually, spammers or harassers will find your form and use it to spam and/or harass other people.
There are several “methods” that you can use to send your form data to the server for PHP to parse. Two of the most common are “post” and “get”. The get method is very useful if you want your visitors to be able to come back to the results page. For example, if your form searches rooms in a building, you might use get to allow them to bookmark a specific building. Or if you are providing a form that lets them search a list of classes by topic, you might use get so that they can bookmark the topic and come back to it later to see if there are any new classes in that topic.
The get method also allows them to copy the URL out of their web browser and send it by e-mail. So they could, for example, look up classes on a topic and then e-mail a link to the results to a friend. Search engines often use the get method. This allows visitors to bookmark their searches, and it allows them to send the search results to friends and colleagues.
The “post” method is not bookmarkable. You should use post if you do not want the user to be able to “come back” to this page. For example, if they are purchasing something you don’t want them to submit the purchase twice. If they are deleting something from your database, coming back a second time will probably just result in an error; if they are inserting something into your database, they may end up inserting it twice if you aren’t careful with your PHP code.
Posted information is also more private. Because get information is part of the URL it is also stored in the web server’s logs. Anyone who can see those logs can see the form information. Even if the server itself is a secure server, get information is still posted to the logs. If your form submissions include secure or private information, you should use post to submit them.
If your forms accept a lot of data, you will need to use a post form. Web browsers and web servers can “truncate” get submissions. The limit on the size of a get submission is highly variable but the general recommendation is that if the form data is likely to approach 1,024 bytes, go with the post method. This is probably part of the reason that search engines, which want to be bookmarkable, will abbreviate their form fields to two-letter or one-letter fieldnames.
If your form is method="get" you’ll use $_GET instead of $_POST to get the submitted values.
<?php
class FormField {
public $value = null;
public $fieldName;
protected $submitted = false;
public function __construct($fieldName) {
$this->fieldName = $fieldName;
$this->clean();
}
public function answered() {
if ($this->submitted) {
if ($this->value === '') {
echo "<p>You need to enter a {$this->fieldName}!</p>\n";
} else {
return true;
}
}
return false;
}
protected function clean() {
if (isset($_POST[$this->fieldName])) {
$this->submitted = true;
$value = $_POST[$this->fieldName];
$value = trim($value);
$value = htmlentities($value);
$this->value = $value;
}
}
}
class ColorField extends FormField {
public function background() {
if ($this->value == 'white') {
$color = 'green';
} else {
$color = 'white';
}
return $color;
}
protected function clean() {
parent::clean();
if (isset($this->value)) {
$this->value = strtolower($this->value);
}
}
}
?>
<?php
include_once('/home/USERNAME/includes/fields.phpi');
$color = new ColorField('color');
$name = new FormField('name');
?>
<!doctype html>
<html lang="en">
<head>
<meta charset="utf-8">
<title>Your Favorite Color</title>
<style>
body {
margin: 10em;
padding: 2em;
border: solid .2em green;
}
h1 {
text-align: center;
}
</style>
</head>
<body>
<h1>PHP Color Extravaganza</h1>
<?php IF ($color->answered() && $name->answered()):?>
<p style="color: <?php echo $color->value; ?>; background-color: <?php echo $color->background(); ?>">
You said your favorite color was <?php echo $color->value; ?>.
Thanks, <?php echo $name->value; ?>!
</p>
<?php
$recipient = 'yourname@example.com';
$subject = 'Favorite color of ' . $name->value;
$message = $name->value . ' said their favorite color was ' . $color->value . '.';
$message .= "\n\n";
$message .= "Browser: " . $_SERVER['HTTP_USER_AGENT'] . "\n";
$message .= "IP Address: " . $_SERVER['REMOTE_ADDR'] . "\n";
mail($recipient, $subject, $message);
?>
<?php ENDIF; ?>
<form method="post" action="color.php">
<p>
What is your favorite color?
<input type="text" name="color" value="<?php echo $color->value; ?>" />
</p>
<p>
What is your name?
<input type="text" name="name" value="<?php echo $name->value; ?>" />
</p>
<input type="submit" />
</form>
</body>
</html>
Here is a very simple poll to ask people what their favorite imaginary character is among a list of four characters: Neo, the Tin Man, the White Rabbit, and the Scarecrow.
<!doctype html>
<html lang="en">
<head>
<meta charset="utf-8">
<title>Best Imaginary Character</title>
<style>
body {
margin: 10em;
padding: 2em;
border: solid .2em green;
}
h1 {
text-align: center;
}
</style>
</head>
<body>
<h1>Imaginary Fight to the Finish</h1>
<form method="post" action="poll.php">
<p>
Please choose your favorite imaginary imaginary character:
<select name="character">
<option value="">Choose:</option>
<option value="rabbit">The White Rabbit</option>
<option value="scarecrow">The Scarecrow</option>
<option value="tinman">The Tin Man</option>
<option value="neo">Neo</option>
</select>
<input type="submit" value="Submit your answer" />
</p>
</form>
</body>
</html>
Save this as poll.php to your server, and try it out to make sure it works. It doesn’t currently do anything except display a pull-down menu and forget your choice as soon as you submit it.

What we want to do is save the data to a simple file. Here’s a very simple vote counter class that only does that. Add it to fields.phpi:
class VoteCounter extends FormField {
protected $ballotFolder = '/home/USERNAME/ballots/';
protected $filePath;
public function __construct($fieldName) {
parent::__construct($fieldName);
$this->filePath = $this->ballotFolder . $fieldName . '.txt';
}
//append the vote, if it exists, to the specified file in ballotFolder
public function save() {
if ($this->submitted && $this->value !== '') {
$choice = $this->value;
$ballots = fopen($this->filePath, 'a');
fwrite($ballots, "$choice\n");
fclose($ballots);
}
}
}
This class takes one parameter when you create a VoteCounter object from it: the field name, which it uses to know what form field to look for and what file to store the ballots in. It has one method other than the __construct method, and that method saves the results to the file. It uses three “f” functions to do this; the “f” stands for “file”, and these are “fopen” to open a file for use, “fwrite” to write to the opened file, and “fclose” to close the file and let another web page or visitor use it.
The “!==” is the “not equals” equivalen to the triple equal. If $this->value is anything other than a string of text and an empty string of text, it will match here and allow saving.
The first thing to do is set up a folder that we can allow the web page to write to. By default, web pages are not allowed to write to most places on the server. This is for very good security reasons: if web pages could write more files, it would be easier for them to hack the system.
Commonly, you’ll make a data folder off of your account’s home directory and outside of your web site, so that no one can access the data files directly. Create a ballots folder in your home directory if you’re using Mac OS X, Linux, or something like that:
mkdir ~/ballots
chmod o+wr ~/ballots
This creates the ballots folder and then makes it writable and readable by “other”. The “o+wr” means “add write and read access to other”. “Other” is the world, basically, and almost always includes your web pages. Sometimes, you may have to use “g+wr” or “u+wr” if your web pages are in the same “group” as your account, or if your web pages use your own account’s privileges.
You don’t have to worry too much about this, but don’t go around giving maximum privileges to every file. Privileges are designed to help keep your system—and your data—secure both from prying and tampering.
Add this to the top of poll.php:
<?php
include_once('/home/USERNAME/includes/fields.phpi');
$vote = new VoteCounter('character');
$vote->save();
?>
Whenever someone visits the page, this will save any submission they make in a file called “character.txt” in the ballots folder that you’ve specified in the $ballotFolder property.
Load the page, make a choice, and look in your ballots directory. There should be a file called “character.txt” and it should contain the choice you made in the pull-down menu. Make another choice, and that should be reflected in a new line in character.txt.
After they vote, of course, we want to both thank them for voting and hide the form from them.
<?php IF ($vote->answered()):?>
<p>Thank you for voting!</p>
<?php ELSE:?>
<form method="post" action="poll.php">
<p>
Please choose your favorite imaginary imaginary character:
<select name="character">
<option value="">Choose:</option>
<option value="rabbit">The White Rabbit</option>
<option value="scarecrow">The Scarecrow</option>
<option value="tinman">The Tin Man</option>
<option value="neo">Neo</option>
</select>
<input type="submit" value="Submit your answer" />
</p>
</form>
<?php ENDIF;?>
This tells them “thank you for voting” rather than showing the form, if $vote->answered() returns true. The answered method is on the FormField class; since VoteCounter extends FormField, $vote can use the answered method, too.
A common thing to do on a poll after someone votes is show them the current results. We can do that, but to do it we need a list of all of the options available. In PHP, a list is called an array. For example, if you want to keep a list of colors, you might have an array that contains “red”, “blue”, “green”, “cyan”, “yellow”, and “magenta”. The simplest arrays are just lists of values.
Arrays can also be more complex. For example, you might have a list of employee identification numbers and employee names and phone numbers. If so, you could take the employee identification number and use that to look up an employee’s name and the employee’s phone number.
What we’re going to do is first read the entire file into a simple array that lists every line in the file. Then we’re going to ask PHP to count all of the similar entries. PHP will return that count in a slightly more complex array that corresponds each unique entry with the number of times that entry appears.
If fourteen people have voted for the Tin Man and three people have voted for Neo, the simple array will contain fourteen tinmans and three neos. The count will contain one “tinman” and correspond that to “14”, and one “neo” that corresponds to “3”.
Add this method to VoteCounter:
public function counts() {
$votes = file($this->filePath);
$votecounts = array_count_values($votes);
return $votecounts;
}
First, we read our ballots using the “file” command. It takes every line of the file and places each line as an entry in the array $votes. We then use the function array_count_values() to count the items in the $votes array. That result is stored in $votecounts.
If there are five votes, with one for the Scarecrow, two for the Tin Man, and two for Neo, $votes will contain something like “scarecrow, tinman, neo, neo, tinman”. The variable $votecounts will contain a table of values:
| scarecrow | 1 |
| tinman | 2 |
| neo | 2 |
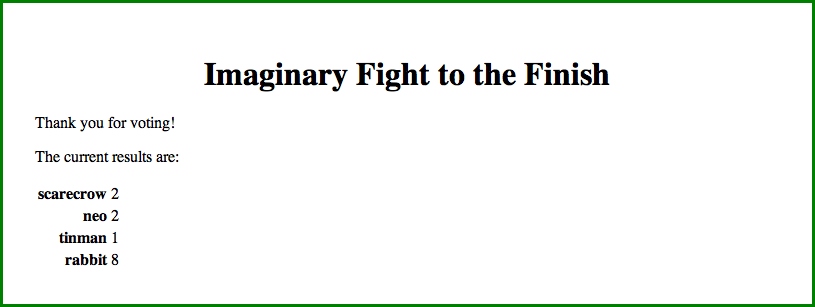
In the web page, add a table below the thanks for voting message:
<?php IF ($vote->answered()):?>
<p>Thank you for voting!</p>
<p>The current results are:</p>
<table>
<?php FOREACH ($vote->counts() as $choice=>$count):?>
<tr>
<th><?php echo $choice; ?></th>
<td><?php echo $count; ?></td>
</tr>
<?php ENDFOREACH;?>
</table>
<?php ELSE:?>
The foreach structure is a lot like the if structure. Like IF, the lines between the FOREACH and the ENDFOREACH are performed while the foreach is valid. Unlike the if, however, the lines enclosed by a foreach block can, and usually are, performed more than once. PHP goes through those lines once for every entry in the array. If there are five items in the array, PHP will use those lines five times. In between the parentheses, we give foreach the array and the name of the variable(s) that should contain the current array item each time we go through the “loop”.
In the $votecounts array, each item is composed of two parts: the choice, and the count of how many times that choice was chosen. So when we say “$votecounts as $choice => $count”, we’re telling PHP to give us the first part of the array item in $choice and the second part in $count. If there were only one part (such as the $votes array), we would use something like “$votes as $choice”.
You may want to add a new style to the page, to align <th> cells to the right:
th {
text-align: right;
}
That’ll produce output like this:
The above code works. It accepts votes and it shows the results of the votes. But the results are ugly. We’re showing the visitors our internal representation of the votes, not the human representation. Instead of displaying “The White Rabbit” for example, we’re displaying “rabbit”. We need an array to store our internal representation and correspond it to our English representation.
Add a third parameter to the VoteCounter __construct method:
protected $ballotFolder = '/home/USERNAME/ballots/';
protected $filePath;
protected $choices;
public function __construct($fieldName, $choices) {
$this->choices = $choices;
parent::__construct($fieldName);
$this->filePath = $this->ballotFolder . $fieldName . '.txt';
}
On the web page, add this an array of the vote values:
include_once('/home/USERNAME/includes/fields.phpi');
$imaginaries = array(
'rabbit'=>'The White Rabbit',
'scarecrow'=>'The Scarecrow',
'tinman'=>'The Tin Man',
'neo'=>'Neo',
);
$vote = new VoteCounter('character', $imaginaries);
$vote->save();
The values in the array are the same as the values in the select menu. In the results table, change the FOREACH that creates the table.
th><?php echo $vote->choiceName($choice); ?></th>
And add the choiceName method to VoteCounter:
public function choiceName($choice) {
return $this->choices[$choice];
}
What this is supposed to do is look up, say, “tinman” in the array of imaginary characters and get back “The Tin Man”. What it actually provides is a whole bunch of undefined indexes:
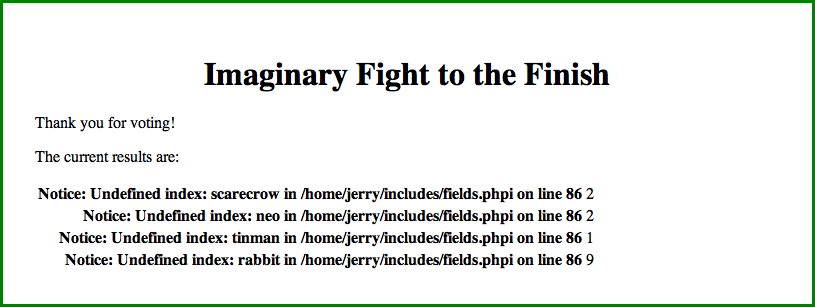
If you don’t see undefined indexes, make sure you have error display turned on. See Finding Errors.
That doesn’t look like it makes any sense. One thing to always look at when you see unexplained errors, however, is the source HTML of the page. In the browser, do a “view source” to see the HTML that PHP is generating. In this case, you’ll see that there’s a carriage return after each item. The keys scarecrow, neo, tinman, and rabbit all have a carriage return after them.
It turns out that when the file function reads lines in from a file, it doesn’t throw out the carriage return at the end of each line. A quick look at the php.net web page for the file function shows that there’s a special parameter to make file throw out the end of line character. Modify the counts() method to use this parameter.
$votes = file($this->filePath, FILE_IGNORE_NEW_LINES);
And now we’ve got it.
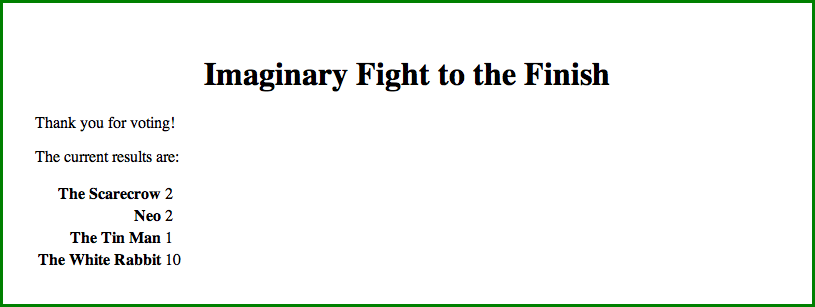
Once you store values in an array, you can do all sorts of automatic things on them. For example, we can sort arrays using “asort()” and “arsort()”. The first sorts in ascending order, the second in descending (reverse) order. Why not show our results in order from the most popular on down? In the VoteCounter’s counts method, add a new line:
public function counts() {
$votes = file($this->filePath, FILE_IGNORE_NEW_LINES);
$votecounts = array_count_values($votes);
arsort($votecounts);
return $votecounts;
}
Our display will now automatically adjust itself according to who is winning the poll.
Keep your code organized and, as best as you can, in a central location. One of the cardinal rules of programming is D-R-Y: Don’t Repeat Yourself. We are now, however, repeating ourselves. If we wanted to add a new contestant to the imaginary character list, we would have to do it in two places: once for the VoteCounter class, and once in the select menu in the page form. We’re also repeating the field name. If we change the field name later, we need to remember to do it in two places. Chances are, we’ll forget.
Replace the entire select menu with a method:
<p>
Please choose your favorite imaginary imaginary character:
<?php echo $vote->formSelect(); ?>
<input type="submit" value="Submit your answer" />
</p>
Inside the VoteCounter class, add a new method called formSelect:
public function formSelect() {
echo '<select name="', $this->fieldName, '">';
echo '<option value="">Choose:</option>';
foreach ($this->choices as $key=>$name) {
echo '<option value="', $key, '">', $name, '</option>';
}
echo '</select>';
}
This constructs the same select menu using the choices property. On the page, the HTML should look exactly the same.
It’s not paranoia when they really are out to get you. Remember, never trust anything coming from outside of your own PHP code. It’s important to think, not in terms of what it looks like is happening but what is actually happening. What it looks like is happening is that visitors come to our form, select a choice, and then submit that choice. Then we write that choice to a file to record.
That’s not what’s happening. What’s happening is that they are sending us text, and we are writing that text, whatever it is, to a file on our server. If they send us text that includes a computer program, we will write that computer program to a file on our server! And the form in their browser tells them exactly how to do that. That’s very, very bad.
We no longer have to trust them. We have a list of valid choices. We can verify their submission against that list.
There’s already a method, on FormField, that cleans submissions. Override that method to check against the array of choices:
protected function clean() {
parent::clean();
if (isset($this->value)) {
//if their vote isn’t in the list of valid votes, cancel
if (!isset($this->choices[$this->value])) {
$this->value = '';
}
}
}
First, it calls the parent to perform basic cleaning. Then it verifies that a choice for the submitted value exists (“is set”) in the choices property. The exclamation point reverses the check, so what we’re checking is if the value does not exist. If it doesn’t, it sets $this->vote to '' so that we don’t use it.
Test this by temporarily disabling one of your array options: First, load the page, so that you have all of the options available in the menu. Then put two slashes in front of the White Rabbit’s line and upload the page again. Then submit. You should be told that you need to answer the question as if you hadn’t answered it. Your submissions are now being ignored if they’re not in the list.
Our ability to answer the poll repeatedly has been very useful while testing, but makes it trivial for anyone to skew our poll by hitting “reload”. We need to track their visits, so that we know when and whether they’ve voted in the past. This is what cookies are for. You set a cookie on the client’s browser, and every time the browser visits you in the future, the browser returns the cookie. You can use that cookie to look up information about that visitor. PHP manages this via the $_SESSION variable. At the top of fields.phpi, start a session:
session_start();
And in the VoteCounter class, add a method to get and set the visitor’s current vote status:
protected function remember() {
if (isset($_SESSION['lastvisit'])) {
$this->lastVisit = $_SESSION['lastvisit'];
if (isset($_SESSION[$this->fieldName])) {
$this->existingVote = $_SESSION[$this->fieldName];
}
} else {
$this->lastVisit = null;
}
$_SESSION['lastvisit'] = time();
}
In the list of properties, add:
protected $lastVisit;
protected $existingVote;
When accepting their vote, we should make sure they’ve visited us in the past, and aren’t either coming from some other site or turning cookies off to vote multiple times:
protected function clean() {
$this->remember();
parent::clean();
if (isset($this->value)) {
//if they haven’t visited us before, this can’t be a valid vote
if (!$this->lastVisit) {
$this->value = '';
return;
}
//if they already made a vote, they can’t vote again
if (isset($this->existingVote)) {
$this->value = '';
return;
}
//if their vote isn’t in the list of valid votes, cancel
if (!isset($this->choices[$value])) {
$this->value = '';
}
}
}
And, in the save method, after writing and closing the ballot file save their vote in the session.
if ($this->submitted && $this->value !== '') {
$choice = $this->value;
$ballots = fopen($this->filePath, 'a');
fwrite($ballots, "$choice\n");
fclose($ballots);
$_SESSION[$this->fieldName] = $choice;
}
You should be able to verify this by voting one more time, and then not being able to vote again.
Now, remember: no trust. Checking their last visit in the session will ensure that they visited the page before voting. It does not ensure that they submitted from your page, just that they visited it.
When you start a session in PHP, PHP automatically checks to see if there is already an existing session on the client. You can store data in the session using $_SESSION and then look in $_SESSION in later visits. So here, after we start the session, we check to see if the session data already includes a choice having been made. If it is, we save when they last visited again, but clear any potential double-vote.
At the moment, it’s very confusing. If they’ve already voted, we give them the form and then refuse their answer. We should use the session to display either the form or a thanks for voting message.
Override the answered method:
public function answered() {
if (isset($this->existingVote)) {
return true;
} else {
return parent::answered();
}
}
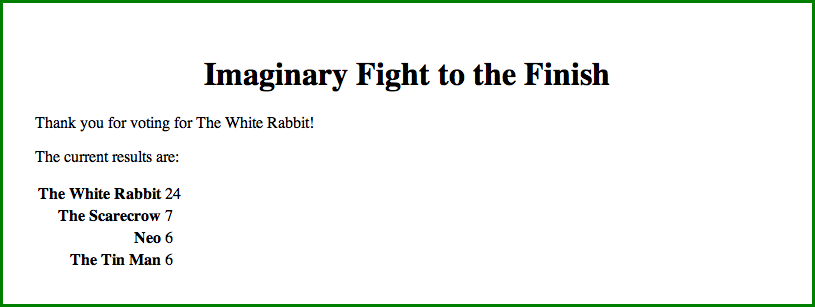
We now remember if they made a choice and what the choice was, so we can remind them who they voted for.
<p>Thanks for voting for <?php echo $vote->name(); ?>!</p>
And, for the name method, use:
public function name() {
if (isset($this->existingVote)) {
$vote = $this->existingVote;
} elseif ($this->value != '') {
$vote = $this->value;
}
return $this->choices[$vote];
}
If they voted this time, use that vote; otherwise, if they voted sometime before, use that. Then, look that key up in the array of possible votes to get the display name of that vote.
When you try to load this page after editing it, you might see something like:
Warning : session_start() [ function.session-start ]: Cannot send session cache limiter - headers already sent (output started at /home/johndoe/public_html/php/poll.php:2) in /home/johndoe/public_html/php/poll.php on line 4
This means that you did not put the session_start line at the very top of your web page. Cookies are not part of your web page’s document area. They are part of the “headers” that you rarely see as a user. The headers must be sent before the document is sent. Once you start sending the document, even if it is just a space or a carriage return, you can no longer send any headers. Make sure that the “<?” that starts your PHP code is at the very top of your file.
It’s still pretty easy to “beat” our poll. All anyone has to do is delete the cookie from their browser. If they delete the cookie, they’ll never send the cookie back to us, and we’ll never know that they were already here. You can test that: find our cookie in your web browser’s preferences, delete it, and you can vote once again.
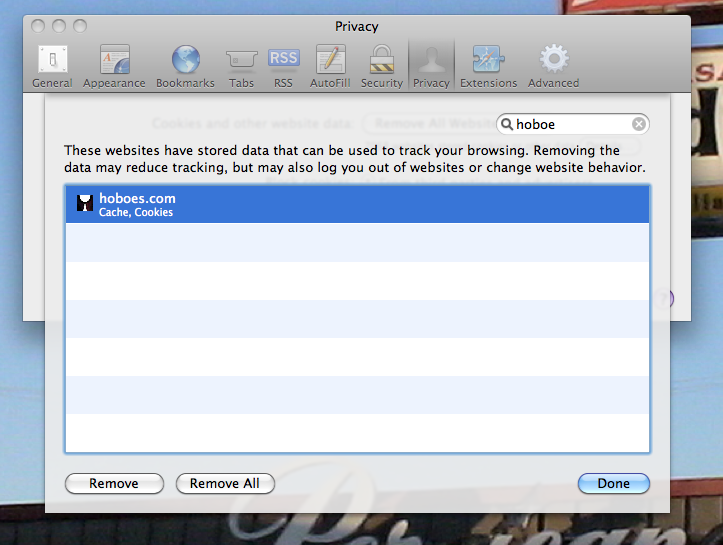
Sessions are based on cookies. Cookies are fully under the control of the browser. No matter how much you try to secure your application from cookie manipulation, you cannot win. You cannot rely on cookies being kept. Sessions are useful for casual polls, but not for, say, electing a president.
This is how PHP programming tends to work best: create functionality in a separate file, and then use that functionality to insert dynamic data into your pages, and to display or not display some HTML. In general, you’ll want to keep the number of lines of code on your pages down to one at a time. If you’re doing more than that, you’re doing programming, and it should—usually—go in the include file.
Usually; you’ll need to play it by ear, but you’ll rarely go wrong if you follow that guideline. This is sometimes called “templating”; your HTML is a “template” upon which you stamp out pages using PHP code. One HTML file can produce multiple pages.
We can put two questions on the page, and treat them separately. How about asking for the best ever president of the United States of America? We can get a list of the presidents easily enough from several places on the net. I’ve provided presidents.txt in the resources file. We can convert that list into an array with PHP’s file function, the same one we used to read the vote tally.
$fictions = new VoteCounter('character', $imaginaries);
$fictions->save();
$presidents = file('/home/USERNAME/includes/presidents.txt', FILE_IGNORE_NEW_LINES);
$election = new VoteCounter('president', $presidents);
$election->save();
$ballots = array($fictions, $election);
That renames the fictional character poll to be “$fictions” instead of “$vote”. It sets up the presidential election poll. And it creates a list of the polls in an array called $ballots.
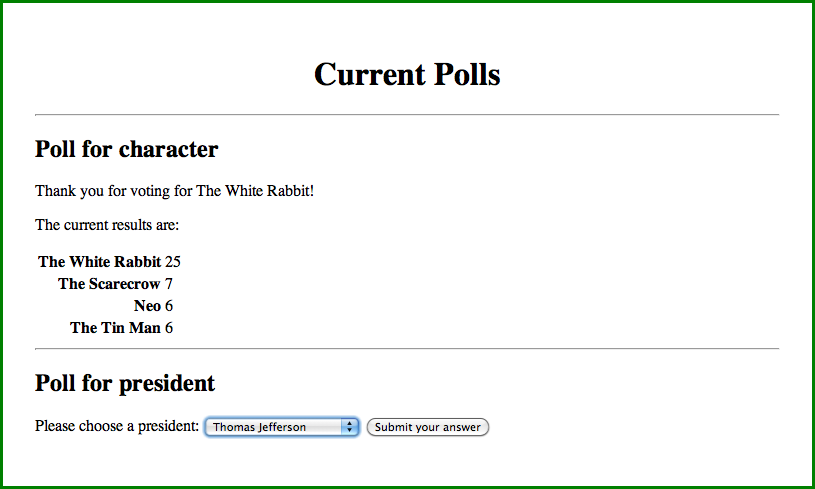
We can now use the same code that we used to display the imaginary character poll to show both polls:
<title>Latest Polls</title>
…
<h1>Current Polls</h1>
<?php FOREACH ($ballots as $vote):?>
<hr />
<h2>Poll for <?php echo $vote->fieldName; ?></h2>
<?php IF ($vote->answered()):?>
<p>Thank you for voting for <?php echo $vote->name(); ?>!</p>
<p>The current results are:</p>
<table>
<?php FOREACH ($vote->counts() as $choice=>$count):?>
<tr>
<th><?php echo $vote->choiceName($choice); ?></th>
<td><?php echo $count; ?></td>
</tr>
<?php ENDFOREACH;?>
</table>
<?php ELSE:?>
<form method="post" action="poll.php">
<p>
Please choose a <?php echo $vote->fieldName; ?>:
<?php echo $vote->formSelect(); ?>
<input type="submit" value="Submit your answer" />
</p>
</form>
<?php ENDIF;?>
<?php ENDFOREACH; ?>
We only change a little bit of code in the page’s HTML. Basically, we change the title and the level 1 headline from being about our imaginary character poll to be a more generic “latest polls” and “current polls”. Then we put a foreach loop around the rest of the code, adding a level 2 headline for each poll, and changing the poll-specific text to reference the field name.
When you load the page now, you should see the results for the “imaginary character” poll, and the opportunity to vote in the “president” poll.
Make your vote, and the page will display the results for both polls. You can put as many polls on the page as you wish, and also remove them when you’re tired of seeing them.

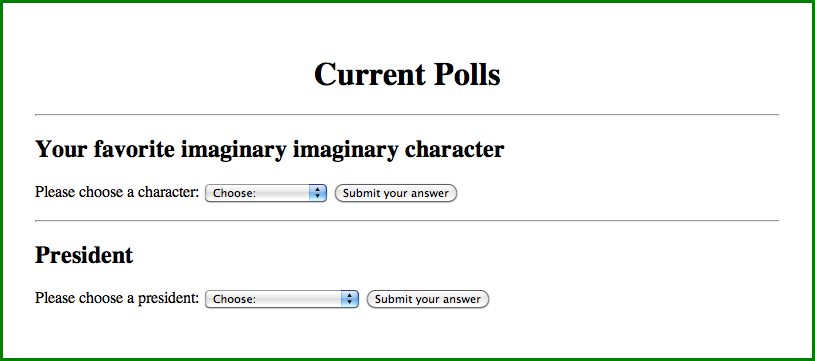
One thing you might notice is that the choice of field name isn’t always going to be a good choice for the title of the poll. Delete your server’s cookie so that you can see the polls again. Let’s add an option for titling a poll.
In fields.phpi, add a new property for the poll title, and two methods:
protected $title;
…
public function setTitle($title) {
$this->title = $title;
}
public function title() {
if ($this->title) {
return $this->title;
} else {
return ucfirst($this->fieldName);
}
}
One method sets the title, the other returns the title; if no custom title was created, it will return the field name, but capitalized.
And then set the title for the imaginary character poll:
$fictions = new VoteCounter('character', $imaginaries);
$fictions->setTitle('Your favorite imaginary imaginary character');
$fictions->save();
Replace the level 2 headline:
<h2><?php echo $vote->title(); ?></h2>
The character poll will get a detailed title; but the presidential poll will get the field name, capitalized.
That’s it! I’m sure you can imagine a lot more options that you might set for each poll. In this case we made the property protected so that people wouldn’t accidentally just display the title property, not knowing that some polls won’t have custom titles. But if you know that a property will only be displayed when it exists, you can leave out both the method to set and the method to display, and access the property directly. Make the property “public” instead of “protected”, and then you can set and display it directly.
$ballot->state = 'Michigan';
echo $ballot->state;
Which method you use, accessing the property directly or accessing it through a method, is up to you and can depend on the needs of the moment. I tend to err toward using methods, because it makes it easier to “intercept” a request to display a property later and provide better options.
We can combine PHP with inline styles to display the results graphically. The $count variable that we display during the foreach loop can just as well go inside of a style attribute.
<table class="graph">
<?php FOREACH ($vote->counts() as $choice=>$count):?>
<tr>
<th><?php echo $vote->choiceName($choice); ?></th>
<td>
<p style="width: <?php echo $count*6; ?>em;">
<?php echo $count; ?>
</p>
</td>
</tr>
<?php ENDFOREACH;?>
</table>
Add some extra styling to the <style> tag in the page’s <head>:
table.graph p {
text-align: right;
margin: 0;
padding: .1em;
background-color: red;
}
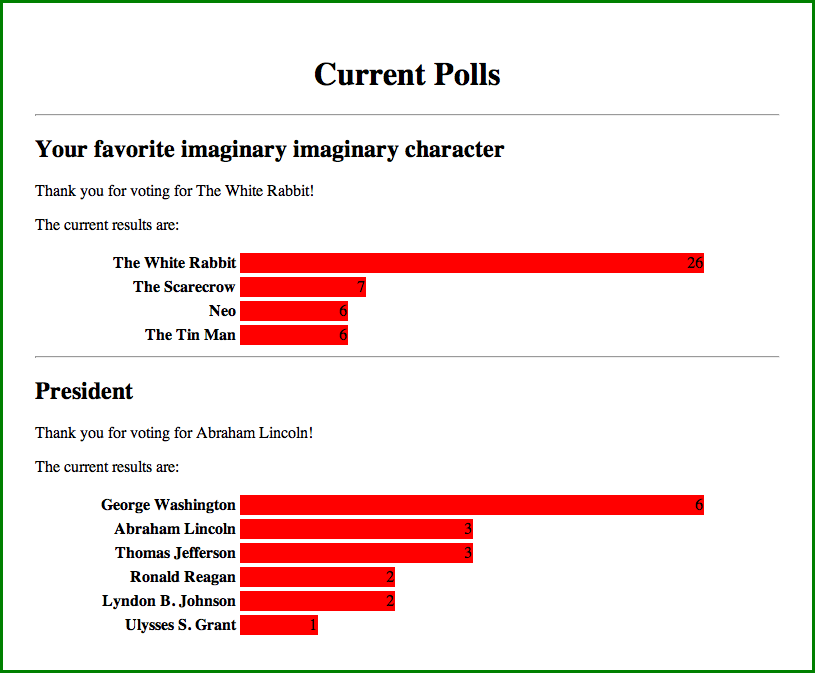
It will now display the results as red bars, with longer bars for bigger vote tallies:
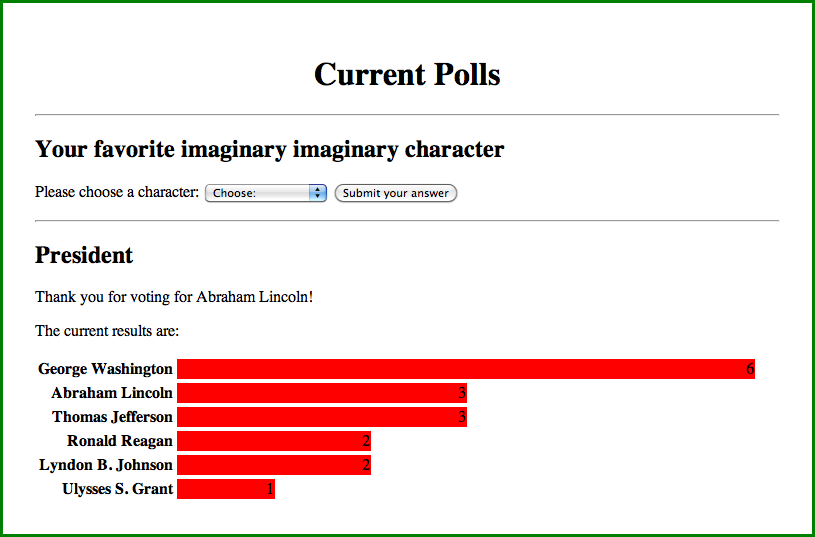
But watch what happens when we display a poll with a lot of results:
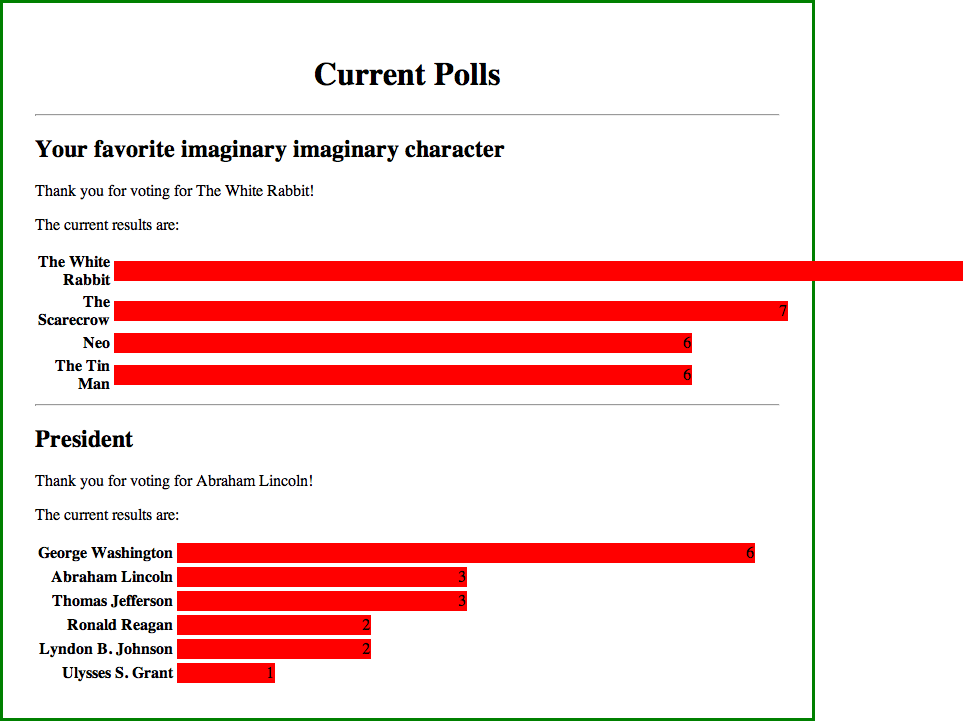
The imaginary character poll has received a lot more total votes than the presidential poll. But if we reduce the multiplier to match the number of votes in the character poll, the presidential poll’s graphs will be too small.
We need a means to calculate a percentage based on the highest vote-getter in that poll as the baseline largest bar. What we need is a smart enough set of results to know the maximum and how much to offset each individual tally to adjust the size of each bar based on the maximum. When we start talking about needing “smarter” variables, we usually need a new class. Let’s create a Results class.
class Results {
public $votes;
public $maximum;
public $multiplier;
public function __construct($votefile) {
$votes = file($votefile, FILE_IGNORE_NEW_LINES);
$votecounts = array_count_values($votes);
arsort($votecounts);
$this->votes = $votecounts;
$this->maximum = max($votecounts);
$this->multiplier = 100/$this->maximum;
}
}
Copy some of the code from VoteCounter’s counts method. The counts method will now return a Results object:
public function counts() {
return new Results($this->filePath);
}
And, now we can slightly modify our graph to have normalized widths:
<table class="graph">
<?php $results = $vote->counts(); ?>
<?php FOREACH ($results->votes as $choice=>$count):?>
<tr>
<th><?php echo $vote->choiceName($choice); ?></th>
<td>
<p style="width: <?php echo $count*$results->multiplier; ?>%;">
<?php echo $count; ?>
</p>
</td>
</tr>
<?php ENDFOREACH;?>
</table>
Because we’re now using percentage widths, we need to make sure the table itself has a width to be a percentage of. Add this to the <style> tag:
table.graph {
width: 90%;
}
table.graph td {
width: 70%;
}
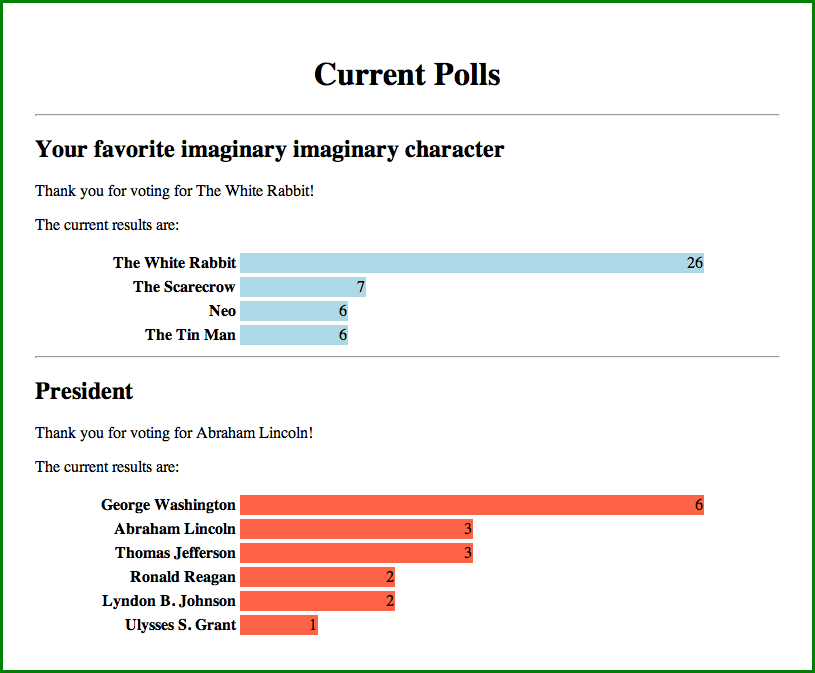
Notice that the longest bar in both cases is the same size. Each is at 100% of the width of the table cell.
Currently, both polls are the same color. Why not make them a different color to help differentiate them? For that matter, solid red is pretty bright. Let’s lighten them up at the same time. Add a default color to the property list for VoteCounter:
public $color = 'tomato';
And now change the color of the imaginary character poll:
$fictions = new VoteCounter('character', $imaginaries);
$fictions->setTitle('Your favorite imaginary imaginary character');
$fictions->color = 'lightblue';
$fictions->save();
Remove the hard-coded background color from the <style> tag and put it into the paragraph tag:
<p style="
background-color: <?php echo $vote->color; ?>;
width: <?php echo $count*$results->multiplier; ?>%;
">
You now have a very simple means of accepting, storing, and displaying poll results on a web page.
Storing form results in a flat file is easy, but it doesn’t let you manipulate the results easily. If you want to look at your data later you almost always want to store the data in a SQL database. SQL allows you to run queries on your data to see only parts of the data: only the votes from today, or only the votes from one IP address.
For purposes of this tutorial, I’m going to use SQLite, because it is available by default in PHP.
In SQLite, your database is stored as a file on the server. If your server has the sqlite3 command installed, you can access the database from the command line. You can also download the file regularly and look at it through various graphical interfaces you can download or purchase.
Like your include files, your database files should be outside of your web root. There should be no chance of someone visiting your web site and downloading your database directly!
There are two pieces of data I try to always collect on form submissions: the visitor’s IP address and the time that they made the submission. I might also collect other information if I think it would be useful, such as their browser/operating system, but that and everything else can be faked. The IP address and time, however, can be manipulated but they can’t be faked. They might choose to make one submission at home, one at Starbucks, and one at McDonald’s, and even one via a proxy, but they actually did make their submissions from those places. Barring a major misconfiguration on your server, the IP address the server sends to is the one they’re listening at. And there’s no way for them to convince your server that it’s a different time than it really is.
For this table, let’s store the field name, the ballot response, the IP address of the voter, and the time of the vote. Let’s also store the publicly-displayed name of their ballot response as well, just in case we need that later.
You can create this using the sqlite3 command if it’s installed:
sqlite3 ~/ballots/ballots.sqlite
CREATE TABLE votes (
ballot VARCHAR(50) NOT NULL,
vote VARCHAR(50) NOT NULL,
address VARCHAR(40) NOT NULL,
timeVoted DATETIME NOT NULL,
displayName VARCHAR(100) NOT NULL
);
.quit
chmod o+wr ~/ballots/ballots.sqlite
The CREATE TABLE command may be slightly different for different SQL database servers. For example, when using the sqlite3 command, you don’t want to type the tabs; I’ve included them here to make the CREATE TABLE command easier to read.
You can use “.schema” in sqlite3 to see the tables you’ve created.
If you don’t have sqlite3 on your server, but you do have it on your client, you can create the database file and then upload it. Just make sure that the file is writable by the web server, using something like the chmod command above.
If you don’t have the sqlite3 command anywhere, you can create the database using PHP. You’ll need to create a special file, view that file, and then delete that file so no one else can use it. You could call it create.php and put something like this in it:
<?php
$filename = '/home/USERNAME/ballots/ballots.sqlite';
touch($filename);
$database = new PDO("sqlite:$filename");
$database->query(
'CREATE TABLE votes (
ballot VARCHAR(50) NOT NULL,
vote VARCHAR(50) NOT NULL,
address VARCHAR(40) NOT NULL,
timeVoted DATETIME NOT NULL,
displayName VARCHAR(100) NOT NULL
)'
);
?>
This should create the database file for you, and one table in that database.
A table is kind of like the file that the current version of VoteCounter uses to store votes. Each record in the table is like one line in the votes file. Each record consists of columns, which makes it easy to associate a lot of data with each record. Where with the file it was easiest to store just the voter’s choice, in the “votes” database table here we have a column for their vote, a column for the ballot they were voting in, a column for their IP address, a column for when they voted, and a column for what they saw when they voted.
In SQL, you store and get records from the database using queries. The CREATE TABLE text is a query. If we wanted to get all of the votes for, say, the presidential poll, we would use a select query:
SELECT vote FROM votes WHERE ballot="president";
That selects every record from the votes table pertaining to the presidential ballot. You can type this query in the sqlite3 command line program. Currently, you won’t see anything, since we haven’t added records to the table.
Create records using the insert query.
INSERT INTO votes (ballot, vote, address, timeVoted, displayName) VALUES ("president", "2", "10.12.11.6", "2012-08-11 22:38:12", "Thomas Jefferson");
This will create one record for a ballot in the presidential poll. If you now run the above select query again, you should see the number (more specifically, the text) “2”. Change the select query to:
SELECT vote, displayName FROM votes WHERE ballot="president";
You should see “2|Thomas Jefferson”. In the sqlite3 command line, the pipe separates column values.
Subclass VoteCounter into SQLVoteCounter. We are going to override the save method to save to a database rather than to a file.
class SQLVoteCounter extends VoteCounter {
protected $database = '/home/USERNAME/ballots/ballots.sqlite';
//store the vote, if it exists, to a SQLite database
public function save() {
if ($this->submitted && $this->value !== '') {
$choice = $this->value;
$ballots = new PDO("sqlite:{$this->database}");
$insert = 'INSERT INTO votes (ballot, vote, address, timeVoted, displayName) VALUES (:ballot, :vote, :address, :timeVoted, :displayName)';
$inserter = $ballots->prepare($insert);
$values = array(
':ballot'=>$this->fieldName,
':vote'=>$choice,
':address'=>$_SERVER['REMOTE_ADDR'],
':timeVoted'=>gmdate('Y-m-d H:i:s'),
':displayName'=>$this->choices[$choice],
);
$inserter->execute($values);
$ballots = null;
$_SESSION[$this->fieldName] = $choice;
}
}
}
The IP address is easy: store REMOTE_ADDR. For dates and times, however, SQL uses a more readable format. Rather than the number of seconds since an arbitrary time, SQL uses a “YYYY-MM-DD HH:MM:SS” format. This is easy enough to create with a date/time format string. However, when storing dates/times in a database, it’s a good idea to use universal time. This ensures that if your server changes timezone—for example, you change servers from one in Philadelphia to one in Texas—your dates and times remain comparable.
PHP’s gmdate function works just like the date function, but it returns the results in Greenwich Mean Time.
gmdate('Y-m-d H:i:s');
Switch to the new SQLVoteCounter class in poll.php:
$fictions = new SQLVoteCounter('character', $imaginaries);
…
$election = new SQLVoteCounter('president', $presidents);
Kill your cookies, reload the page, and make another vote. If you look in the database using the command-line sqlite, you should see something like:
sqlite> select * from votes;
president|2|10.12.11.6|2012-08-12 18:14:35|Thomas Jefferson
The vote was successfully stored.
The votes are still being displayed from the flat file. We need to create a SQLResults class that will handle SQLite data instead of flat files. The easiest way to do this, since the SQLVoteCounter class already knows the ballot name ($this->fieldName) and database location, will be to pass the SQLResults class an executed query.
public function counts() {
$ballots = new PDO("sqlite:{$this->database}");
$query = 'SELECT vote, count(vote) AS voteCount FROM votes WHERE ballot=:ballot GROUP BY vote ORDER BY voteCount DESC';
$results = $ballots->prepare($query);
$results->execute(array(':ballot'=>$this->fieldName));
$results = new SQLResults($results);
$ballots = null;
return $results;
}
This creates a new PHP Data Object from the SQLite database file. It then constructs a query to get only the rows corresponding to this object’s poll. Then it uses the results of that query to construct a SQLResults object.
SQLResults extends the Results class. Currently the Results class does all its work in the __construct method. But we only need to override the part that reads in and constructs the votes property. Separate that part out of __construct in Results and put it in its own method:
public function __construct($votefile) {
$this->readVotes($votefile);
$this->maximum = max($this->votes);
$this->multiplier = 100/$this->maximum;
}
protected function readVotes($votefile) {
$votes = file($votefile, FILE_IGNORE_NEW_LINES);
$votecounts = array_count_values($votes);
arsort($votecounts);
$this->votes = $votecounts;
}
Now that the data import section is its own method, we can override that method in a new class.
class SQLResults extends Results {
//$ballots is a PDO statement object that has already had a query executed
protected function readVotes($ballots) {
$votecounts = array();
foreach ($ballots->fetchAll() as $row) {
$votecounts[$row['vote']] = $row['voteCount'];
}
$this->votes = $votecounts;
}
}
This uses the SQLite query to get the same information that array_count_values originally got. It loops through the results to create a votes property that has the vote as the key and the number of votes as the value. The values are sorted according to who got the most votes, so arsort is unnecessary.
It should display exactly what the flat file version of the vote counter displayed. It will start over with new votes, of course, since it’s a new file. You’ll need to repeatedly delete your server’s cookie to keep testing the voting.
We used PHP’s “PHP Data Objects” method of accessing the database, so everything should work the same in other databases that also use PDO. PHP’s PDO system is designed to make your database code portable. If you transfer your database from SQLite to another database server, you should be able to make it work by changing only one line, the line where you create the database object.
For example, if you’re using a MySQL server on mysql.example.com, you might change:
$database = new PDO('sqlite:/home/ACCOUNT/databases/poll.sqlite3')
to be something like:
$database = new PDO('mysql:host=mysql.example.com;dbname=poll', 'user', 'password');
Where in SQLite you create a database object by giving it the path to the database file, in most other database servers you’ll create a database object by giving it the hostname of the database server, the name of the database on that server, a user name for accessing that database, and a password for that user name.
The most useful book I’ve seen for PHP isn’t a book at all: it’s the PHP web site at http://php.net/.
“The best book on programming for the layman is Alice in Wonderland; but that’s because it’s the best book on anything for the layman.”
Programming is pretty easy. You find the function that does what you want, and you stick it in your web page; or you do a web search on “PHP” and whatever it is you want to do, and you find a snippet of code to copy and paste into your web page. Programming is simple; programming well is an art. It’s an art with only a few rules, simple to learn and difficult to master.
The cardinal rule is this: keep your code easy to read. Indent well. Correct indentation will solve bugs before they become bugs. Both your PHP include files and your HTML template files should be well indented, similar to the examples in this tutorial.
Name your functions, methods, variables, classes, and properties well. Their names should be short but should describe what that piece of code does. Do not use abbreviations unless those abbreviations have already become a word. “SQL” is a good abbreviation; “db” is not.
Use comments liberally. Every method and function more complex than two or three lines should have a comment describing what it expects and what it does. Every section of code inside your methods and functions should be commented. And even your properties and variables often need comments to remind you of what they’re meant for later. You can always remove comments if they’re too obvious later; it’s difficult to put them in once you’ve forgotten what the code means.
Keep your methods short. Once a method takes up more than a screen, it’s time to break it into parts, each part performing a discrete and useful function.
Use standard naming schemes. Capitalize your class names. If you use camelCase for methods, properties, variables, and functions, use them consistently. If you use under_scores instead of camelCase, use it consistently.
When you paste code snippets from the web into your own include files and web pages, understand what every part of the code means. If you don’t, your code will build up cruft that probably isn’t necessary but that you’re afraid to remove.
Don’t repeat yourself! Two pieces of code doing the same thing should be combined into a single method or function. Two lines of code not doing the same thing should not be combined into a single method or function.
Other advice you may find useful are Wil Shipley’s Free Programming Tips are Worth Every Penny (http://hoboes.com/samurai) and Jeff Atwood’s Curly’s Law: Do One Thing (http://hoboes.com/curly).
Version 1.3, 3 November 2008
Copyright (C) 2000, 2001, 2002, 2007, 2008 Free Software Foundation, Inc. <http://fsf.org/>
Everyone is permitted to copy and distribute verbatim copies of this license document, but changing it is not allowed.
The purpose of this License is to make a manual, textbook, or other functional and useful document “free” in the sense of freedom: to assure everyone the effective freedom to copy and redistribute it, with or without modifying it, either commercially or noncommercially. Secondarily, this License preserves for the author and publisher a way to get credit for their work, while not being considered responsible for modifications made by others.
This License is a kind of “copyleft”, which means that derivative works of the document must themselves be free in the same sense. It complements the GNU General Public License, which is a copyleft license designed for free software.
We have designed this License in order to use it for manuals for free software, because free software needs free documentation: a free program should come with manuals providing the same freedoms that the software does. But this License is not limited to software manuals; it can be used for any textual work, regardless of subject matter or whether it is published as a printed book. We recommend this License principally for works whose purpose is instruction or reference.
This License applies to any manual or other work, in any medium, that contains a notice placed by the copyright holder saying it can be distributed under the terms of this License. Such a notice grants a world-wide, royalty-free license, unlimited in duration, to use that work under the conditions stated herein. The “Document”, below, refers to any such manual or work. Any member of the public is a licensee, and is addressed as “you”. You accept the license if you copy, modify or distribute the work in a way requiring permission under copyright law.
A “Modified Version” of the Document means any work containing the Document or a portion of it, either copied verbatim, or with modifications and/or translated into another language.
A “Secondary Section” is a named appendix or a front-matter section of the Document that deals exclusively with the relationship of the publishers or authors of the Document to the Document’s overall subject (or to related matters) and contains nothing that could fall directly within that overall subject. (Thus, if the Document is in part a textbook of mathematics, a Secondary Section may not explain any mathematics.) The relationship could be a matter of historical connection with the subject or with related matters, or of legal, commercial, philosophical, ethical or political position regarding them.
The “Invariant Sections” are certain Secondary Sections whose titles are designated, as being those of Invariant Sections, in the notice that says that the Document is released under this License. If a section does not fit the above definition of Secondary then it is not allowed to be designated as Invariant. The Document may contain zero Invariant Sections. If the Document does not identify any Invariant Sections then there are none.
The “Cover Texts” are certain short passages of text that are listed, as Front-Cover Texts or Back-Cover Texts, in the notice that says that the Document is released under this License. A Front-Cover Text may be at most 5 words, and a Back-Cover Text may be at most 25 words.
A “Transparent” copy of the Document means a machine-readable copy, represented in a format whose specification is available to the general public, that is suitable for revising the document straightforwardly with generic text editors or (for images composed of pixels) generic paint programs or (for drawings) some widely available drawing editor, and that is suitable for input to text formatters or for automatic translation to a variety of formats suitable for input to text formatters. A copy made in an otherwise Transparent file format whose markup, or absence of markup, has been arranged to thwart or discourage subsequent modification by readers is not Transparent. An image format is not Transparent if used for any substantial amount of text. A copy that is not “Transparent” is called “Opaque”.
Examples of suitable formats for Transparent copies include plain ASCII without markup, Texinfo input format, LaTeX input format, SGML or XML using a publicly available DTD, and standard-conforming simple HTML, PostScript or PDF designed for human modification. Examples of transparent image formats include PNG, XCF and JPG. Opaque formats include proprietary formats that can be read and edited only by proprietary word processors, SGML or XML for which the DTD and/or processing tools are not generally available, and the machine-generated HTML, PostScript or PDF produced by some word processors for output purposes only.
The “Title Page” means, for a printed book, the title page itself, plus such following pages as are needed to hold, legibly, the material this License requires to appear in the title page. For works in formats which do not have any title page as such, “Title Page” means the text near the most prominent appearance of the work’s title, preceding the beginning of the body of the text.
The “publisher” means any person or entity that distributes copies of the Document to the public.
A section “Entitled XYZ” means a named subunit of the Document whose title either is precisely XYZ or contains XYZ in parentheses following text that translates XYZ in another language. (Here XYZ stands for a specific section name mentioned below, such as “Acknowledgements”, “Dedications”, “Endorsements”, or “History”.) To “Preserve the Title” of such a section when you modify the Document means that it remains a section “Entitled XYZ” according to this definition.
The Document may include Warranty Disclaimers next to the notice which states that this License applies to the Document. These Warranty Disclaimers are considered to be included by reference in this License, but only as regards disclaiming warranties: any other implication that these Warranty Disclaimers may have is void and has no effect on the meaning of this License.
You may copy and distribute the Document in any medium, either commercially or noncommercially, provided that this License, the copyright notices, and the license notice saying this License applies to the Document are reproduced in all copies, and that you add no other conditions whatsoever to those of this License. You may not use technical measures to obstruct or control the reading or further copying of the copies you make or distribute. However, you may accept compensation in exchange for copies. If you distribute a large enough number of copies you must also follow the conditions in section 3.
You may also lend copies, under the same conditions stated above, and you may publicly display copies.
If you publish printed copies (or copies in media that commonly have printed covers) of the Document, numbering more than 100, and the Document’s license notice requires Cover Texts, you must enclose the copies in covers that carry, clearly and legibly, all these Cover Texts: Front-Cover Texts on the front cover, and Back-Cover Texts on the back cover. Both covers must also clearly and legibly identify you as the publisher of these copies. The front cover must present the full title with all words of the title equally prominent and visible. You may add other material on the covers in addition. Copying with changes limited to the covers, as long as they preserve the title of the Document and satisfy these conditions, can be treated as verbatim copying in other respects.
If the required texts for either cover are too voluminous to fit legibly, you should put the first ones listed (as many as fit reasonably) on the actual cover, and continue the rest onto adjacent pages.
If you publish or distribute Opaque copies of the Document numbering more than 100, you must either include a machine-readable Transparent copy along with each Opaque copy, or state in or with each Opaque copy a computer-network location from which the general network-using public has access to download using public-standard network protocols a complete Transparent copy of the Document, free of added material. If you use the latter option, you must take reasonably prudent steps, when you begin distribution of Opaque copies in quantity, to ensure that this Transparent copy will remain thus accessible at the stated location until at least one year after the last time you distribute an Opaque copy (directly or through your agents or retailers) of that edition to the public.
It is requested, but not required, that you contact the authors of the Document well before redistributing any large number of copies, to give them a chance to provide you with an updated version of the Document.
You may copy and distribute a Modified Version of the Document under the conditions of sections 2 and 3 above, provided that you release the Modified Version under precisely this License, with the Modified Version filling the role of the Document, thus licensing distribution and modification of the Modified Version to whoever possesses a copy of it. In addition, you must do these things in the Modified Version:
A. Use in the Title Page (and on the covers, if any) a title distinct from that of the Document, and from those of previous versions (which should, if there were any, be listed in the History section of the Document). You may use the same title as a previous version if the original publisher of that version gives permission.
B. List on the Title Page, as authors, one or more persons or entities responsible for authorship of the modifications in the Modified Version, together with at least five of the principal authors of the Document (all of its principal authors, if it has fewer than five), unless they release you from this requirement.
C. State on the Title page the name of the publisher of the Modified Version, as the publisher.
D. Preserve all the copyright notices of the Document.
E. Add an appropriate copyright notice for your modifications adjacent to the other copyright notices.
F. Include, immediately after the copyright notices, a license notice giving the public permission to use the Modified Version under the terms of this License, in the form shown in the Addendum below.
G. Preserve in that license notice the full lists of Invariant Sections and required Cover Texts given in the Document’s license notice.
H. Include an unaltered copy of this License.
I. Preserve the section Entitled “History”, Preserve its Title, and add to it an item stating at least the title, year, new authors, and publisher of the Modified Version as given on the Title Page. If there is no section Entitled “History” in the Document, create one stating the title, year, authors, and publisher of the Document as given on its Title Page, then add an item describing the Modified Version as stated in the previous sentence.
J. Preserve the network location, if any, given in the Document for public access to a Transparent copy of the Document, and likewise the network locations given in the Document for previous versions it was based on. These may be placed in the “History” section. You may omit a network location for a work that was published at least four years before the Document itself, or if the original publisher of the version it refers to gives permission.
K. For any section Entitled “Acknowledgements” or “Dedications”, Preserve the Title of the section, and preserve in the section all the substance and tone of each of the contributor acknowledgements and/or dedications given therein.
L. Preserve all the Invariant Sections of the Document, unaltered in their text and in their titles. Section numbers or the equivalent are not considered part of the section titles.
M. Delete any section Entitled “Endorsements”. Such a section may not be included in the Modified Version.
N. Do not retitle any existing section to be Entitled “Endorsements” or to conflict in title with any Invariant Section.
O. Preserve any Warranty Disclaimers.
If the Modified Version includes new front-matter sections or appendices that qualify as Secondary Sections and contain no material copied from the Document, you may at your option designate some or all of these sections as invariant. To do this, add their titles to the list of Invariant Sections in the Modified Version’s license notice. These titles must be distinct from any other section titles.
You may add a section Entitled “Endorsements”, provided it contains nothing but endorsements of your Modified Version by various parties—for example, statements of peer review or that the text has been approved by an organization as the authoritative definition of a standard.
You may add a passage of up to five words as a Front-Cover Text, and a passage of up to 25 words as a Back-Cover Text, to the end of the list of Cover Texts in the Modified Version. Only one passage of Front-Cover Text and one of Back-Cover Text may be added by (or through arrangements made by) any one entity. If the Document already includes a cover text for the same cover, previously added by you or by arrangement made by the same entity you are acting on behalf of, you may not add another; but you may replace the old one, on explicit permission from the previous publisher that added the old one.
The author(s) and publisher(s) of the Document do not by this License give permission to use their names for publicity for or to assert or imply endorsement of any Modified Version.
You may combine the Document with other documents released under this License, under the terms defined in section 4 above for modified versions, provided that you include in the combination all of the Invariant Sections of all of the original documents, unmodified, and list them all as Invariant Sections of your combined work in its license notice, and that you preserve all their Warranty Disclaimers.
The combined work need only contain one copy of this License, and multiple identical Invariant Sections may be replaced with a single copy. If there are multiple Invariant Sections with the same name but different contents, make the title of each such section unique by adding at the end of it, in parentheses, the name of the original author or publisher of that section if known, or else a unique number. Make the same adjustment to the section titles in the list of Invariant Sections in the license notice of the combined work.
In the combination, you must combine any sections Entitled “History” in the various original documents, forming one section Entitled “History”; likewise combine any sections Entitled “Acknowledgements”, and any sections Entitled “Dedications”. You must delete all sections Entitled “Endorsements”.
You may make a collection consisting of the Document and other documents released under this License, and replace the individual copies of this License in the various documents with a single copy that is included in the collection, provided that you follow the rules of this License for verbatim copying of each of the documents in all other respects.
You may extract a single document from such a collection, and distribute it individually under this License, provided you insert a copy of this License into the extracted document, and follow this License in all other respects regarding verbatim copying of that document.
A compilation of the Document or its derivatives with other separate and independent documents or works, in or on a volume of a storage or distribution medium, is called an “aggregate” if the copyright resulting from the compilation is not used to limit the legal rights of the compilation’s users beyond what the individual works permit. When the Document is included in an aggregate, this License does not apply to the other works in the aggregate which are not themselves derivative works of the Document.
If the Cover Text requirement of section 3 is applicable to these copies of the Document, then if the Document is less than one half of the entire aggregate, the Document’s Cover Texts may be placed on covers that bracket the Document within the aggregate, or the electronic equivalent of covers if the Document is in electronic form. Otherwise they must appear on printed covers that bracket the whole aggregate.
Translation is considered a kind of modification, so you may distribute translations of the Document under the terms of section 4. Replacing Invariant Sections with translations requires special permission from their copyright holders, but you may include translations of some or all Invariant Sections in addition to the original versions of these Invariant Sections. You may include a translation of this License, and all the license notices in the Document, and any Warranty Disclaimers, provided that you also include the original English version of this License and the original versions of those notices and disclaimers. In case of a disagreement between the translation and the original version of this License or a notice or disclaimer, the original version will prevail.
If a section in the Document is Entitled “Acknowledgements”, “Dedications”, or “History”, the requirement (section 4) to Preserve its Title (section 1) will typically require changing the actual title.
You may not copy, modify, sublicense, or distribute the Document except as expressly provided under this License. Any attempt otherwise to copy, modify, sublicense, or distribute it is void, and will automatically terminate your rights under this License.
However, if you cease all violation of this License, then your license from a particular copyright holder is reinstated (a) provisionally, unless and until the copyright holder explicitly and finally terminates your license, and (b) permanently, if the copyright holder fails to notify you of the violation by some reasonable means prior to 60 days after the cessation.
Moreover, your license from a particular copyright holder is reinstated permanently if the copyright holder notifies you of the violation by some reasonable means, this is the first time you have received notice of violation of this License (for any work) from that copyright holder, and you cure the violation prior to 30 days after your receipt of the notice.
Termination of your rights under this section does not terminate the licenses of parties who have received copies or rights from you under this License. If your rights have been terminated and not permanently reinstated, receipt of a copy of some or all of the same material does not give you any rights to use it.
The Free Software Foundation may publish new, revised versions of the GNU Free Documentation License from time to time. Such new versions will be similar in spirit to the present version, but may differ in detail to address new problems or concerns. See http://www.gnu.org/copyleft/.
Each version of the License is given a distinguishing version number. If the Document specifies that a particular numbered version of this License “or any later version” applies to it, you have the option of following the terms and conditions either of that specified version or of any later version that has been published (not as a draft) by the Free Software Foundation. If the Document does not specify a version number of this License, you may choose any version ever published (not as a draft) by the Free Software Foundation. If the Document specifies that a proxy can decide which future versions of this License can be used, that proxy’s public statement of acceptance of a version permanently authorizes you to choose that version for the Document.
“Massive Multiauthor Collaboration Site” (or “MMC Site”) means any World Wide Web server that publishes copyrightable works and also provides prominent facilities for anybody to edit those works. A public wiki that anybody can edit is an example of such a server. A “Massive Multiauthor Collaboration” (or “MMC”) contained in the site means any set of copyrightable works thus published on the MMC site.
“CC-BY-SA” means the Creative Commons Attribution-Share Alike 3.0 license published by Creative Commons Corporation, a not-for-profit corporation with a principal place of business in San Francisco, California, as well as future copyleft versions of that license published by that same organization.
“Incorporate” means to publish or republish a Document, in whole or in part, as part of another Document.
An MMC is “eligible for relicensing” if it is licensed under this License, and if all works that were first published under this License somewhere other than this MMC, and subsequently incorporated in whole or in part into the MMC, (1) had no cover texts or invariant sections, and (2) were thus incorporated prior to November 1, 2008.
The operator of an MMC Site may republish an MMC contained in the site under CC-BY-SA on the same site at any time before August 1, 2009, provided the MMC is eligible for relicensing.
PHP is a full programming language that lets you easily add dynamic content to your web pages. If you have a database with data that needs to be displayed on your web pages or edited from your web pages, PHP lets you quickly mock-up a form and form processor. PHP includes support for many databases out of the box. In this tutorial, learn how to use PHP to create and manage simple forms. Store the form data in a file, in email, or in a database. And use that data to provide a better web experience for your visitors.
