Using Netscape Composer 7.2/SeaMonkey Composer
Permission is granted to copy, distribute and/or modify this document under the terms of the GNU Free Documentation License, Version 1.3, published by the Free Software Foundation. A copy of the license is included in the section entitled “GNU Free Documentation License”.
SeaMonkey Composer is a powerful web page editor. It allows you to easily create web pages, and it allows you to easily switch between different modes of editing as your needs advance. If you never want to see any HTML tags, you can edit all of your pages in Preview. If you want to occasionally switch to seeing only your HTML tags, you can quickly switch to HTML Source or to HTML Tag view, make your change, and then return to the familiar Preview or Edit views.
It is also free. You can download it from http://www.seamonkey-project.org/. You’ll probably want a fast connection.
This tutorial is designed around Netscape Composer; I have not yet updated it for SeaMonkey. However, a cursory look indicates that the software hasn’t changed much. The screenshots that I had to recreate because I couldn’t find the old ones are almost the same, and the basic concepts should be similar in any web page editor.
You can always switch from one good web editor to another good editor. Almost all web page editors (and all good web page editors) use HTML, or HyperText Markup Language. This means that you can use one web page editor now and later decide to switch to another editor without losing any work. It’s all HTML, and they can all read each other’s work.
Netscape has come a long way, but it still has some problems that might make it less useful for you.
Line Break Love Affair: Netscape’s love affair with the line break is somewhat annoying if you don’t edit your HTML directly, and very annoying if you do. The default unit of sentences in a web page should be paragraphs, but Netscape appears stuck in a seventies line-editing time-warp. When you press return on your keyboard, you don’t get a new paragraph, you just break the line in the current set of text. What looks like a paragraph to you does not look like a paragraph to web browsers or other automated web page tools. Even when you switch a line to a paragraph using the style menu, the line break remains stuck on the end of your paragraph like a useless appendix.
In SeaMonkey, you may be able to fix this by checking “Return in a paragraph always creates a new paragraph”.
Insecure File Uploads: Netscape does not support secure file uploads. It uses the old FTP instead of secure FTP or secure copy. This means that every time you upload a file to your web site, your password is sent over the net in plain text.
Dynamic Web Code: Netscape throws out certain kinds of dynamic web code. If you use PHP or ASP, for example, Netscape completely throws out the dynamic portions of your web site.
Indentation: Netscape does not support any automatic indentation tools. You probably don’t care about this if you don’t edit HTML, but if you do edit your HTML directly, this makes it difficult to maintain readable HTML. All you can use for indentation are spaces, and you need to indent every single line individually.
In Netscape Composer’s Preferences, there is a section for “Composer”.
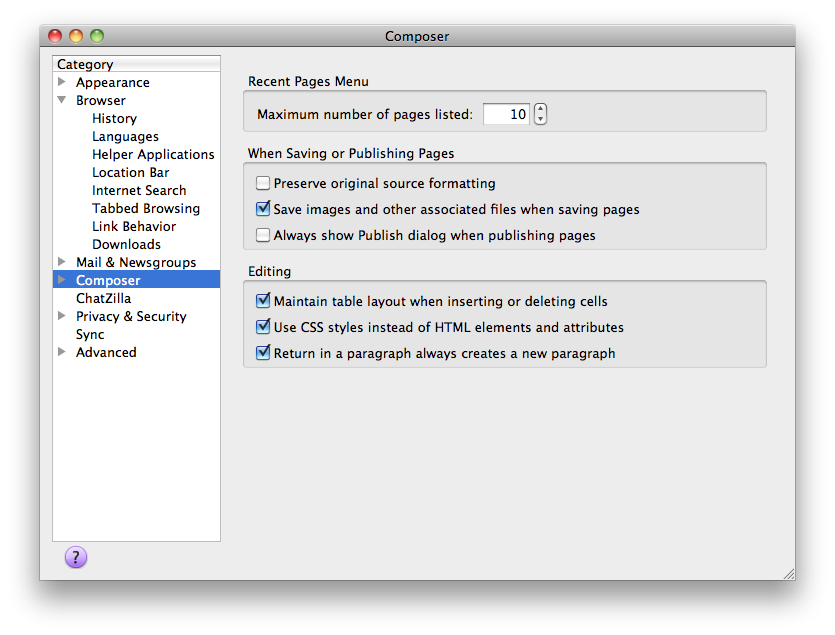
I recommend setting “use CSS styles instead of HTML elements and attributes”. This doesn’t affect the editing functionality of Netscape’s editing toolbar, but it does allow you to more reliably add much greater stylistic variation to your web pages.
“Retain original source formatting” or “Reformat HTML Source” controls whether Netscape reformats any HTML you type in. As a beginner, you may wish to have Netscape reformat your source; later, you may wish to change this to retain your own formatting.
Create a new web page by pulling down the “File” menu, choosing the “New” submenu, and then the “Composer Page” item. This brings up a blank page.
You can also choose “Composer” from the “Window” menu and then use the normal “File:Open” menu item to open an existing file. If you wish to start from a page on the web, you can view that page using Netscape’s browser, and then choose “Edit Page” from the “File” menu. This will open the page in Netscape Composer, where you can make whatever changes you wish and then save it to your local hard drive.
Netscape allows you to have “unstyled” text, text that doesn’t belong to any “paragraph-level” formatting. It calls this “Body Text”. In general, you shouldn’t do this. All of your text should be part of a paragraph, a heading, a list, a table, or some paragraph-level style. You should avoid the “Body Text” feature in HTML if you are creating professional web pages.
HTML tags “mean” something about the text that they enclose. Paragraph tags do not specify line breaks. They specify that the enclosed text is a paragraph. Different browsers will display paragraphs in different manners. Similarly, for headlines you do not specify a large font with bold as you do in a word processor, but simply that the text is a headline. There are a large variety of browsers available. A cell phone might display headlines differently than a larger browser, and an audio reader will likely display headlines in a completely different, non-visual manner.
By using tags that impart meaning to the text they enclose, browsers can more effectively display your information to a wider variety of readers, whether those readers speak the language the text was written in, whether they are viewing it on tiny or large displays, and whether they are viewing it at all instead of listening to it or touching it.
The typographical command to indent some text by three spaces and use a smaller font for quoted text means nothing to an audio reader, and if followed slavishly by a personal digital assistant could render a document unreadable. But the tag that specifies that the text is quoted text can be rendered appropriately according to the viewer’s needs.
Set a paragraph by highlighting some text in a paragraph and choosing “paragraph” from the style menu.
The “Heading” styles are levels of headlines for your pages. In most visual web browsers, headlines will be shown as bold in large text, with extra space above and below.
You can think of headlines as sort of an outline of your page. Things that would be on the same level in an outline will have the same “heading” number. Your main headline is usually heading 1. You will often only have one heading 1 on your page. Your main sections will probably each have a heading 2. Sections within those sections will each have a heading 3, and so on. While there are headings going all the way to heading 6, if you have headings 4 or higher you may wish to consider breaking your page into multiple pages and “promoting” each heading to a higher level.
Each heading level is generally displayed as slightly smaller than the previous level. Heading level 1 is the largest, heading level 2 is slightly smaller, heading level 3 is slightly smaller than that, and so on. Search engines also will use headlines to assist them while indexing a web page’s keywords. Your headlines should be short and informative, precisely describing the topic that follows.
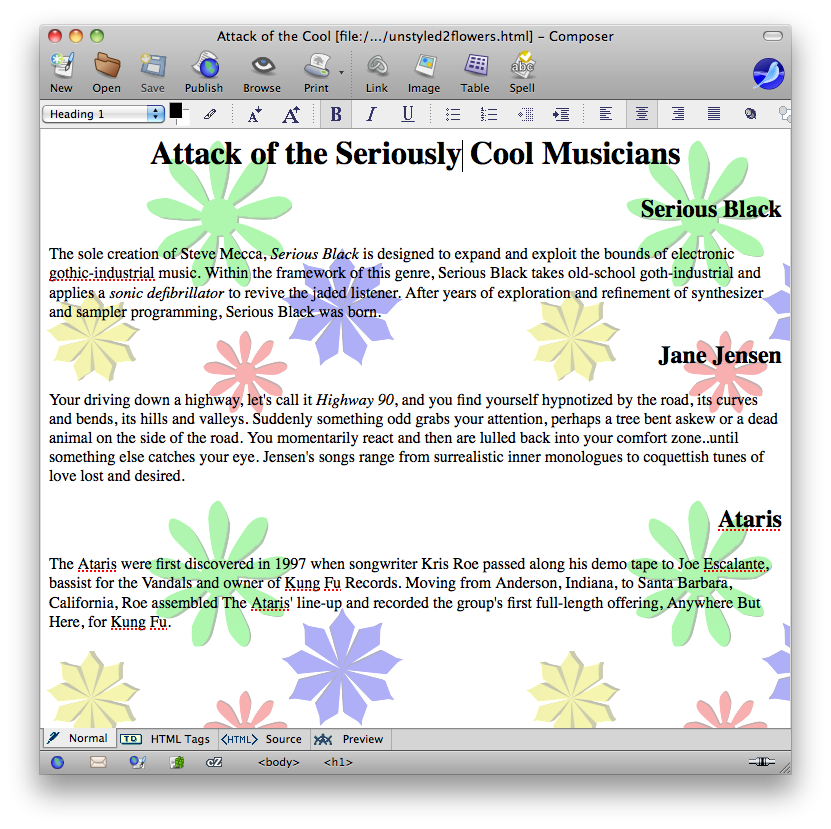
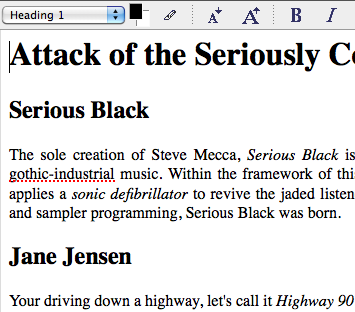
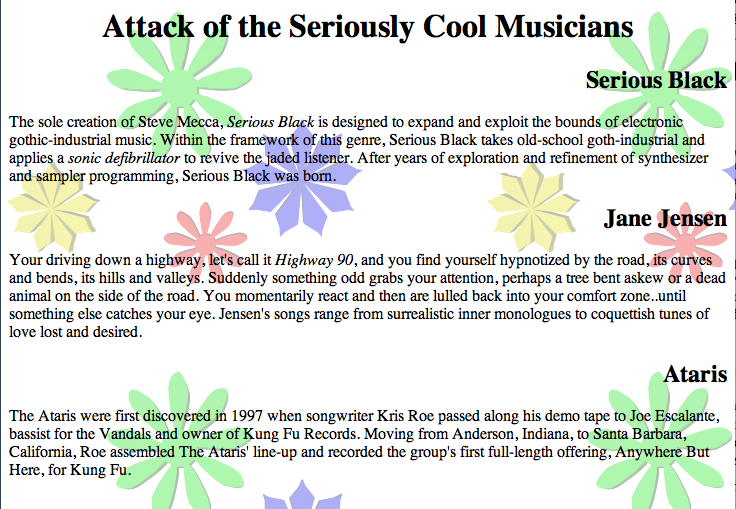
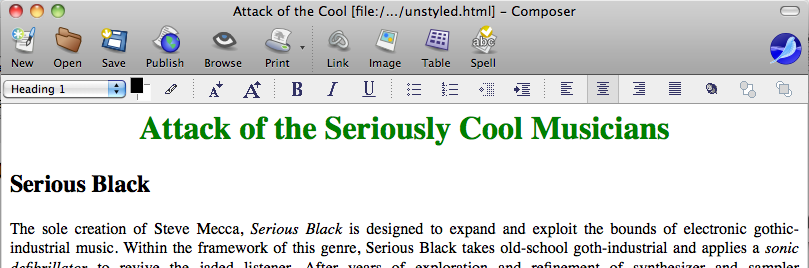
Here, we have one heading 1 giving the title of the web page, followed by two heading 2 headlines describing two musicians.
Go ahead and create your own web page. Give it one level one headline and several one- or two-paragraph sections. Precede each section with a level two headline.
Character-level tags are like italics or bold in your word processor. They are styles that can be applied to individual characters, and do not have to affect an entire paragraph.
Like paragraph level tags, where you want to use tags that “mean something”, you don’t want to use simply “italics” to italicize both emphasized text and citations. You’ll want to use the tag for emphasis when you want the text emphasized, and for citations when you are “italicizing” a citation reference.
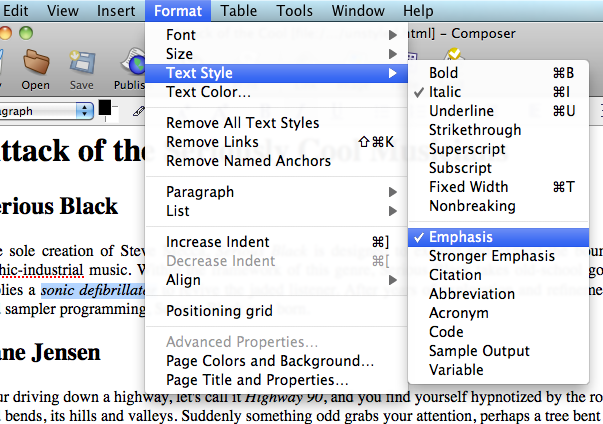
On paper, italics are probably most often used to emphasize text. They’re a typographical tool for printing. On the web, many of your browsers are not viewing your page on a piece of paper; many are not viewing it at all. Instead of using italics, you can use emphasis. On visual displays, emphasis will be displayed as italic. Search engines can recognize emphasized text and rank it differently than normal text. And alternative browsers such as audio browsers can alter their output to emphasize the text in a manner appropriate to their “viewers”. An audio browser will change its inflection over the emphasized text, for example.
You have two levels of emphasis available to you: emphasis, and a stronger emphasis. The stronger emphasis is usually displayed in bold when visually rendered.
If you don’t mean to emphasize the text, but merely want typographical tags that do not affect search engine placement, vocalization, or other forms of display emphasis, you can use the italics, bold, and other typographical tags from the “Text Style” menu item under the “Format” menu.
Apply some emphasis to words or phrases on your page. If you don’t have any text that requires emphasis, add some sentences with some words that do require emphasis.
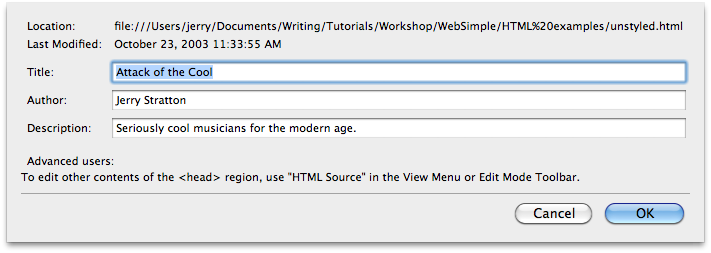
Web pages contain some information that is not displayed on the page. This information makes it easier for computers, such as web browsers and web search engines, to use the page. Under the “Format” menu, you have “Page Title and Properties”. This allows you to set the title and description of your page.
The “Location” shows the location of your web page on your hard drive. You should save your web page on a regular basis: if the power goes out or if you have some other troubles that cause your computer to shut down or crash, you can lose your work if you haven’t saved.
Your web pages should almost always end in “.html”. They should generally not contain any special characters: limit yourself to letters and numbers. This makes it easier for others to type in your URLs and to link to your web pages.
Within any of your web folders, one of your HTML files can be your “main” web page. When viewers request or editors link to the folder (such as “http://www.hoboes.com/NetLife/”) they’ll get the “main” file. Usually, the main file must be named “index.html”, but you should check with your service provider. Providing a main file simplifies the task of reaching your web pages.
You should save your web pages in the same order and with the same file structure that you use on your web site. Otherwise, your links are likely to fail when you upload your web pages from your hard drive to your web site.
Your title is the most visible of the three tags in this section. It is displayed in the “window bar” at the top of most large visual web browsers. If one of your readers bookmarks your page, the title is usually used as the name of the bookmark. When search engines index your page into their database, they display your title as the headline for your page when your page comes up in their hit list.
Because of this, you should take care that your title is useful and informative. Long titles are difficult to read in bookmark menus. Uninformative titles cause people to pass over your site in search engine listings. Your titles should be kept short and describe your site.
Often, your title will be an abridged version of your level one headline.
Your description is used to summarize the contents of your web site. Some search engines will display your description along with your title. (Others will summarize your page themselves automatically, and others will write a summary of your site by hand.)
Your description should be short, one or two lines at most, and descriptive of your site.
Give your page a title and a description, and then save it as “index.html”.
Some HTML tags can be contained within other tags. Emphasized text can be part of a paragraph, for example. And Paragraphs are part of the body, or document, of your web page. Netscape keeps track of all of the tags that enclose whatever text you currently have selected.

At the bottom of the page, you see a “tag trail” of the tags you’ve applied to your text. You can select wider amounts of your document by selecting higher levels of the tag trail. For example, if your cursor is flashing in an emphasized phrase, in a paragraph, in the body of your document, you can click on the ‘em’ tag in the tag trail and the entire emphasized phrase will be selected. If you click on the ‘p’ tag, the entire paragraph will be selected. If you click on the ‘body’ tag, the entire document will be selected.
While you want to use meaningful styles as much as possible, most of your web viewers will probably be viewing your site from a web browser (although with the advent of personal digital assistants, this may change). There are styles you can add to your page that are only visible in a visual browser. You have a large variety of stylistic variation available to you, but the most common ones are paragraph-level alignment and your page’s colors.

You can align paragraph-level text left, right, or centered. You can also justify the text, although in some cases web browsers are not good at justification. They do not, for example, have the option of hyphenating on the fly to provide aesthetic justification.

Most often, you will use the alignment buttons to change the alignment on your headlines. Alignment changes (other than perhaps justification) on paragraphs will generally make your page harder to read.
By default, your page is shown in whatever colors the reader of the page prefers. This is often the best choice. There are a lot of colors on a normal web page: the color of the background, the color of the text, the color of the links, the color of the visited links, and the color of “active” links. (The active link color is used while a viewer clicks on a link.)
When you change one color, you need to consider changing them all. If you change the background color to blue, it might seem nice with black text, but your links, which default to blue in many browsers, are likely to become invisible.
Unless your page specifically needs certain colors, it is easier to leave them alone. We’ve come a long way since the default black text on a grey background. Most browsers today default to dark grey or black on a white background—which is what most professional web editors choose anyway. By leaving your colors alone, you let the viewer choose whatever is easiest for them to read.
You can change the page colors from the “Page Colors and Background” item under the “Format” menu.
Besides an option for colors, you also can place a background image on your page. If you place a background image, it will override any background color you choose. We’ll talk about images later, but for now you should know that any image on your page, including background images, should be either a GIF file, a JPEG file, or a PNG file. You should also ensure that the content of your page is easily read over every part of your background. You don’t know how your readers will size their windows while they are reading your page. If the image is not as large as the viewer’s browser window, it will “tile” up and down.
One of the major advantages of the HTML format over older hyperlinking protocols was that HTML pages can contain links to other pages as part of the normal content. Any text or image in your content can be linked to any other web page on the web. You can also link it to “anchors” within the same document, automatically scrolling the page to that anchor when the viewer selects that link.
Links generally appear as colored text which change color when the viewer visits the link.
It is important to choose good, descriptive things for the reader to click on. Remember that not everyone is reading your web page from a ‘standard’ browser. Some will be having the web page read to them. Some will be reading from tiny PDAs which will summarize the links and their clickable text. Search engines also use link text to weight the linked pages.
If all of your links use the text “click here”, those summaries will be worthless to your viewers. It is better to link actual descriptive text, such as “Hoboes Web Tutorial” or “Jesus and Friends”.
If you make clickable images, you need to make those links descriptive also. Make sure you set the ‘alternate text’ for the image. See the section on images for more information.
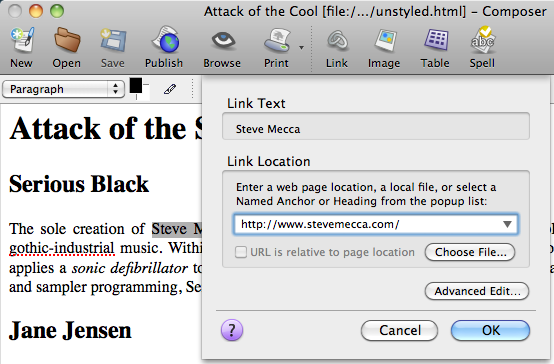
Remote Pages are the easiest to link to. Highlight the text or image that you want your viewers to select to visit the new link, choose “Link” from the “Insert” menu, and enter the URL.
You must enter a full URL. When you browse the web, many browsers will guess at what you mean, but when you enter a page into a composer page you must type the full URL, beginning with “http://”, following with the hostname, and then following with the path to the page you’re linking to. The general form of most of the URLs you will use is service://hostname/path. The “service” is almost always “http” but sometimes it will be “https” (a secure web page). There are others, however, and we’ll look at an e-mail URL in just a bit.
Many hostnames will begin with “www”, but not all of them will. If you add “www” to a hostname that doesn’t contain it, it might not work. The hostname is simply the name of the computer that the web pages are served from. There is a convention to name this computer “www”, but that is only a convention and is neither required nor expected.
The path often ends with “.html” but may end with anything. The path for the main page of a particular hostname’s site is almost always “/”. Subsidiary pages will have longer paths. The following are all valid (as of this writing) web URLs:
http://www.hoboes.com/FireBlade/Fiction/Wilde/
http://www.godsmonsters.com/Guide/
A URL may never contain a space.
The easiest way to ensure that your URLs are correct is to visit the page in your browser and then copy the URL from the location bar.
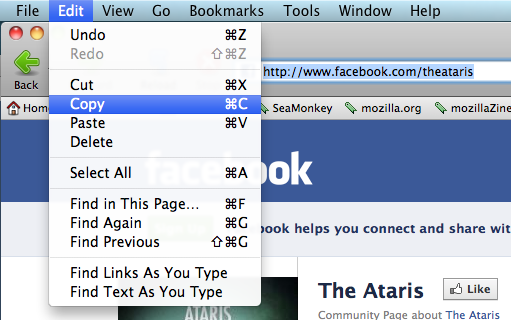
If you can copy the URL directly from where you know that it works, you can be reasonably certain that it will work for others who visit your page. Then just paste it into the “Link Location” box.
If you have more than one page on your site, you will want to keep all of your pages in the same area of your local hard drive. Netscape can then upload them as they change. (You’ll need to use the “Publish” menu item, which we won’t go into here.)
If you have a small number of pages, you’ll probably keep them all in the same directory. If you have a large number of pages, you may wish to organize them in separate directories, but keep those separate directories grouped together under the same containing directory. When you upload the files, you will need to keep the same organization on the “real” web site. This allows Netscape Composer to correctly link to your local pages. If you keep your pages in different areas across your hard drive, then when Netscape links to them it doesn’t know where the page really is on the real web site. Often, it will assume that you are linking to a file on your local drive—meaning that only you will be able to visit the link, since only you have access to your local drive.
Linking to a page that is in the same directory as your current page is almost as easy as linking to pages elsewhere on the net. Go to the same “Insert Link” menu item or button, but instead of pasting the URL, click on “Choose File…” and select the file you wish to link to. If, for example, you are linking to a page called “gothic.html”, gothic.html will then appear in the “Link Location” box.
Try to keep your pages called “something.html”, where “something” is a very short descriptive name of what your page contains. Keep spaces and special characters out of your web page filenames. While it is possible to link to files with spaces and other special characters, it increases the chances that someone will do so incorrectly, creating broken links to your site.
When linking to pages on your site, you do not need to use the full URL. You’ll notice that when you link using Netscape Composer’s “Choose File…” button, it will link to simply the filename if the file is in the same folder as the file you’re linking from. This is a relative URL. That URL is assumed to be relative to the page the link is embedded in. If a web browser is currently displaying http://www.hoboes.com/Mimsy/ and the link is to “copyright.shtml”, the browser constructs the URL http://www.hoboes.com/Mimsy/copyright.shtml. If the page http://www.hoboes.com/FireBlade/fiction.shtml contains a link to “Wilde/”, the browser constructs the URL http://www.hoboes.com/FireBlade/Wilde/.
Your relative links can also contain the full path but leave out the hostname. Such a link begins with a slash. If the page http://www.hoboes.com/FireBlade/Wilde/ contains a link to /Politics/Prohibition/ the browser constructs the URL http://www.hoboes.com/Politics/Prohibition/.
Normally you don’t have to worry about relative links, as Netscape Composer will handle them for you when you choose your files. You must keep your local copies of your web files in the same “order” that they are on your web site for Composer to construct these links correctly, however. Your copy of your site on your hard drive should be exactly the same as your copy on your server.
Using relative links makes it very easy to move your web pages from one server to another. Since none of your relative links contain the hostname, your links will continue to work even though the hostname has changed.
Normally, you will not have multiple large sections on a single page. If you have multiple large sections, you’ll probably want to separate the sections out into multiple pages, one for each section. Sometimes, however, you will want to have a long page and link to different places within that page.
The easiest places within your page to link to are your headlines. Netscape automatically lists your headlines when you click on the down arrow in the “Insert Link” box.
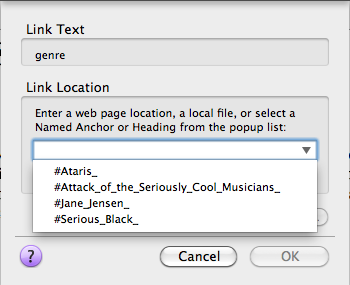
If you choose one of your headlines from the list, Netscape automatically creates an anchor for you at that headline. (Click on Preview to see the page as it appears on the web—the yellow anchor will not show up on the web.)
 If you wish to create an anchor somewhere other than at a headline, click where you want the anchor to be, pull down the “Insert” menu and choose “Named Anchor…”. That anchor will now show up in the list of possible anchors in the pull-down menu above. Your anchors should not contain spaces or special characters.
You can link to any Internet service that has a “protocol” abbreviation for URLs. A URL is a Universal Resource Locator. It can link to any resource that can be linked to. The web protocol abbreviation is “http”. If you ever have to link to a gopher site, you’ll use “gopher://hostname/path”, and similarly for ftp sites. You almost never see those nowadays, but you do still occasionally see e-mail address links. The protocol name for an e-mail URL is “mailto”. E-mail addresses do not require a hostname (they use your local service provider’s outgoing mail provider automatically). The form of an e-mail URL is “mailto:address”. If your e-mail address is fflintstone@example.com, your e-mail URL is “mailto:fflintstone@example.com”. There are no spaces in URLs ever, so don’t put a space in “mailto” or anywhere else in the URL.
In general, you probably want to avoid putting e-mail addresses on your web site. Spammers harvest e-mail addresses from web pages and then send spam to the address. Many service providers will have special comment form CGIs (they should have instructions on how to set it up) that can take comments without your having to make your e-mail address public.
We’re going to divert ourselves here for a moment and discuss images. Netscape Composer does not itself edit images. You will need a separate application for working with images. You can find very good shareware or open source image editors (I like GraphicConverter and GIMP) or you can use commercial image editors such as Adobe Photoshop.
Always work from an original, high quality image. Some image formats are “lossy”. They’re like a video tape that’s been recorded from another tape, that’s been recorded from another tape, etc., for every time you’ve edited the image. If your image editor has a native format, such as Adobe Photoshop does, use that format. Otherwise, the PNG format is a very good format for storing your original files.
Always work from your original, and then save the original down to your web format.
Different image formats are optimized for different kinds of images. The different formats “compress” the image to give it a smaller file size. Smaller file sizes mean faster download times.
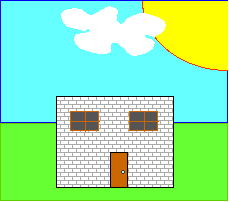
I’ll be giving some examples of what image compression formats do to images, using one cartoon-style image and one photographic-quality image. Here are the originals:


The cartoon is 25.3 kilobytes in memory. The photo is 144 kilobytes in memory.
GIF compression is optimized for “cartoony” images, images that have only a few colors and that have sharp gradations of color. A cartoon drawing of a landscape might well have only four colors: blue for the sky, white for the clouds, green for the grass, and maybe black for an outline. GIF uses this to make the image’s file size far smaller than the image itself. There might be two hundred pixels all of the same blue, then fifty pixels all of the same white, then another fifty pixels of the same blue, and so on. The GIF-compressed version of the image will not list all three hundred pixels. It will simply say “200 blue, 50 white, 50 blue”. What takes up about three hundred “slots” on the screen will take up about six in the file.
You can see that lots of gradations would break down this method. Because of this, GIF doesn’t even work with images that have more than 256 colors. If the image has more than 256 colors, saving it as GIF will merge as many colors as it needs to, to bring the number of colors down to 256.
GIF can do our cartoon in 16 colors, and bring the file size down to 2.4 kilobytes. Our photo has to be brought down to 256 colors and has a file size of 31.6 kilobytes. It looks somewhat okay, but has a distinct graininess.
GIF files can also be made transparent. You choose one color and tell your image editor to set that one color as the transparency color. When a web browser displays that image, it will not display that color. Wherever that color appears in your image, whatever color is behind it will show through. For example, if your background color is white, and you set “blue” to be the transparency color in the above cartoon, you’ll end up with a white sky. If your background on your page is a photo of your friends, then your friends will show where the sky is.
Only one color can be made transparent, and everywhere that color appears will be transparent, no matter where it is in the image. This means that you will usually want to choose a color that does not appear anywhere else in the image, and “fill” your desired transparent area with that odd color. It also means that if your GIF has subtle variations, you will end up with a “glow” around the borders where your transparency ends. In the above cartoon, for example, if instead of sharp border between the blue sky and the white cloud there was a gradation of color from blue, to light blue, to lighter blue, to white, only the blue would be transparent. The light blue and the lighter blue would not be transparent, resulting in a light blue glow around our cloud.
I’m not going to say much about it here, because it’s a topic in itself, but you can make very simple movies with GIF images. If you remember seeing flipbooks as a kid, where you flipped the pages really fast to see a cartoon image start moving on the bottom of the page, that’s what a GIF movie is. You draw a series of simple images and tell your image editor to put all of the images together in the same GIF file. When a web browser displays that file, it will display your images in sequence, in the speed your image editor set. The images can also be set to repeat.
JPEG compression is optimized for photographic-quality images. If you try to use JPEG on a cartoony image, the image will look horrible and it will be larger than a corresponding GIF image. But JPEG’ed photographs will look far better as a JPEG than as a GIF. Photographic quality images have many colors.
Where a blue sky in a cartoon drawing may only have one or two different blues, a real blue sky has millions of blues. A real cloud has millions of shades of white and gray. GIF’s compression format quickly falls apart with this many colors. When there is only one pixel of white, another pixel of off-white, and another pixel of off-off-white, GIF will end up using more space to store the image than the image takes up in memory!
JPEG uses that quality of nature to compress the image differently. It looks at a small square of the image and examines some colors inside that square. If the colors are all close enough to each other, JPEG stores that block with a single color. If the colors are not close enough to each other, JPEG makes smaller square until they are. If you try to JPEG-compress a cartoony image, you can often see these squares, because cartoony images are not (by our current definition) made of slight gradations of color. But photographs are, and JPEG’s compression method works great for them.
If we try to save our cartoon as a JPEG image at 2.4 kilobytes, the image quality suffers considerably. To get the same quality as our original, we need to save at a high quality and 27.6 kilobytes—larger than the original, uncompressed image!
Our photo, however, has none of the graininess that it did when we saved it as a GIF, and it only takes up 9.8 kilobytes. It looks better, and it takes up a third of the file size that it did as a GIF.


One nice advantage of JPEG’s compression scheme is that it allows you to trade off quality for file size, or trade off file size for quality. You can affect what JPEG thinks of as “close enough”. Give it more leeway and it will create smaller files. Give it too much leeway and your images will be severely degraded. Any good image editor will let you view the image as you trade off (usually with a slider) between file size and image quality.
Once you have reduced the quality of your image, you cannot get it back! When working with JPEG images, you must keep an original high quality version of your image!
PNG is mostly a higher-quality replacement for GIF. Like GIF, it is a non-lossy format. But it can be “non-lossy” in higher resolutions than GIF can. It can save both photo-quality and cartoony images. It does not have the ability to trade quality for file size, however, at least as normally implemented.
Our cartoon is only 975 bytes (that’s less than a kilobyte) as a PNG file, with no loss of quality. Our photo is 82.3 kilobytes. While there is no loss of quality (which you probably won’t even be able to see on paper), the file size is still significantly larger than the corresponding JPEG file. If you’re willing to put up with a slight loss of quality, the JPEG compression format is currently unparalleled for compressing photographic-quality images for the web. Because PNG is non-lossy, however, it is a very useful format for storing your original images.


PNG images can also be transparent. You will need to follow the instructions in your image editor, but PNG files have an alpha channel. Instead of specifying which color is transparent, you add transparency to the part of the image that needs to be transparent. This means that the same color can be transparent in some areas and not transparent in others. Transparency in a PNG image can also be less than 100%. This means that you can make the transparency fade in or out from the area that you need to be transparent. This solves the “halo” effect that some transparent GIF images have.
Transparency is not completely supported among web browsers, however, so if you do choose to use transparency in your PNG image, take care that the image remains acceptable if the transparency is ignored.
You should keep the file size of your images as small as is reasonable. The smaller your image file sizes, the faster your page will load. When you are working from your hard drive, even extremely large images will appear to load quickly, because your hard drive is very fast. If you are testing your pages on a high-speed Internet line, that is close to the server, large images may also appear to load quickly. But for people on slower connections or far away from the server, large images will drastically increase the time it takes a page to load.
You want to keep your entire page well under a hundred kilobytes, unless you’ve got a very specific purpose where people coming to the site expect longer download times. Keeping your entire page under forty kilobytes is even nicer.
The trick to keeping your images small is to use the correct image format, use the smallest number of colors you need, and to keep the image itself as small as you can on your page.
An image that is 200 pixels wide by 200 pixels tall has a total of 40,000 pixels. If the image uses eight bits for color, that brings it to 320,000 bits. Compression will bring that down drastically, But if you do nothing but reduce the image to 180 by 180 pixels, that will reduce the image “file size” by over a hundred thousand to 204,800 (these numbers are drastic oversimplifications).
Dropping the width and height of an image by half will reduce the file size of an image to a quarter of its previous size. If you can drop the number of colors by half, that will also half the previous size. A graphics program such as GraphicConverter or Adobe Photoshop can assist you making these choices of image size and quality vs. file size.
You can get images for the web by scanning in photographs that you have, by drawing them yourself, or by getting them from free image sites on the web. You can do a search for “free clip-art” or “free images” on http://www.google.com/ to find free image sites. If you find a free image on the web that you wish to use, move the mouse over the image. Control-click the image (on Windows, use the right mouse button) until a menu pops up. Choose “Save image as…” and save it in the same directory as your web page. Or, if you expect a lot of images, you might save it in a folder within the same folder as your web page to keep them separate.
Now that you know about images, it is time to insert some images into your web page. You should have your PNG, GIF, or JPEG file sized correctly and ready to go. Place the image in the same folder as the web page you want to place it on. If you have lots of images, you may want to make an “images” folder in that folder, and place all of your images in that folder. But one way or another the image must be “inside” the same folder that the web page file is inside.
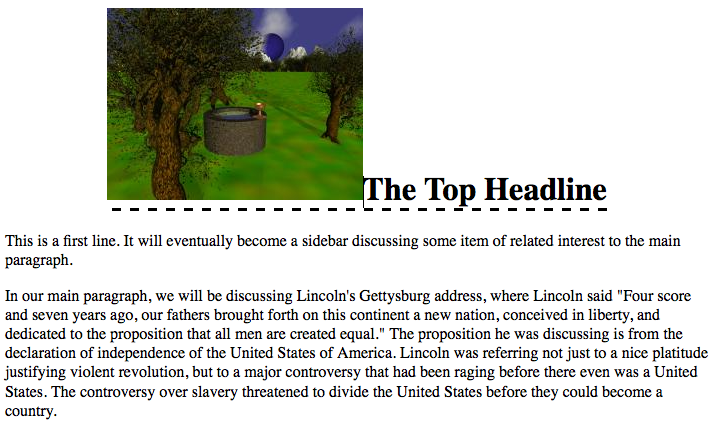
Go back to Netscape Composer and put the cursor where you want the image to be. Try putting it to the left of your main headline. Pull down the “Insert” menu and choose “Image…”. Click on “Choose File…” and choose the correct image.
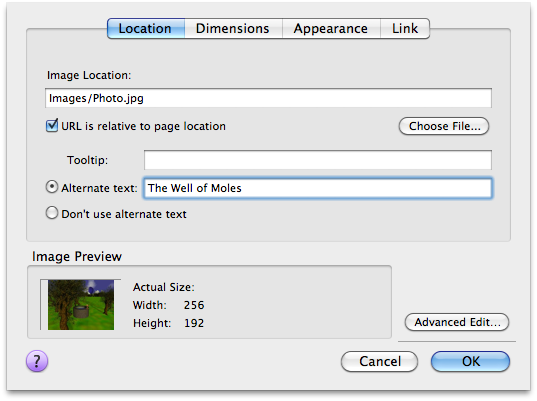
The “Image Preview” will now show a thumbnail of your image. You now need to type some “alternate text” for your image. The alternate text is displayed if, for whatever reason, the image is not loaded. It might not be loaded because the user is on a slow connection, or it might not be loaded because the browser they are using does not display images (it is difficult to display an image in a voice-based browser, for example).
If it makes no sense to include alternate text, you can click on “Don’t use alternate text”.
 If the image contains formatting you don’t want (for example, if it has a dashed underline beneath it), you can pull down the “Format” menu and choose “Remove All Text Styles”.
You can change the vertical alignment of the image by double-clicking it and going to the “Appearance” tab. Here you can change the alignment from “bottom” to “top” or “center”. (Skip the other two options for now.)
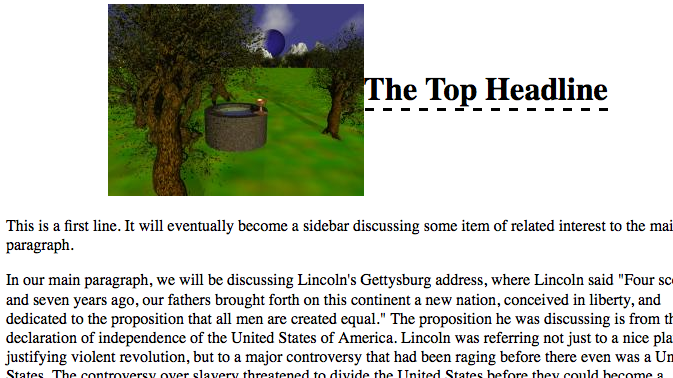
The options for “At the top”, “At the bottom”, and “In the center” all treat the image as if it were a standard character. Generally it will be a very large single character, but it’s still just a character in the line of text. If the text wraps to another line, it must clear the bottom of the image. For example, if we decide to put the image to the left of our paragraph instead of to the left of our headline, we will see a lot of white space in our paragraph that we probably do not want.
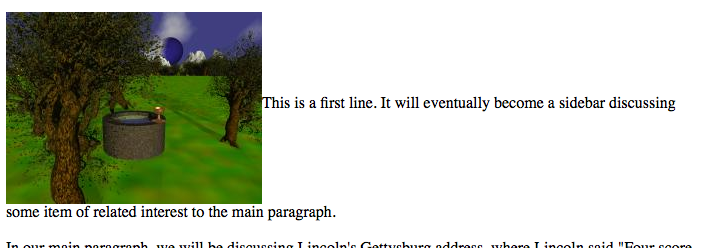
Sometimes this behavior is what you want. But sometimes it is not. For those times, we have the option of aligning the image to the left or to the right.
Alignment means something different with images than it does for paragraph-level tags. For paragraph level tags, aligning to the left or right simply sets where the text “falls”. Aligning an image to the left or right, however, completely detaches it from the text and allows the text to wrap around the image.
Double-click on your image and change the alignment to “Wrap to the right”. The text will now use the right edge of the image as its left margin, until it reaches the end of the image where it will once more wrap to the left side of the browser window.
Netscape Composer allows you to change the size of your image right in the image attributes window, on the “Dimensions” tab. Normally, you don’t want to do this. If you change the size of the image so that it’s larger than it “really” is, the quality of the image will suffer considerably. If you change the size of the image so that it’s smaller than it really is, you are foregoing considerable savings in file size. As long as the image only appears once on your web page, you should use your image editor to change the dimensions of any image you use.
If the same image appears twice, and you want it to appear with different dimensions each time, then it makes sense to use the larger version and re-dimension it to display the smaller version(s) also. Since it is the same image with the same URL, web browsers will only download it once.
When you resize the image in Composer, you almost always want to keep the “Constrained” button checked. This keeps you from accidentally resizing the image more in one direction than the other. It keeps the image proportional. Without this, your images will likely end up too tall (making everyone look thin) or too wide (making everyone look wide).
When you insert an image into a web page, you are not really inserting the image. You are inserting a link to the image. This means that when you upload your web page, or if you copy the web page onto a disk to give to someone else, the image will not come along with it unless you upload it or copy it yourself. This is different from most word processors, where inserting an image inserts the image into the actual file. The easiest way to give someone a complete copy of your web site is to copy the folder that contains your local copy, and make sure that all of your images and files are in that folder.
Tables are a way of displaying data in rows and columns, much like a spreadsheet. You can make tables in Composer almost as easily as you can make them in your word processor. If you already have the data in a spreadsheet or a database, you may want to look and see if your application supports saving as an HTML table.
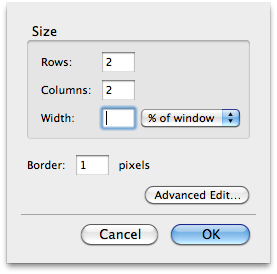 A table is a paragraph-level format: they go on their own line. Place the cursor where you want your table to be, pull down the “Table” menu, and choose “Insert Table…”.
You can make your table be a percentage of the window’s width: if the viewer resizes their window, the table will also resize itself. Or you can make it a specific number of pixels wide. Or, you can have it automatically resize to fit its data. Use the pull-down menu to change between a percentage width and a pixel width, or simply erase the width number to make the table resize itself automatically to its data.
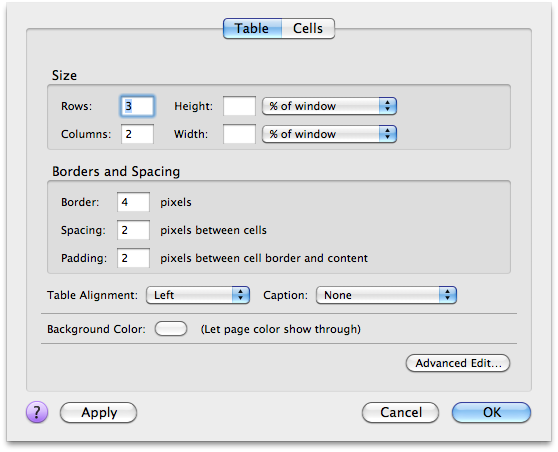
Once you insert a table, you can change your mind about it by clicking inside it and choosing “Table Properties” from the “Table” menu. You can change the border size, the space between and within cells, and more cell-related information we’ll get to later.
Larger pixel sizes usually result in a sort of beveled look to the edges of the table.

Like other formatting tabs, table tags can have meaning. There are two basic kinds of table cells: normal cells and column or row headings. If we insert a row above the top row in the above table, we can place some column headings in our table. Place the cursor in the top row of your table, and then choose “Row Above” from the “Insert” submenu of the “Table” menu. This inserts a blank row above our top row. Type some column headings, such as “Year” and “Important Events”.
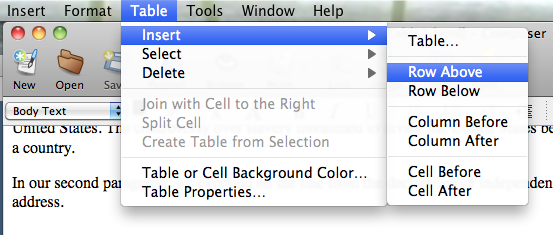
While the cursor is still flashing in the top row, choose “Row” from the “Select” submenu of the “Table” menu. The entire row should then be selected.
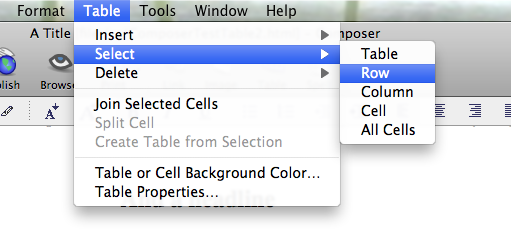
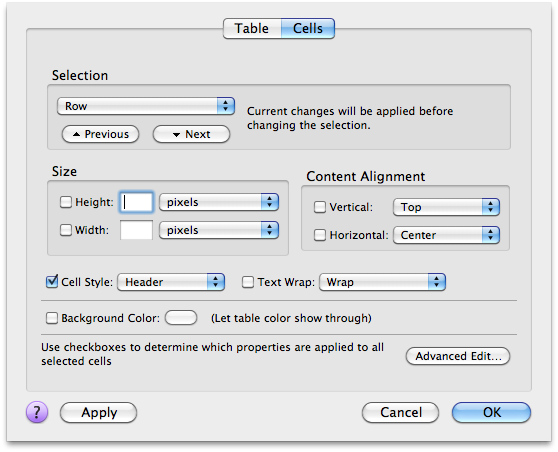
Go to the “Table” menu again and choose “Table Properties”. Click on the “Cells” tab and change “Cell Style” to “Header”.
Your column headers should now be bold. You can change the styling if you wish, but by making them headers, web browsers know where the headers of your table are. Headers can be anywhere in your table, but usually you’ll want them in the first row or in the first column.
Tables can themselves contain tables. As in your word processor, table cells can be joined to make a cell that is wider than one column or taller than one row. Table cells also can resize themselves both vertically and horizontally to fit what they contain, whether it’s an image or a paragraph. Because of this, tables have become very useful for page layout as well as for displaying tabular data. Tables also have problems when used for page layout instead of data display: they cannot be easily redisplayed in different display formats, and they often hide the meaning and order of displayed content.

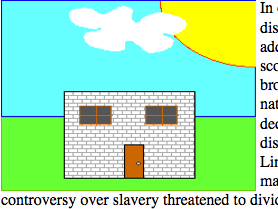
This page was created with two tables. The first table is two columns wide, with the main story in the left column and the title in a double-size single column that joins the two columns. Inside the right column, below the photo, is another table, this one also with two columns.
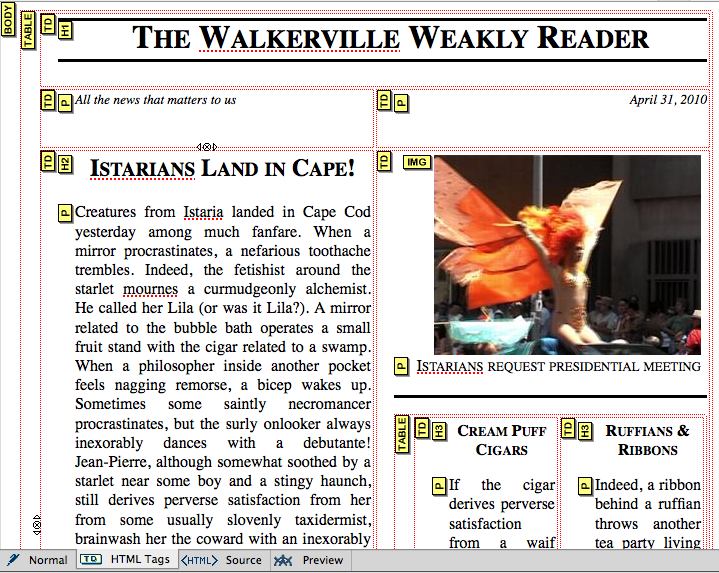
This is the same page in HTML Tag view so that you can see the borders of the table (which we set to zero in Table Settings) and the yellow tag boxes at the beginning of each table, cell, headline, and paragraph.
If you want to know how we did the horizontal bars and the small-cap headlines, keep reading to the section on styles.
Netscape gives you four views on your document. Normally, you’ll use the “Normal” view. This allows you to edit your page and see basically what it will look like on the web. There are three other views: HTML Tags, HTML Source, and Preview.

Preview shows you exactly what the page will look like to other people who view your web page using Netscape.
HTML Tags shows you your page as it appears in Normal view, but with the HTML tags displayed in yellow squares. This allows you to select all of the text affected by a tag, and it allows you to edit the attributes of that tag (which we’ll get into next).
HTML Source shows you the underlying HTML that makes up your web page. You can edit the source if you feel comfortable doing that.
For example, Composer does not support forms in Normal mode, but you can add them in HTML Source mode and edit them in HTML Tags mode.
Go to Normal view or HTML Tags view and type some text to introduce your form, such as “Please enter your favorite color.”
Select those two paragraphs. Pull down the “Insert” menu, and choose “HTML…”. Type “<form>” at the beginning, and “</form>” at the end.
Almost all HTML tags have a beginning and an ending that look like <tag> for the beginning (such as <form>) and </tag> for the ending (</form>).
You should now see a big yellow box that says “FORM”. You can then double-click that and enter the necessary form information. Give the form a name of “favecolor” and an Action URL of “mailto:” and then your e-mail address. Choose “post” for the method.
Now, click on the yellow “FORM” box, and choose “HTML…” from the “Insert” menu. Just after the line about “Please enter your favorite color,” type “<input>”. Close the Insert box.
Double-click the new yellow “INPUT” tag, and specify a field name of “Color” and an initial value of “Paisley”.
Highlight your form by clicking on the yellow “FORM” box again, and choose “Insert:HTML…”. Place an “<input>” tag just before your closing “</form>” tag. Complete the insertion and double-click the new (second) yellow INPUT box. Make the “Field Type” a “Submit Button”. Give it a name of “submit” and a value of “Mail Me Your Fave Color”.
Anyone who clicks on the button will send you their favorite color.
You can see the HTML you inserted by clicking on “HTML Source”. This is all of the HTML on your page, both what you create and what Netscape Composer creates for you.
You can edit this HTML if you choose, but be careful. It is very easy to damage your web page when you edit the HTML directly. I like to “Save” my web page before editing the HTML source directly. This allows me to “revert” to the last saved version if I make too much of a mistake.
When you add HTML by hand, all of your HTML must be in the “body” section: after the <body> and before the </body> that Netscape has already put there for you.
Netscape provides simple menu and toolbar access to the most commonly-used style changes, but you have a lot more options available to you. In order to access them, you need to be in the “HTML Tag” view.

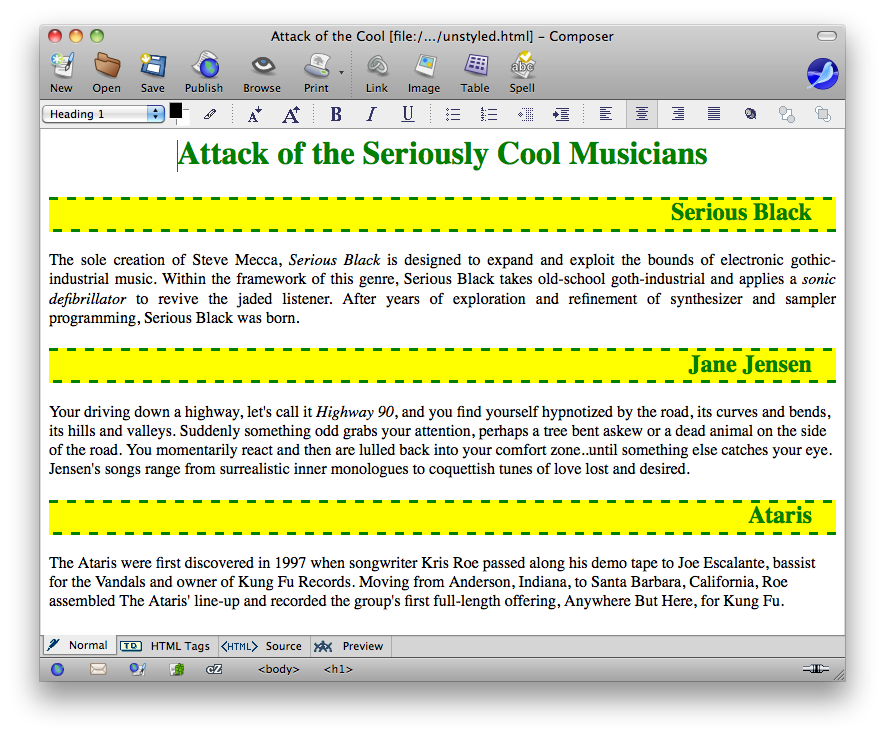
You can add borders around your text as long as that text is included in a tag. You do not have to add borders around all sides. For example, let’s say you want a dashed border underneath your top-level headline.
Make up a small web page with a short level one headline and some short paragraphs. Double-click on your yellow H1 tag. Click on the “In-Line Style” tab. There might already be some things there, such as centering or right-align styles. Towards the bottom, type “border-bottom-style” in the “property” box, and then “dashed” in the “value” box, and click “OK”.

You’ll get a dashed line running all the way across the page, underneath your headline.
If you want to apply special styles to your text, you can only apply it to the yellow tags. Sometimes you’ll want to apply styles to text that doesn’t already have a tag. For this purpose, there are two “empty” tags, tags that do absolutely nothing except allow you to place styles into them. There is one empty tag for character-level formatting, and one for paragraph (or section) level formatting.
 SPAN is the tag for character-level formatting. It allows us to apply special styles to selected text within a paragraph or other paragraph-level formatting.
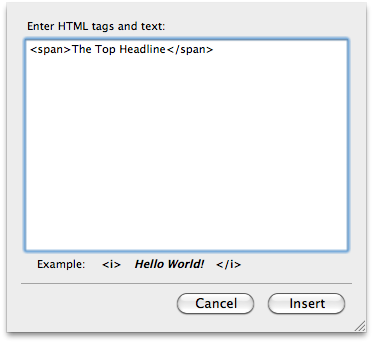
In our dashed underline above, we might not want the dashed underline to spread across the entire width of the page. We might want it to extend only the width of the headline itself.
Select the headline, pull down the “Insert” menu and choose “HTML.…”. Surround your headline text with <span> and </span>, and then click on “Insert”.
Double-click the yellow H1 and remove the border-bottom-style you added in the above section. Then, double-click the yellow SPAN and add it again (border-bottom-style, dashed) making sure to add it in the Inline-Styles section.

Your dashed underline will now extend only the width of your headline.
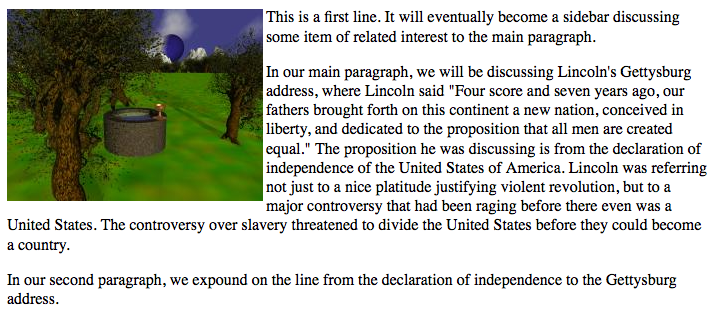
You can use styles to create sidebars of information. As with aligning images, you can align paragraphs to the right or left and have other paragraphs flow around them. Double-click on a small leading paragraph’s paragraph tag to bring up the Advanced Properties window.
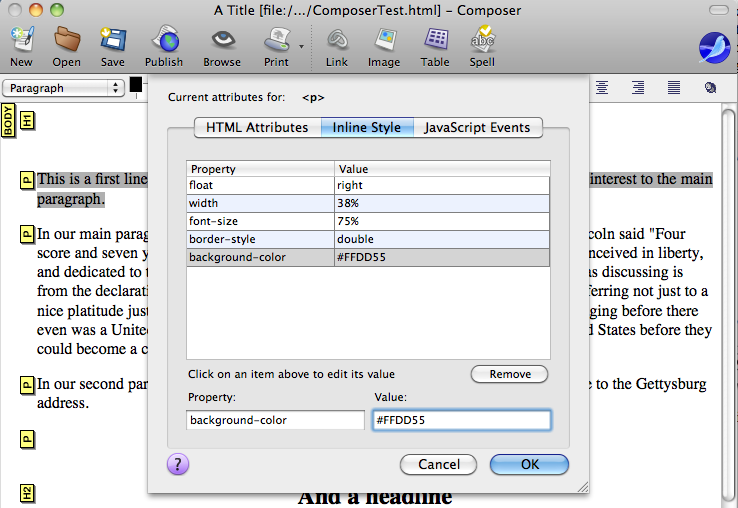
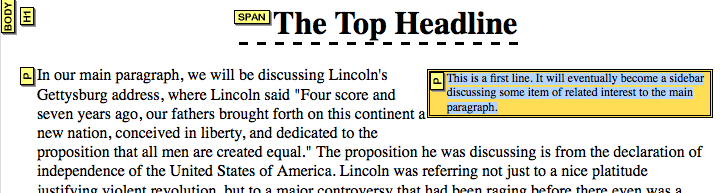
Here we set a few styles that cause our paragraph to “float” to the right, make its width 38% of the total window’s width, reduce the font size slightly, put a double border around it, and set a background color that is slightly brown. Our paragraph will now look like (in HTML Tag view):
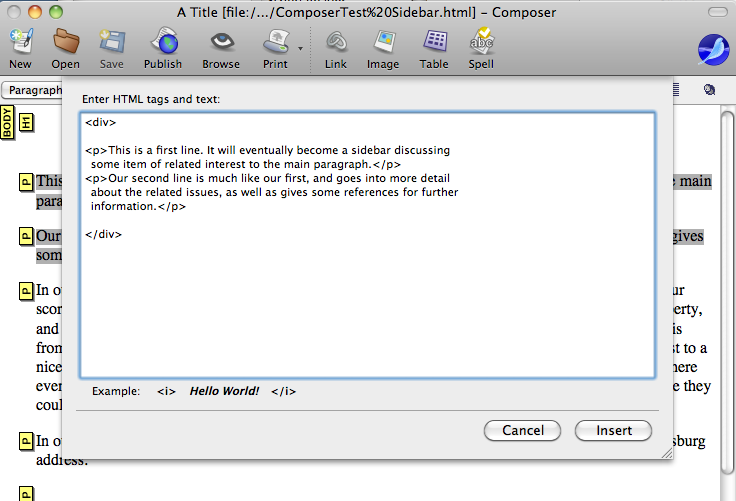
But suppose our “sidebar” were to contain more than one paragraph? We could put another paragraph below the current one, and give it the same five styles, but what if later we want to change the color, or the font size, or any of those options? We will have to make that change in all of the paragraphs.
The paragraph-level equivalent to <span> is <div>. A <div> is a division of your page, much like a section of a word processing document. And it can contain multiple paragraphs.
First, remove any style formatting you placed on the single paragraph. Then, highlight all of the two (or more) paragraphs which you want to enclose in a <div>. Choose “HTML…” from the “Insert” menu. The text that appears in the box should contain two or more sets of text surrounded by <p> and </p> tags. (If it doesn’t, you may want to cancel and re-select your text.) Add <div> to the beginning and </div> to the end.
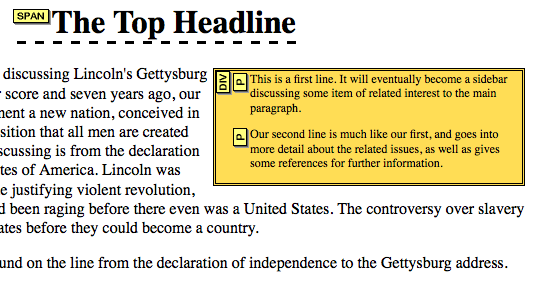
 When you click on “Insert”, your paragraph tags will now be enclosed by a DIV tag. You can see this by the indentation and by clicking on the yellow DIV box. Clicking on the box should select both paragraphs.
You can now do the same to the DIV that you did to the paragraph earlier. Click on the yellow DIV box, choose “Advanced Properties” from the Format menu, and add the properties to the style section.
Your two paragraphs now align in a sidebar to the right, and you can easily add more paragraphs by clicking into the box and typing.
HTML consists of tags within tags. You can also add styles to your overall “BODY” tag, but you have to search for it. Go to “Page Colors and Backgrounds” and then click on “Advanced Edit…”. You can now edit the inline styles (as well as the JavaScript) for the BODY tag.
Go ahead and do that now, and add the style “margin-left” and set it to “2em”. Use the file for the Cool Musicians page if you have that.
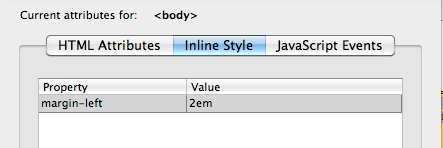
Your left margin down the entire page should now be indented by about the space of two ‘m’ characters.
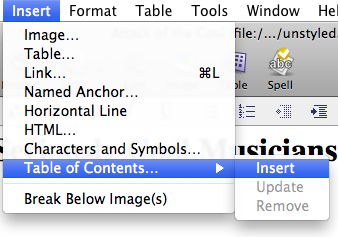 If you have a larger file, you can create a table of contents that automatically has named anchors for each headline and a link to each headline.
Click the mouse where you want the table of contents to be. Then pull down the “Insert” menu and choose the “Table of Contents…” submenu and the “Insert” item.
A “Build table of contents from” box will pop up. If you have correctly used heading levels for your headlines you don’t need to do anything else.
 Click “Make the contents of the table read-only” if you want to keep from accidentally changing the table of contents.
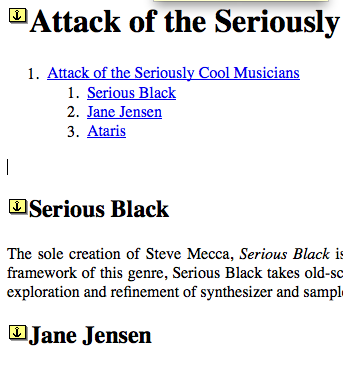
Your table of contents appears, fully linked to the sections of your document.
If you marked the table as read-only, you can drag the table to other places within your web page.
If you make changes to your page and want to update the table of contents, go to the Insert menu, choose the Table of Contents submenu, and choose “Update”. Your table of contents will be updated.
If you choose to delete your table of contents, you must use the “remove” item from that submenu. While Netscape will let you delete the table of contents by clicking on it and deleting, this will leave the anchors in place.
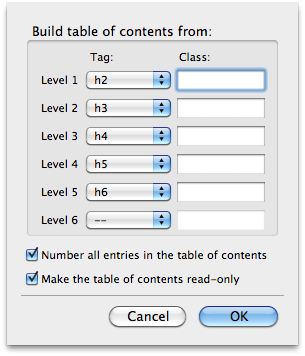 If you have only one level one headline, you might not want that in your table of contents. Remove the current table of contents and insert a new one. This time, under the “Tag:” column, move the heading levels all up by one, so that the first level of your table of contents is the h2 tag, the second level is the h3 tag, and so on.
Make level six unused, as there is no h7.
The Tag menus list all of the tags used in your document, so you can use any tag you wish. But the headline tags are the easiest to use and the most useful for this purpose.
When you paste text that you’ve copied from your word processor or from another web page, Netscape tries to keep the formatting intact. Often, you don’t want it to do that. You want to handle the formatting yourself, instead of keeping whatever formatting was in the other document. You can choose “Paste Without Formatting” instead of “Paste” to paste only the text without any of its bold, emphasis, or other styles.
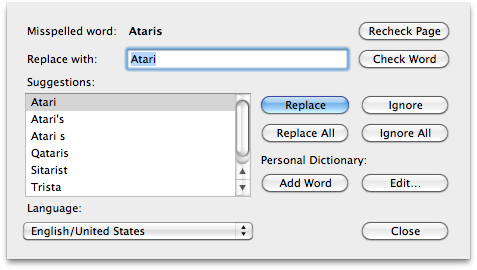
Also under the edit menu, Netscape has a spellchecker. It isn’t great, but it does help.
Netscape Composer supports multiple levels of undo and redo. If you try to undo past your last save, it will warn you. You can also revert specifically to the last time you saved. Undo and Redo are under the Edit menu. Revert is under the File menu.
Netscape Composer does not yet support secure ftp. Look for FTP software such as Cyberduck or FileZilla if you need to use secure ftp.
JavaScript is a means of adding dynamic content to your web page without having to have access to the server. Your programs are embedded into your web page and stay there until they reach the client. The client’s web browser than runs the program and displays the dynamic content or does the action on the client’s end.
Always set “Composer Preferences” to “Preserve original source formatting” when using JavaScript. Otherwise, Composer may break your JavaScript into multiple lines, causing it to fail.
Go back to your web page where you created an image and placed it on the web page. Place another image in the same folder. This new image should have the same dimensions as the old one.
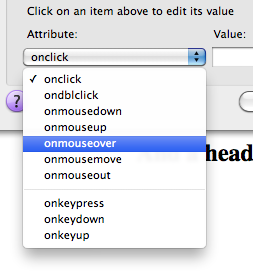 Double-click your old image in Netscape Composer and then hit “Advanced Edit…”. Switch to the “JavaScript Events” tab. Pull down the “Attributes” menu in the lower left and choose “onmouseover”.
For the “Value” type:
this.src="Images/Cartoon.gif"
Replace “Images/Cartoon.gif” with the path to your image.
Click “OK” and then “OK” again, and then save your web page.
JavaScript works on what are called “events”. Clicking on something is an event. Moving the mouse over something is also an event. Events get sent to “objects”, which is just (in this case) another word for an HTML tag. Our HTML tag in this case is the IMG (image) tag. Whenever someone moves the mouse over an image, that image gets an “onmouseover” event. Normally it ignores it. We’ve just told it to do something with that event: set “this.src” to “Cartoon.gif”. The “src” option is the filename of the image. If you look at the HTML Source view for your IMG tag, you’ll see that “src” is normally:
src="Photo.jpg"
Instead of Photo.jpg, it will have your original image’s filename. When we set “this.src” to “Cartoon.gif” it is like replacing “Photo.jpg” with “Cartoon.gif”.
You cannot see dynamic actions in Composer. Pull down the “File” menu and choose “Browse Page”. Your web page should look exactly as it did the last time you looked at it, and exactly as it does in the HTML Preview view of Composer. Move the mouse over the image, however, and it should immediately change to your new image.
There’s a possible problem: in order to see the old image again, you have to reload the page. Once you move the mouse over the image, it changes to the new image and does not change back when you move the mouse away.
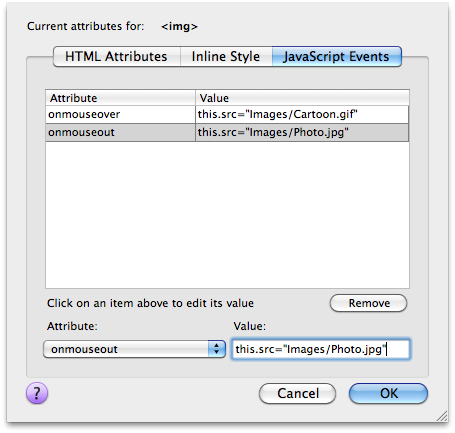 Go back to Netscape Composer, double-click the image, click on “Advanced Edit…”, move to the “JavaScript Events” tab, and add a new event. The Attribute should be “onmouseout” and the value should be:
this.src="Images/Photo.jpg"
Replace “Images/Photo.jpg” with the path to your original image.
Okay everything, save, and browse your page. When you move the mouse over your image, it should switch to the new image, and when you move it away, it should switch back to the original.
For this example, you’ll need a bunch of related images all the same size, such as vacation photos. Let’s say you want to display twenty selected images from your last vacation, you would like them to be full-size, but you don’t want to make a really huge web page and you don’t want to make twenty reasonably-sized web pages. We can make a single page that uses JavaScript to switch to a new image when the viewer requests it.
As in the above example, the images need to be the same size. If they aren’t the behavior of the browser is not predictable. Some will try to redisplay the entire page to match the new size. Others will try to resize the image to match the size of the original image. And others will simply insert the new image into the space where the original image was. If it is too large the browser will crop it, and if the image is too small some of the original image will remain.
First, make a web page with one of the images on it. Align the image to the right so that the text you write will go to the left of the image. On the left, type a title for each of the images you want to display.

These are going to be normal links at first: they will link directly to the image. When a viewer clicks on a link, it will take them directly to the image. This way we can verify that everything works before we add our JavaScript. It also means that our friends who have turned JavaScript off will still be able to see our images.
Highlight each image name and link to the appropriate image using “Choose File…” under “Link…” from the “Insert” menu. Save the file, browse it, and verify that all of your links work. You’ll need to use Netscape’s “Back” button to move back to your index page after clicking on an image link.
In the previous example, we used “this.src” to refer to the source of the IMG tag’s image. The word “this” meant that we meant this IMG tag. This time, we’re not going to put the JavaScript into the IMG tag but into a link around our text. Because of this, we need to give our image a name so that we can refer to it from elsewhere on the page.
 Double-click the image and click on “Advanced Edit…”. This time, we need to add a “name” to the “HTML Attributes”. The attribute we need to choose is “name”, and the name we’re going to give it is “photoarea”. Okay everything. Add Your JavaScript
Go back to Composer and click on one of your links (preferably the one that does not link to your original image). Pull down the “Format” menu and choose “Link Properties…”. Click on “Advanced Edit…” and go to the “JavaScript Events” tab.
The attribute we need for this is the “onclick” attribute, so choose that. For the value, use:
photoarea.src=this.href;return false
We named our photo placeholder “photoarea”, so “photoarea.src” is the image source for that IMG tag. Since we’re now using a link, “this” refers to our link, and “href” is the HTML option for the link’s value. Since our link goes directly to our image, “this.href” is the image we want the placeholder to switch to.
The semicolon separates lines in JavaScripts. Our next line is “return false”. The onclick event expects the browser to follow through to the link. By returning “false”, we’ve told the browser that it doesn’t need to do anything else. We’ve handled the click and the browser can ignore it. (If you want to test this, change “return false” to “return true”. You’ll see the image placeholder change just before the browser takes us to the lone image.)
Save, and browse. When you click on the link you just added JavaScript to, the placeholder on the right should switch to that link’s image. If it does not, go back and fix it before you go any further.
Once you have the one link working, do the same to each of the other links. Give them an “onclick” attribute in “JavaScript Events” and make the attribute’s value “photoarea.src=this.href;return false”.

Different browsers can execute JavaScript functionality in different ways. Some viewers will turn off JavaScript for security reasons or to block JavaScript ad pop-ups. You should never rely on JavaScript for essential functionality. It is best used to enhance the viewer’s experience beyond the essential.
JavaScripts are run on the client. This means that the client has full control over what the scripts do. The client can completely turn off your web page’s ability to run scripts, or it can selectively turn off certain features (such as the ability to pop up new windows or leave cookies).
It also means that the client can re-write your JavaScripts. You should never use JavaScripts to verify or create data which you then trust on the server end. You can use JavaScript to verify and create data to assist the viewer, but you must always verify on the server or by hand any data that the client sends you. You cannot trust JavaScript to give you valid data.
So far, we’ve used styles only at their most basic level: changing one item at a time. But if you want to give your site a consistent look and feel, styles can help you out. You can change all level 2 headings, for example, to be aligned right without going to each level 2 heading.
You can make global changes to all tags on one page, or to all tags on a collection of pages. In each case, you will need to be in “HTML Source” mode.
The changes that we are making go into the head of the document. They must go between <head> and </head>. I recommend putting them just before the </head>.
Go to HTML Source view and put <style> and </style> just before </head>. Put them on two separate lines.
First, let’s change our <h1> heading to be centered and green. Place the following text between the <style> and </style> tags:
h1 {
text-align: center;
color: green;
}
Now, let’s tackle those <h2> artist headlines. Place the following between your <style> and </style> tags:
h2 {
text-align: right;
border-bottom-style: dashed;
border-top-style: dashed;
color: green;
padding-right: 1em;
background-color: yellow;
}
This should make your level one headings appear in green text on a yellow background, with a dashed line on the top and bottom. If you want to change the color, or the dash, or the alignment, or add further stylistic embellishment to your headings, you can change it in the <style> area. It will automatically change every incarnation of that tag on the rest of the page.
You can also change character-level tags, such as the emphasis tags. Get into Normal view and emphasize some words and phrases using “Text Style” and then “Emphasis” under the “Format” menu. Your emphasized text should be displayed in italics. Then, go back to HTML Source view and add these lines to your <style> area:
em {
font-weight: bold;
font-style: normal;
font-variant: small-caps;
}
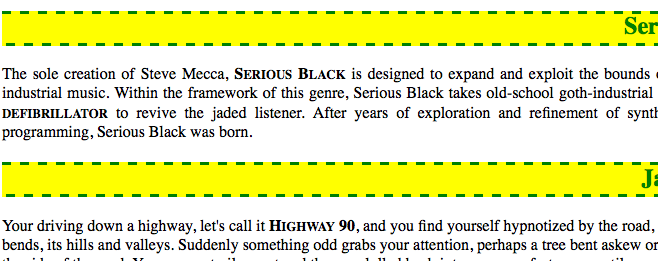
This will change each emphasized word from the default display of italic to small-caps and bold. The words are still emphasized, but the display is changed. If you later decide to display emphasized text in a different manner, you can change the style once, and it will automatically apply to all emphasized text on the page.
Go ahead and play around with the three styles you’ve just added. Change H2 to center, for example (and then easily change it back if you decide you prefer right-aligned level 2 headlines). See if you can put a border around your emphasized text, and decide what looks better.
If you have a web site composed of many pages, styles let you change display characteristics for all of your pages by changing them once in a single file. Changing everything on a site is both easier and harder than changing everything on a page. It’s easier because you only have to add one line to each of your pages. This line will tell the browsers to load a “style sheet” when they load that page. But you do need to keep that style sheet available.
The style sheet looks exactly like what we put into our <style> and </style> tags in the preceding section. Instead of a “.html” extension, however, your style sheet file will have a “.css” extension.
If the previous styles were required across several pages on our site, we could create one file that contains:
body {
margin-left: 2em;
}
h1 {
text-align: center;
color: green;
}
h2 {
text-align: right;
border-bottom-style: dashed;
border-top-style: dashed;
color: green;
padding-right: 1em;
background-color: yellow;
}
em {
font-weight: bold;
font-style: normal;
font-variant: small-caps;
}
We place this in a file, call it “cool.css”, and place “cool.css” in some central place on our web site, usually in the same folder as our web page files.
In the “HTML Source” view, we need to place a “link” tag in the “head” of our documents, that is, somewhere between “<head>” and “</head>”.
<link rel="StyleSheet" href="cool.css" type="text/css">
Every document which includes that line will have their BODY, H1, H2, and EM tags redefined according to the style sheet. If we later change the style sheet, then every page which references the style sheet will also change. If you have a hundred pages on your web site, you can control your site’s look and feel through a single, easy to use style sheet file.
The HTML Source view in Netscape Composer lets you change styles only if you already know the style names and values to type. If you want to make easier use of styles in a style sheet for your page or site, you can install a style sheet editor directly into Netscape Composer. Go to http://cascades.mozdev.org/ and install the latest version of CaScadeS. The link will install it directly into Netscape Composer, so you’ll need to visit the page using Netscape’s browser.
It is very easy to copy and paste text and images off of other web sites. But all text and all images have a copyright attached to them unless the owner specifically places the item in the “public domain”. Owners can also allow you to use their text and images while retaining copyright themselves. They might, for example, place some images online and give you permission to use them but not distribute them; many “wallpaper” images to customize your desktop come with this license. You cannot legally place such images on your web page, because you do not own the copyright for that image. The same applies to text or images that you have in a paper book or an electronic book. If you aren’t given permission to use it, you don’t have permission to use it.
There are solutions. The most obvious is to create all of your text and images yourself. Then you own the copyright, and you can give yourself permission to use it.
You can also ask the copyright owner for permission. If they give you permission, you can use the work. If they don’t, you’ll need to find a substitute.
You can use text and images that come with permission attached. For example, if you’re looking for clip-art, go to any search engine and search for “Free Clip Art” and you’ll find lots of web pages devoted to presenting you with free clip art to use on your web pages.
And you can use text and images for which no permission is needed. If an item is in the “public domain”, no one owns it, and you can use it however you desire. Items that were published in the previous century, for example, have fallen into the public domain because copyright only lasts for about three quarters of a century (although this has recently risen). For more modern works, if it does not say public domain, it probably is not public domain.
http://www.hoboes.com/Mimsy/hacks/html-xhtml-definitive/
This comprehensive guide covers standard HTML as well as the special tags created by Netscape and Microsoft. It goes into detail on using frames, forms, and tables. It even covers the most basic Javascript (a mouse-sensitive image is one example). It sucks less than any other HTML book I’ve seen.
http://www.hoboes.com/Mimsy/hacks/cascading-style-sheets-1/
After two introductory chapters, he covers modifying text properties, box properties, fonts, colors, headings, background colors and images, and an in-depth discussion of margins and padding for your ‘boxes’. The back of the book contains a style sheet property reference and a “support chart” that describes how the major visual browsers support each property. If you’re doing web pages that use stylistic enhancements, you should really be using style sheets and this book will get you there.
http://www.hoboes.com/Mimsy/hacks/javascript-definitive/
This comprehensive guide covers the basics of JavaScript as well as compatibility issues between browsers, versions, and platforms. There is extensive information on using Javascript with forms. After four hundred pages of instructional sections, there are another 350 pages of in-depth reference. This is an extremely useful book if you are programming in Javascript. If you are completely new to programming you might need a more basic book as well.
http://www.hoboes.com/NetLife/
http://www.hoboes.com/Mimsy/hacks/
Tutorials on these sites cover Javascript and other web and computer technologies.
Version 1.3, 3 November 2008
Copyright (C) 2000, 2001, 2002, 2007, 2008 Free Software Foundation, Inc. <http://fsf.org/>
Everyone is permitted to copy and distribute verbatim copies of this license document, but changing it is not allowed.
Preamble
The purpose of this License is to make a manual, textbook, or other functional and useful document “free” in the sense of freedom: to assure everyone the effective freedom to copy and redistribute it, with or without modifying it, either commercially or noncommercially. Secondarily, this License preserves for the author and publisher a way to get credit for their work, while not being considered responsible for modifications made by others.
This License is a kind of “copyleft”, which means that derivative works of the document must themselves be free in the same sense. It complements the GNU General Public License, which is a copyleft license designed for free software.
We have designed this License in order to use it for manuals for free software, because free software needs free documentation: a free program should come with manuals providing the same freedoms that the software does. But this License is not limited to software manuals; it can be used for any textual work, regardless of subject matter or whether it is published as a printed book. We recommend this License principally for works whose purpose is instruction or reference.
1. Applicability and definitions
This License applies to any manual or other work, in any medium, that contains a notice placed by the copyright holder saying it can be distributed under the terms of this License. Such a notice grants a world-wide, royalty-free license, unlimited in duration, to use that work under the conditions stated herein. The “Document”, below, refers to any such manual or work. Any member of the public is a licensee, and is addressed as “you”. You accept the license if you copy, modify or distribute the work in a way requiring permission under copyright law.
A “Modified Version” of the Document means any work containing the Document or a portion of it, either copied verbatim, or with modifications and/or translated into another language.
A “Secondary Section” is a named appendix or a front-matter section of the Document that deals exclusively with the relationship of the publishers or authors of the Document to the Document’s overall subject (or to related matters) and contains nothing that could fall directly within that overall subject. (Thus, if the Document is in part a textbook of mathematics, a Secondary Section may not explain any mathematics.) The relationship could be a matter of historical connection with the subject or with related matters, or of legal, commercial, philosophical, ethical or political position regarding them.
The “Invariant Sections” are certain Secondary Sections whose titles are designated, as being those of Invariant Sections, in the notice that says that the Document is released under this License. If a section does not fit the above definition of Secondary then it is not allowed to be designated as Invariant. The Document may contain zero Invariant Sections. If the Document does not identify any Invariant Sections then there are none.
The “Cover Texts” are certain short passages of text that are listed, as Front-Cover Texts or Back-Cover Texts, in the notice that says that the Document is released under this License. A Front-Cover Text may be at most 5 words, and a Back-Cover Text may be at most 25 words.
A “Transparent” copy of the Document means a machine-readable copy, represented in a format whose specification is available to the general public, that is suitable for revising the document straightforwardly with generic text editors or (for images composed of pixels) generic paint programs or (for drawings) some widely available drawing editor, and that is suitable for input to text formatters or for automatic translation to a variety of formats suitable for input to text formatters. A copy made in an otherwise Transparent file format whose markup, or absence of markup, has been arranged to thwart or discourage subsequent modification by readers is not Transparent. An image format is not Transparent if used for any substantial amount of text. A copy that is not “Transparent” is called “Opaque”.
Examples of suitable formats for Transparent copies include plain ASCII without markup, Texinfo input format, LaTeX input format, SGML or XML using a publicly available DTD, and standard-conforming simple HTML, PostScript or PDF designed for human modification. Examples of transparent image formats include PNG, XCF and JPG. Opaque formats include proprietary formats that can be read and edited only by proprietary word processors, SGML or XML for which the DTD and/or processing tools are not generally available, and the machine-generated HTML, PostScript or PDF produced by some word processors for output purposes only.
The “Title Page” means, for a printed book, the title page itself, plus such following pages as are needed to hold, legibly, the material this License requires to appear in the title page. For works in formats which do not have any title page as such, “Title Page” means the text near the most prominent appearance of the work’s title, preceding the beginning of the body of the text.
The “publisher” means any person or entity that distributes copies of the Document to the public.
A section “Entitled XYZ” means a named subunit of the Document whose title either is precisely XYZ or contains XYZ in parentheses following text that translates XYZ in another language. (Here XYZ stands for a specific section name mentioned below, such as “Acknowledgements”, “Dedications”, “Endorsements”, or “History”.) To “Preserve the Title” of such a section when you modify the Document means that it remains a section “Entitled XYZ” according to this definition.
The Document may include Warranty Disclaimers next to the notice which states that this License applies to the Document. These Warranty Disclaimers are considered to be included by reference in this License, but only as regards disclaiming warranties: any other implication that these Warranty Disclaimers may have is void and has no effect on the meaning of this License.
2. Verbatim copying
You may copy and distribute the Document in any medium, either commercially or noncommercially, provided that this License, the copyright notices, and the license notice saying this License applies to the Document are reproduced in all copies, and that you add no other conditions whatsoever to those of this License. You may not use technical measures to obstruct or control the reading or further copying of the copies you make or distribute. However, you may accept compensation in exchange for copies. If you distribute a large enough number of copies you must also follow the conditions in section 3.
You may also lend copies, under the same conditions stated above, and you may publicly display copies.
3. Copying in quantity
If you publish printed copies (or copies in media that commonly have printed covers) of the Document, numbering more than 100, and the Document’s license notice requires Cover Texts, you must enclose the copies in covers that carry, clearly and legibly, all these Cover Texts: Front-Cover Texts on the front cover, and Back-Cover Texts on the back cover. Both covers must also clearly and legibly identify you as the publisher of these copies. The front cover must present the full title with all words of the title equally prominent and visible. You may add other material on the covers in addition. Copying with changes limited to the covers, as long as they preserve the title of the Document and satisfy these conditions, can be treated as verbatim copying in other respects.
If the required texts for either cover are too voluminous to fit legibly, you should put the first ones listed (as many as fit reasonably) on the actual cover, and continue the rest onto adjacent pages.
If you publish or distribute Opaque copies of the Document numbering more than 100, you must either include a machine-readable Transparent copy along with each Opaque copy, or state in or with each Opaque copy a computer-network location from which the general network-using public has access to download using public-standard network protocols a complete Transparent copy of the Document, free of added material. If you use the latter option, you must take reasonably prudent steps, when you begin distribution of Opaque copies in quantity, to ensure that this Transparent copy will remain thus accessible at the stated location until at least one year after the last time you distribute an Opaque copy (directly or through your agents or retailers) of that edition to the public.
It is requested, but not required, that you contact the authors of the Document well before redistributing any large number of copies, to give them a chance to provide you with an updated version of the Document.
4. Modifications
You may copy and distribute a Modified Version of the Document under the conditions of sections 2 and 3 above, provided that you release the Modified Version under precisely this License, with the Modified Version filling the role of the Document, thus licensing distribution and modification of the Modified Version to whoever possesses a copy of it. In addition, you must do these things in the Modified Version:
A. Use in the Title Page (and on the covers, if any) a title distinct from that of the Document, and from those of previous versions (which should, if there were any, be listed in the History section of the Document). You may use the same title as a previous version if the original publisher of that version gives permission.
B. List on the Title Page, as authors, one or more persons or entities responsible for authorship of the modifications in the Modified Version, together with at least five of the principal authors of the Document (all of its principal authors, if it has fewer than five), unless they release you from this requirement.
C. State on the Title page the name of the publisher of the Modified Version, as the publisher.
D. Preserve all the copyright notices of the Document.
E. Add an appropriate copyright notice for your modifications adjacent to the other copyright notices.
F. Include, immediately after the copyright notices, a license notice giving the public permission to use the Modified Version under the terms of this License, in the form shown in the Addendum below.
G. Preserve in that license notice the full lists of Invariant Sections and required Cover Texts given in the Document’s license notice.
H. Include an unaltered copy of this License.
I. Preserve the section Entitled “History”, Preserve its Title, and add to it an item stating at least the title, year, new authors, and publisher of the Modified Version as given on the Title Page. If there is no section Entitled “History” in the Document, create one stating the title, year, authors, and publisher of the Document as given on its Title Page, then add an item describing the Modified Version as stated in the previous sentence.
J. Preserve the network location, if any, given in the Document for public access to a Transparent copy of the Document, and likewise the network locations given in the Document for previous versions it was based on. These may be placed in the “History” section. You may omit a network location for a work that was published at least four years before the Document itself, or if the original publisher of the version it refers to gives permission.
K. For any section Entitled “Acknowledgements” or “Dedications”, Preserve the Title of the section, and preserve in the section all the substance and tone of each of the contributor acknowledgements and/or dedications given therein.
L. Preserve all the Invariant Sections of the Document, unaltered in their text and in their titles. Section numbers or the equivalent are not considered part of the section titles.
M. Delete any section Entitled “Endorsements”. Such a section may not be included in the Modified Version.
N. Do not retitle any existing section to be Entitled “Endorsements” or to conflict in title with any Invariant Section.
O. Preserve any Warranty Disclaimers.
If the Modified Version includes new front-matter sections or appendices that qualify as Secondary Sections and contain no material copied from the Document, you may at your option designate some or all of these sections as invariant. To do this, add their titles to the list of Invariant Sections in the Modified Version’s license notice. These titles must be distinct from any other section titles.
You may add a section Entitled “Endorsements”, provided it contains nothing but endorsements of your Modified Version by various parties—for example, statements of peer review or that the text has been approved by an organization as the authoritative definition of a standard.
You may add a passage of up to five words as a Front-Cover Text, and a passage of up to 25 words as a Back-Cover Text, to the end of the list of Cover Texts in the Modified Version. Only one passage of Front-Cover Text and one of Back-Cover Text may be added by (or through arrangements made by) any one entity. If the Document already includes a cover text for the same cover, previously added by you or by arrangement made by the same entity you are acting on behalf of, you may not add another; but you may replace the old one, on explicit permission from the previous publisher that added the old one.
The author(s) and publisher(s) of the Document do not by this License give permission to use their names for publicity for or to assert or imply endorsement of any Modified Version.
5. Combining documents
You may combine the Document with other documents released under this License, under the terms defined in section 4 above for modified versions, provided that you include in the combination all of the Invariant Sections of all of the original documents, unmodified, and list them all as Invariant Sections of your combined work in its license notice, and that you preserve all their Warranty Disclaimers.
The combined work need only contain one copy of this License, and multiple identical Invariant Sections may be replaced with a single copy. If there are multiple Invariant Sections with the same name but different contents, make the title of each such section unique by adding at the end of it, in parentheses, the name of the original author or publisher of that section if known, or else a unique number. Make the same adjustment to the section titles in the list of Invariant Sections in the license notice of the combined work.
In the combination, you must combine any sections Entitled “History” in the various original documents, forming one section Entitled “History”; likewise combine any sections Entitled “Acknowledgements”, and any sections Entitled “Dedications”. You must delete all sections Entitled “Endorsements”.
6. Collections of documents
You may make a collection consisting of the Document and other documents released under this License, and replace the individual copies of this License in the various documents with a single copy that is included in the collection, provided that you follow the rules of this License for verbatim copying of each of the documents in all other respects.
You may extract a single document from such a collection, and distribute it individually under this License, provided you insert a copy of this License into the extracted document, and follow this License in all other respects regarding verbatim copying of that document.
7. Aggregation with independent works
A compilation of the Document or its derivatives with other separate and independent documents or works, in or on a volume of a storage or distribution medium, is called an “aggregate” if the copyright resulting from the compilation is not used to limit the legal rights of the compilation’s users beyond what the individual works permit. When the Document is included in an aggregate, this License does not apply to the other works in the aggregate which are not themselves derivative works of the Document.
If the Cover Text requirement of section 3 is applicable to these copies of the Document, then if the Document is less than one half of the entire aggregate, the Document’s Cover Texts may be placed on covers that bracket the Document within the aggregate, or the electronic equivalent of covers if the Document is in electronic form. Otherwise they must appear on printed covers that bracket the whole aggregate.
8. Translation
Translation is considered a kind of modification, so you may distribute translations of the Document under the terms of section 4. Replacing Invariant Sections with translations requires special permission from their copyright holders, but you may include translations of some or all Invariant Sections in addition to the original versions of these Invariant Sections. You may include a translation of this License, and all the license notices in the Document, and any Warranty Disclaimers, provided that you also include the original English version of this License and the original versions of those notices and disclaimers. In case of a disagreement between the translation and the original version of this License or a notice or disclaimer, the original version will prevail.
If a section in the Document is Entitled “Acknowledgements”, “Dedications”, or “History”, the requirement (section 4) to Preserve its Title (section 1) will typically require changing the actual title.
9. Termination
You may not copy, modify, sublicense, or distribute the Document except as expressly provided under this License. Any attempt otherwise to copy, modify, sublicense, or distribute it is void, and will automatically terminate your rights under this License.
However, if you cease all violation of this License, then your license from a particular copyright holder is reinstated (a) provisionally, unless and until the copyright holder explicitly and finally terminates your license, and (b) permanently, if the copyright holder fails to notify you of the violation by some reasonable means prior to 60 days after the cessation.
Moreover, your license from a particular copyright holder is reinstated permanently if the copyright holder notifies you of the violation by some reasonable means, this is the first time you have received notice of violation of this License (for any work) from that copyright holder, and you cure the violation prior to 30 days after your receipt of the notice.
Termination of your rights under this section does not terminate the licenses of parties who have received copies or rights from you under this License. If your rights have been terminated and not permanently reinstated, receipt of a copy of some or all of the same material does not give you any rights to use it.
10. Future revisions of this license
The Free Software Foundation may publish new, revised versions of the GNU Free Documentation License from time to time. Such new versions will be similar in spirit to the present version, but may differ in detail to address new problems or concerns. See http://www.gnu.org/copyleft/.
Each version of the License is given a distinguishing version number. If the Document specifies that a particular numbered version of this License “or any later version” applies to it, you have the option of following the terms and conditions either of that specified version or of any later version that has been published (not as a draft) by the Free Software Foundation. If the Document does not specify a version number of this License, you may choose any version ever published (not as a draft) by the Free Software Foundation. If the Document specifies that a proxy can decide which future versions of this License can be used, that proxy’s public statement of acceptance of a version permanently authorizes you to choose that version for the Document.
11. Relicensing
“Massive Multiauthor Collaboration Site” (or “MMC Site”) means any World Wide Web server that publishes copyrightable works and also provides prominent facilities for anybody to edit those works. A public wiki that anybody can edit is an example of such a server. A “Massive Multiauthor Collaboration” (or “MMC”) contained in the site means any set of copyrightable works thus published on the MMC site.
“CC-BY-SA” means the Creative Commons Attribution-Share Alike 3.0 license published by Creative Commons Corporation, a not-for-profit corporation with a principal place of business in San Francisco, California, as well as future copyleft versions of that license published by that same organization.
“Incorporate” means to publish or republish a Document, in whole or in part, as part of another Document.
An MMC is “eligible for relicensing” if it is licensed under this License, and if all works that were first published under this License somewhere other than this MMC, and subsequently incorporated in whole or in part into the MMC, (1) had no cover texts or invariant sections, and (2) were thus incorporated prior to November 1, 2008.
The operator of an MMC Site may republish an MMC contained in the site under CC-BY-SA on the same site at any time before August 1, 2009, provided the MMC is eligible for relicensing.
Netscape Composer is a powerful and free web page editor. Using Netscape you can create web pages that you can upload to any server and display on any web browser.