We’ll be installing the full MySQL server on your desktop computer. This portion of the tutorial is geared pretty much exclusively to the Macintosh. Installation of MySQL on Mac OS X is quick and easy.
If you are using Linux, you may well have MySQL already installed on your system. Look at your instructions or manual (depending on your installation) to see how to enable it or access it.
Download package
MySQL is free software. You can download it at http://dev.mysql.com/downloads/. As I write this, the current recommended version is MySQL 5.1. Click on that. If you are going to install the Mac OS X version, scroll down to the Mac OS X downloads section, and download the Package Format version for your version of OS X.
Install package
For the Mac OS X install, you have just downloaded a file whose name ends in “.dmg”. Double-click this file to “mount” the dmg file, and then double-click the new disk icon to open the installation.
There are three files in the installation as I write this: a ReadMe file, which you should read; a “MySQLStartupItem.pkg” file, which you would use only if you want MySQL to start up every time you start your computer; and the “mysql-standard-xxxxx.pkg” file. The latter will install MySQL on your computer. Double-click it and follow the instructions.
You will need to give the installer your administrative username and password. After that, you can just follow the defaults and install MySQL. When the software is successfully installed, close the installer program, drag the mysql-standard disk to the eject button, and you are ready to start using MySQL!
Start MySQL
If you installed the startup item, MySQL will start automatically every time you start your computer. Otherwise, you will need to go to the command line of an administrative account and type:
sudo /usr/local/mysql/bin/mysqld_safe
After you type your administrative password, mysqld will be running on your computer. If MySQL starts up correctly, type CTRL-Z, then “bg” and return, and then you can exit out of the terminal.
When you want to shut down MySQL, go back to the command line and type:
/usr/local/mysql/bin/mysqladmin -h localhost -u root -p shutdown
It will ask for your MySQL root password. Type it, and MySQL will shut down.
Connect to your server
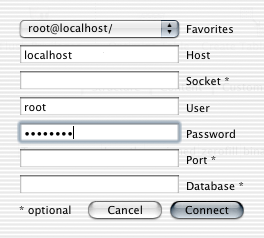
In Sequel Pro, if it is not showing you a “Connecting…” window, pull down the “File” menu and choose “New”. Leave everything blank except for Host and User. Set Host to “localhost” and User to “root”. Click “Connect” and you will be connected to your MySQL server.
If you are using the command line, type:
/usr/local/mysql/bin/mysql –h localhost –u root –p
Test Version
In Sequel Pro, go to the “Custom Query” tab. Type “select version()” to see the version of MySQL you are using. (Command-line users, remember to add a semicolon at the end of every line!)
Set Password
By default, root does not have a password. This means that anyone can connect to your MySQL database server from anywhere on the net, and gain root access—the ability to do anything whatsoever to any database on your server.
So the very first thing you want to do is change your root password.
Click on “Custom Query” in Sequel Pro. Type the following command:
set password = password(‘newpassword’)
This sets the password for the current user.
Something very important to remember in MySQL, however, is that users are not just described by name, they are also described by where they are coming from. In this way, a user on the web server can be given different access as the same user on the rest of the Internet.
When we set up our server, the server set up two root users. One for localhost, and one for the name of our computer. We need to change the root password for each root user.
1. Click back on the “Content” tab.
2. Pull down the “Databases” menu and choose “mysql”.
3. Click on the “user” table.
4. You should see a password for localhost root, but not for the other root.
5. Double-click, to select, the localhost root’s password.
6. Copy the password.
7. Double-click the other root’s blank password.
8. Paste the password into the blank field.
9. Click in the white area to put the password in.
10. Click “Flush Privileges”.
This will ensure that both root users have a password.
If you are using the command line, type:
use mysql;
update user set Password=password("newpassword") where User="root";
flush privileges;
Create a database
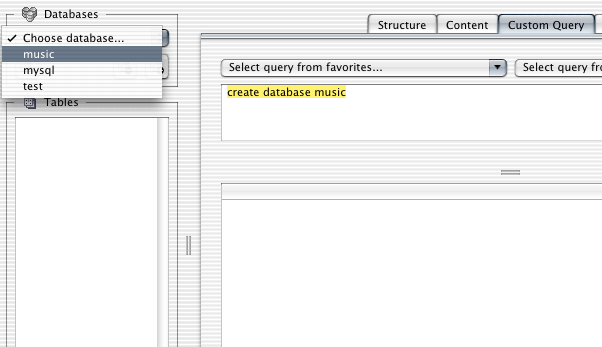
In the Custom Query tab, type “create database DatabaseName”. This will create a new, empty database. If you refresh the Databases menu or type “show databases” you will see your new database in the list of databases.
Create a database called “music”.
Create a working user
You do not want to work as root for normal usage. If you make a mistake as root, you can destroy not only your entire database but every database on the system. You want to limit the damage a typo can do.
grant alter, create, delete, drop, index, insert, select, update on DatabaseName.* to User@localhost identified by "Password"
For DatabaseName, specify the same database that you just created. For User, specify the username you wish to use to connect normally. Your username should not contain any spaces or other non-alphanumeric characters. Your password can (and probably should) contain special characters.
grant alter, create, delete, drop, index, insert, select, update on music.* to User@localhost identified by "Password"
This will allow you to connect but only from “localhost”, which is the same computer the server is on. Since we are installing this test server on our workstations, this will allow us to connect only from our workstation.
The “.*” in Databasename.* means that we have access to every table in that database.
The privileges we’re allowing this user are to alter tables, create tables, delete records, drop tables, index columns, insert records, and update records.
Finally, we need to set this user up with a password.
set password for User@localhost = password("Password")
Now that you have a user created, go ahead and quit using root. In Sequel Pro, close the window. From the command-line, type “quit” and press return.
