If you want to apply special styles to your text, you can only apply it to the yellow tags. Sometimes you’ll want to apply styles to text that doesn’t already have a tag. For this purpose, there are two “empty” tags, tags that do absolutely nothing except allow you to place styles into them. There is one empty tag for character-level formatting, and one for paragraph (or section) level formatting.
Empty Tags: SPAN
 SPAN is the tag for character-level formatting. It allows us to apply special styles to selected text within a paragraph or other paragraph-level formatting.
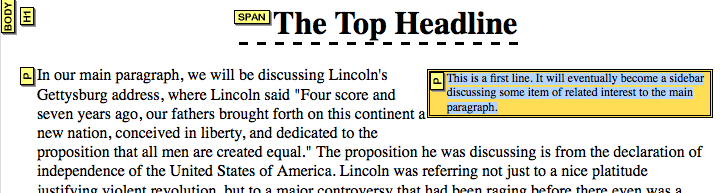
In our dashed underline above, we might not want the dashed underline to spread across the entire width of the page. We might want it to extend only the width of the headline itself.
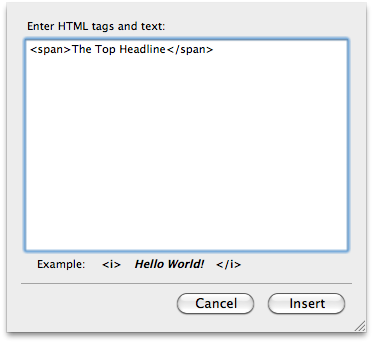
Select the headline, pull down the “Insert” menu and choose “HTML.…”. Surround your headline text with <span> and </span>, and then click on “Insert”.
Double-click the yellow H1 and remove the border-bottom-style you added in the above section. Then, double-click the yellow SPAN and add it again (border-bottom-style, dashed) making sure to add it in the Inline-Styles section.

Your dashed underline will now extend only the width of your headline.
Empty Tags: DIV
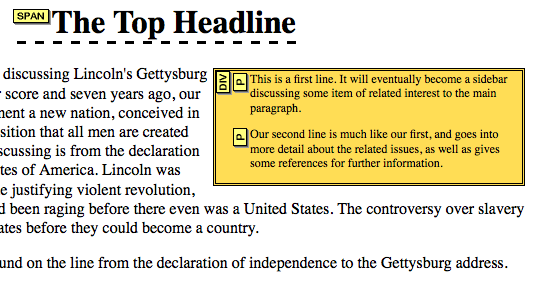
You can use styles to create sidebars of information. As with aligning images, you can align paragraphs to the right or left and have other paragraphs flow around them. Double-click on a small leading paragraph’s paragraph tag to bring up the Advanced Properties window.
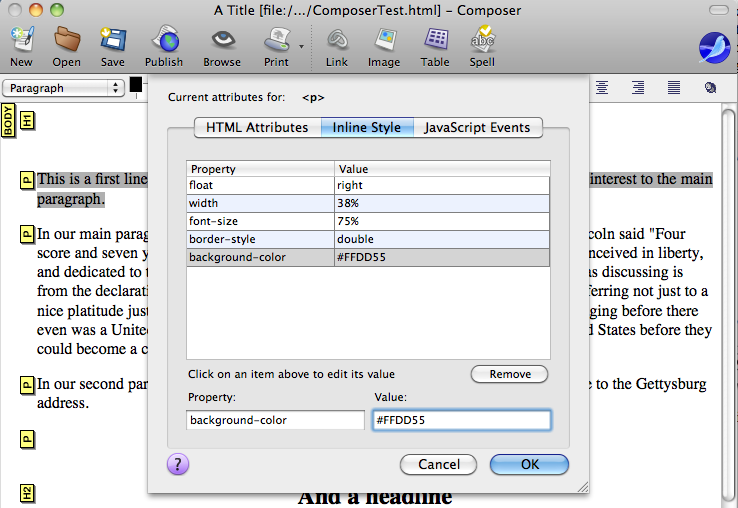
Here we set a few styles that cause our paragraph to “float” to the right, make its width 38% of the total window’s width, reduce the font size slightly, put a double border around it, and set a background color that is slightly brown. Our paragraph will now look like (in HTML Tag view):
But suppose our “sidebar” were to contain more than one paragraph? We could put another paragraph below the current one, and give it the same five styles, but what if later we want to change the color, or the font size, or any of those options? We will have to make that change in all of the paragraphs.
The paragraph-level equivalent to <span> is <div>. A <div> is a division of your page, much like a section of a word processing document. And it can contain multiple paragraphs.
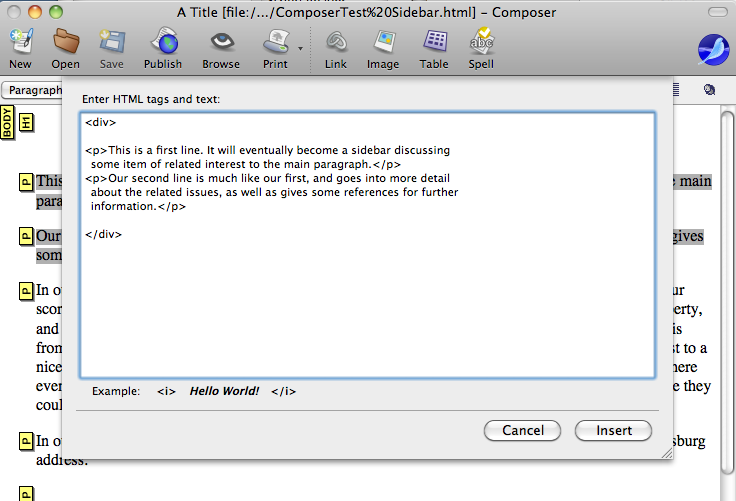
First, remove any style formatting you placed on the single paragraph. Then, highlight all of the two (or more) paragraphs which you want to enclose in a <div>. Choose “HTML…” from the “Insert” menu. The text that appears in the box should contain two or more sets of text surrounded by <p> and </p> tags. (If it doesn’t, you may want to cancel and re-select your text.) Add <div> to the beginning and </div> to the end.
 When you click on “Insert”, your paragraph tags will now be enclosed by a DIV tag. You can see this by the indentation and by clicking on the yellow DIV box. Clicking on the box should select both paragraphs.
You can now do the same to the DIV that you did to the paragraph earlier. Click on the yellow DIV box, choose “Advanced Properties” from the Format menu, and add the properties to the style section.
Your two paragraphs now align in a sidebar to the right, and you can easily add more paragraphs by clicking into the box and typing.
The Body Tag
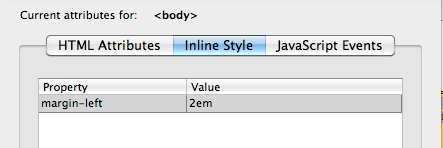
HTML consists of tags within tags. You can also add styles to your overall “BODY” tag, but you have to search for it. Go to “Page Colors and Backgrounds” and then click on “Advanced Edit…”. You can now edit the inline styles (as well as the JavaScript) for the BODY tag.
Go ahead and do that now, and add the style “margin-left” and set it to “2em”. Use the file for the Cool Musicians page if you have that.
Your left margin down the entire page should now be indented by about the space of two ‘m’ characters.
