In the middle of the clearing in the trees in the southeast is a rock altar. A random sacrificial animal of somebody’s god will appear. If that person offers the animal as a sacrifice, he will be interviewed by his god to see if he is worthy. If so, he will be granted anything, but what he asks for is also part of the test. If he fails (doesn’t act right, asks for something big) he will be cursed. No one else will notice this questioning, as it takes place on the spiritual planes at slowed time.
In the southeast is an Orc tower, abandoned. Anyone going by (on the path or river) will hear her yell for help, and if they can see the East window, will see her—as when she was alive. There are 8 skeletons on the bottom floor: AC7, HD1, At1, D1-6, save F1, C. The 2nd, 4th, and 6th floors are empty, along with the dungeon. There are 4 skeletons in the 3rd floor, and 5 on the 5th. In the top dungeon is the “girl”—who is now a skeleton with hair. She will act as though she didn’t know she is dead, and will act lawful, following the party out if they let her loose. Upon leaving the tower, she will become dust, and then the dust will form into a red amulet, surrounded by silver, with a gold chain. This will glow whenever the wearer is about to be endangered. It will also, upon being thrown into the rivers surrounding Grabdok’s lair, reform into Ara—the skeleton, but this time fully alive, and wanting to return to Erression*. The amulet will glow with heat when next to the river.
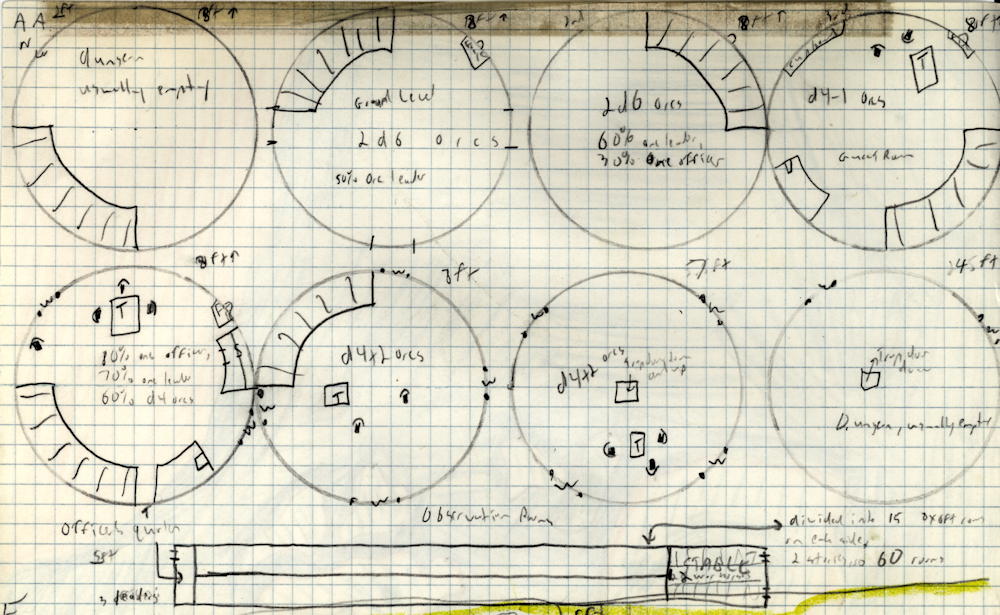
Orc tower in the southwest: see aa E for map. If many orc parties in the area are disappearing, or turn up dead, this will be beefed up. It is an outpost for the mercenary orcs.
In the forest between this tower and the swamp, a good person will (roll a secret 5 in 6) see a glint off to the east. About 10 feet off to the side is a sword-in-stone (+3, lawful, int 15, ego 12). This sword will not get a +3 against monsters within Grabdok’s rivers, but if the ‘to hit’ +3 is made, there is an automatic double damage. This sword does not do damage against other “goods”. It can be pulled out by a lawful good* on a 3 in 6, chaotic 2 in 6, and neutral 1 in 6. This can be tried only once every five levels.
Area A (sand)
7 staff earth elementals: AC6, HD8, hp 33, 37, 43, 36, 44, 21, At 1, D2-16, save F8, N. These elementals will attack any strong party attempting to move across the sand, and will follow them up to 10 feet from the sand (MV 20 feet/round) or scare off any party not worth attacking.
Area B (river)
7 staff water elementals: AC2, HD8, D1-8+, save F8, N. If in the water, they do an additional 1-8 points damage. The elementals will attempt to do the same as the earth elementals, but not leaving the water. Their “territory” stretches from the bridge by area B to the far west part of the river, 1-200 feet from the falls.
Area C (forest)
• 15 treants: AC2, HD8, AT2, D2-12/2-2, save F8, L.
Treants may also animate trees (2 per treant at a time) to fight as treants. The treants will not attack unless the party attempts to chop trees in area C. (There is a 1 in 20 chance that this tree will be a treant.) There is a 50% chance that the treants will attack, or that they will simply have the tree run away. If the party attempts to start a forest fire, all treants will animate two trees to fight.
Points D1 and D2 on the paths are connected by an invisible 2-way portal to each other. It will seem as though the path just acts normal, but there is a 2 in 6 chance that, if it is morning or night, each person will notice that the sun is on the other side.
Area D (swamp)
4 sea serpents will attack any non-orcs attempting to pass through the swamp.
• d4 sea serpents (lesser): AC5, HD6, hp 25, 26, 24, 34, At 1 bite, D2-12, save F3, N.
Area E (bay)
15 giant piranhas will attack anyone entering the bay.
• 3d4+3 giant piranhas: AC6, HD3+3, hp 9, 12, 20, 18, At 1 bite, D1-8, save F2, N.
Point F (buried skull)
Right at this point is a skull, half-buried in the ground. If they party digs him out, they will find a small sack with 3 gold pieces, 4 silver pieces, and a map of the island.
Area G (whirlpool)
At the fork, there must be a total strength of 90 rowing to keep from being pulled in. Anyone going down the whirlpool will take 2-8 points of damage. The boat will take 3-10. They will find themselves in the dwarven stronghold Stragenheim. See map db C.
db A Farmhouse
The circle is a silo, 30 feet high, with rotted grain, and d6+3 giant bats: AC6, HD2, hp 12, 11, 9, 7, At1, D1-4/round, save F1, N.
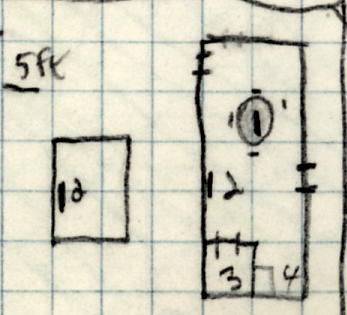
1. Table, with 4 people—mom, dad, son, daughter—sitting, eating, and talking noiselessly. The table, food, and silverware will appear real until taken 2 feet from the table. The people will not be able to be moved. If the table is broken (it is already rotted, but the illusion hides it) they will become skeletons, and the illusion will disappear: AC7, HD1, hp 3, 7, 7, 6, At1, D1-6, save F1, C.
2. Ladder to the bedroom: just some sheets and hay.
3. Pantry: a tarantella is in here: AC5, HD4, hp 24, At 1 bite, D1-8+poison, save F2, N. Victims must save vs. poison or start a frantic dance for 2d6 turns; they have a -4 on ‘to hit’, attackers get a +4, and onlookers save vs. spells or dance as long as the poisoned victim. There are some foodstuffs here, rotted and moldy, and webs.
4. Kitchen area: gas stove, no gas, but would still work if it had gas.*
db B 36) ZOMBIES!
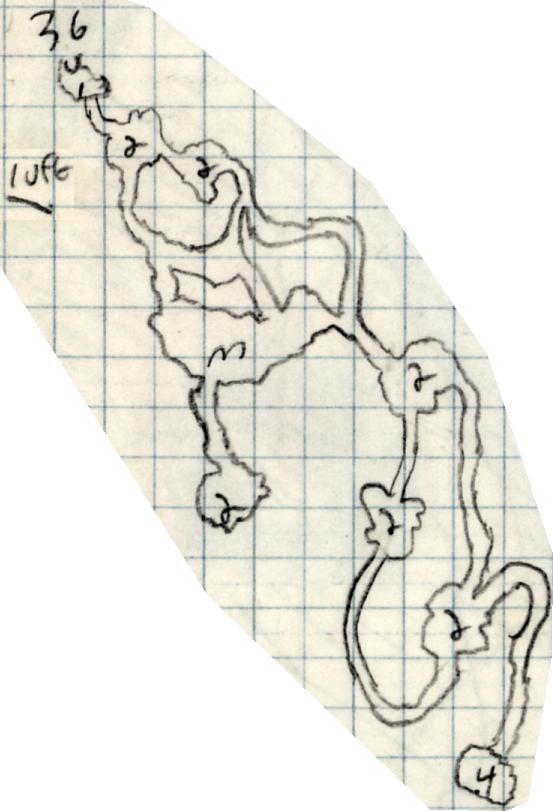
• Zombies: AC8, HD2, hp 9, 4, 3, 12, 7, 10, At1, D1-8, save F1, C.
1. Looks like this is all there is. If secret doors are looked for, 2 ones for humans are needed. Only 1 one is needed for elves to find the secret doors.
2. 9 zombies.
3. 9 zombies.
4. The door is secret. Inside, an amber golem: AC6, HD10, hp 56, At 2 claws, 1 bite, D2-12/2-12/2-20. The golem guards an Astral armor set and sword†.
Description: Cave 37
This cave is empty.
