If you rotate an object, you often don’t know where one end is. If you know where it was to begin with, you can use trigonometry to figure out where it will be. Or, more specifically, you can let POV use trigonometry to figure out where it will be.
The functions you’ll be using are sine, cosine, and tangent. In POV, these are sin, cos, and tan. The basic idea is that, in a triangle, you have six pieces: three lengths, and three angles. If you know any three of those (including at least one length and at least one angle), you can determine the other three. So if you can draw a triangle with one point at your unknown location, POV’s trigonometry functions can determine what that location is.
The easiest way to work with trigonometry is to make sure that at least one of your angles is a 90 degree angle. Preferably, the angle directly below your unknown location. This means that the distance from ‘0’ to your unknown location is the same as the height of your triangle. It also means that you know the angle there: it’s 90 degrees. (This is called a ‘right triangle’, by the way, because it has a 90 degree, or ‘right’, angle in it.) If you also know the angle that you rotated your object (and you should, since you rotated it), that gives you two items. And if you know one of the other sides (for example, the length of your object), that gives you three items, and that’s all you need to get the height and/or distance to your new object.
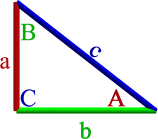
In the image, capital letters are angles. Lower-case letters are lengths. You can see that C is 90 degrees. The basic formulas are:
- A+B = 90
- c*c = a*a + b*b
- sine(A) = a/c
- cosine(A) = b/c
- tangent(A) = a/b
- cosine(B) = a/c
- sine(B) = b/c
- tangent(B) = b/a
Now, if you just start plugging in numbers, you’re probably going to get confused. POV uses two different ways of noting angles. When you rotate an object with the ‘rotate’ command, you rotate using degrees. But when you feed an angle to sin(), cos(), or tan(), you must feed it in radians. And if you use the reverse functions, you’ll get your answer back in radians. Where degrees go from 0 to 360, radians go from 0 to twice pi. POV has a formula to convert from radians to degrees, and another one to convert from degrees to radians. So the true formulas in POV code are:
- a = c * sin(radians(A));
- a = b * tan(radians(A));
- a = c * cos(radians(B));
- a = b/tan(radians(B));
- a = sqrt(c*c - b*b);
- b = c * cos(radians(A));
- b = a/tan(radians(A));
- b = c * sin(radians(B));
- b = a * tan(radians(B));
- b = sqrt(c*c - a*a);
- c = a/sin(radians(A));
- c = b/cos(radians(A));
- c = a/cos(radians(B));
- c = b/sin(radians(B));
- c = sqrt(a*a + b*b);
- A = degrees(asin(a/c));
- A = degrees(acos(b/c));
- A = degrees(atan2(a,b));
- A = 90-B;
- B = degrees(asin(b/c));
- B = degrees(acos(a/c));
- B = degrees(atan2(b,a));
- B = 90-A;
Remember that you don’t have to look at it sloping from right to left. You can flip it around and the angles and lengths stay the same.
You can see that, as long as you can make your problem into a right angle, you only need two lengths to find the third distance and any of the angles. And any combination of an angle and a length will also get you the rest of the angles and lengths.
Rotate a bar and determine its new endpoint
One of the simplest applications of trigonometry is when you know one side and one angle (other than the right angle). What are the lengths of the other two sides? That is, how much did the high end raise, and how much did it move inward as it rose?
Let’s make a simple scene with a block of wood on an alabaster tabletop:
[toggle code]
- #include "colors.inc"
- #include "textures.inc"
- #include "woods.inc"
- //the block
- #declare blockwidth = 5;
- #declare blockheight= .25;
- #declare blockdepth = 1.75;
- #declare blockrotate = 39;
-
box {
- <-blockwidth,0,0>,
- <0,blockheight,blockdepth>
-
texture {
- T_Wood31
-
finish {
- ambient .5
- }
- scale 1
- }
- rotate <0,0,-blockrotate>
- translate <blockwidth/2,0,-blockdepth/2>
- }
- //the tabletop
-
cylinder {
- <0,-blockheight,0>,<0,0,0>,blockwidth*.75
-
texture {
- PinkAlabaster
- }
- }
-
camera {
- location <0,3,-6>
- look_at <0,0.5,0>
- }
-
light_source {
- <20,90,-50>
- color White
- }
-
background {
- color White
- }
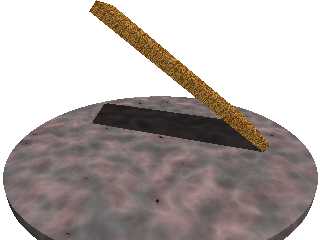
We’ve rotated this block up 39 degrees. If we want to hang something off of the top end, where is the top end?
This one’s pretty simple. You can visualize the triangle sitting right there. The board itself is side ‘c’, the angle we rotated it is angle ‘A’. The height will be side ‘a’.
The motion inward will be a little more complicated: side ‘b’ is the distance from where the board touches the table to directly underneath the top end. The motion inward, then, is often the length of the board minus side ‘b’. In our case right here, it becomes easier to do it a little differently.
According to our formulas above, if we have side ‘c’ and angle ‘A’, we can get the other two sides with:
- a = c * sin(radians(A));
- b = c * cos(radians(A));
So, add the following ‘glass support’:
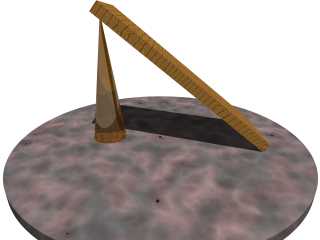
[toggle code]
- //the conical glass support
- //a = c * sin(radians(A));
- //b = c * cos(radians(A));
- #declare sidec = blockwidth;
- #declare angleA = blockrotate;
- #declare sidea = sidec * sin(radians(angleA));
- #declare sideb = sidec * cos(radians(angleA));
-
cone {
- <-sideb,0,0>,blockdepth/4,
- <-sideb,sidea,0>,0
-
texture {
- NBbeerbottle
- }
- translate <blockwidth/2,0,0>
- }
We knew side ‘c’ and we knew angle ‘A’, so we plugged that into the formulas to get side ‘b’ and side ‘a’. Remember that when we create the board, we created it with its right edge at x=0. So, we can place our cone at x = 0 minus side ‘b’, and then later translate it to the right the same amount that the board was translated to the right.
We ignored ‘z’. The board was centered on the ‘z’ axis, so leaving z=0 left the cone in the ‘z’ center of the board.
Side ‘a’ is the height of the high end of the board, so that’s where we put the tip of our cone.
- Rotated wooden bar scene
- This bar illustrates a problem that can be solved with trigonometry: we rotate a wooden slab by an arbitrary angle. How high is the end? How far as it moved to the right?
- Rotated bar with calculated height
- Using trigonometry, we can determine the exact height that a cone needs to be, to fit under the raised end of the wooden bar.
Roll a ball down an incline at a constant speed
Let’s roll a ball down our board. Change the angle to a more manageable 25 degrees by changing “#declare blockrotate = 39;” to “#declare blockrotate = 25;”.
Then, add a small ball at the top of the high end. We’re going to create an animation that rolls the ball to the right at a constant speed. The ball maintains contact with the board, of course, so it ‘falls’ down as well. Since we’re moving it to the right at a known speed, we know side ‘c’. We also still know angle ‘A’. What we need to find is side ‘a’ (the height of the ball) and side ‘b’, the motion to the right.
[toggle code]
- //the ball
- //a = c * sin(radians(A));
- //b = c * cos(radians(A));
- #declare sidec = (1-clock)*blockwidth;
- #declare angleA = blockrotate;
- #declare sidea = sidec * sin(radians(angleA));
- #declare sideb = sidec * cos(radians(angleA));
- #declare sphereradius = blockwidth*.1;
- #declare spherecircumference = 2*pi*sphereradius;
-
sphere {
- <0,0,0>,sphereradius
-
texture {
- pigment { Bright_Blue_Sky }
- scale .1
- finish { ambient .5 }
- }
- rotate <0,0,sidec/spherecircumference*360>
- translate <-sideb,sphereradius+sidea,0>
- translate <blockwidth/2,0,0>
- }
- First, we determine the length of side ‘c’: it starts out, at clock 0 equal to blockwidth, and ends, at clock 1, as 0.
- Next, we determine side ‘a’ (the height) and side ‘b’ (the distance from where the block meets the table).
- Then, we determine the circumference. We’ll use that to ‘rotate’ the ball so that it really rolls along the board. We match the circumference to the distance rolled by dividing the two and then multiplying by 360, or a full rotation.
And it works wonderfully, except our ball is sunk into the board! Why did that happen? Because the board has thickness. Our calculations determined where the bottom of the board would be, not where the top of the board would be. The cone, of course, should touch the bottom, but our ball needs to touch the top.
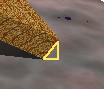
But if you try to draw a simple triangle where you know enough to find all that information, you’ll probably have a lot of trouble. It is easier to stick with the current formula, and then take a look at the lower right of the image, where the board meets the table. If you look, there’s a tiny little triangle there, with the left point being where the bottom of the board meets the table, and the right angle directly beneath the overhang. I’ve drawn the triangle in the extreme close-up on the right. Side ‘c’ is known: it’s the height of the board. Angle ‘A’, where the board meets the table, is also known. It is 90 minus the angle the board was rotated. We need to find side ‘a’ (the height) and side ‘b’ (how far over the tip of the triangle is).
[toggle code]
- //now we need to determine how to move it to the top of the board
- #declare tiny_sidec = blockheight;
- #declare tiny_angleA = 90-blockrotate;
- #declare tiny_sidea = tiny_sidec * sin(radians(tiny_angleA));
- #declare tiny_sideb = tiny_sidec * cos(radians(tiny_angleA));
-
sphere {
- <0,0,0>,sphereradius
-
texture {
- pigment { Bright_Blue_Sky }
- scale .1
- finish { ambient .5 }
- }
- rotate <0,0,sidec/spherecircumference*360>
- translate <-sideb,sphereradius+sidea,0>
- translate <blockwidth/2,0,0>
- translate <tiny_sideb, tiny_sidea,0>
- }
- Rolling ball down an incline scene
- By shortening the side we use in the calculation, we can move an object down that side. As the side gets shorter, so does the height that results from the calculation.
- Rolling ball on surface
- Sometimes, because “real world” objects are not infinitely thin, you’ll need to adjust for the thickness of a rotated object in your calculations.
Roll a ball down an incline with acceleration
It might be more realistic to have our ball start out slow and accelerate as it moves down the incline. Gravity accelerates at approximately 9 meters per second per second in free fall. On an incline, the incline applies an opposing force that partially counteracts gravity. Completely flat, there is no acceleration. In between flat and 90 degrees (straight up) are varying degrees of opposition to acceleration due to gravity. I don’t know the formula offhand, so I’m going to assume a linear relationship.
By determining the acceleration due to gravity, we can determine how long it takes the ball to hit the ground. This gives us the number of seconds we want to follow the ball. That is, if it takes 2.5 seconds for the ball to hit the ground, we want POV’s clock of 0 to mean 0, and 1 to mean 2.5 seconds. Once we know how many seconds an arbitrary clock interval is, we can determine how far the ball has fallen. Since the ball has to fall down the incline, we need to determine where along that incline the ball is for having fallen that far.
The acceleration due to gravity is going to be assumed to be 9 meters per second per second times the angle divided by 90. A 90 degree angle is free fall, and a 0 degree angle is a flat surface.
The time it takes the ball to fall to the ground is the height in meters, times 2, divided by the acceleration due to gravity, and then the square root of that. We’re going to assume here that our units are in meters.
Given the current time, we know the distance fallen; that’s side ‘a’. And we know the angle A: that’s what we rotated the block. Given that, we can find side ‘c’ (the amount the ball has rolled) and side ‘b’ (the distance to the right the ball has gone).
[toggle code]
- //the ball
- //determine what time it is now
- //assume that 1 unit = 1 meter
- //save the height of the cone
- #declare startheight = sidea;
- #declare startleft = sideb;
- #declare gaccel = 9*mod(blockrotate,90)/90;
- #declare time2fall = sqrt(2 * sidea/gaccel);
- #declare currenttime = clock*time2fall;
- #declare sidea = gaccel/2 * currenttime*currenttime;
- #declare angleA = blockrotate;
- //b = a/tan(radians(A));
- //c = a/sin(radians(A));
- #declare sideb = sidea/tan(radians(angleA));
- #declare sidec = sidea/sin(radians(angleA));
- //now we need to determine how to move it to the top of the board
- #declare tiny_sidec = blockheight;
- #declare tiny_angleA = 90-blockrotate;
- #declare tiny_sidea = tiny_sidec * sin(radians(tiny_angleA));
- #declare tiny_sideb = tiny_sidec * cos(radians(tiny_angleA));
- #declare sphereradius = blockwidth*.1;
- #declare spherecircumference = 2*pi*sphereradius;
-
sphere {
- <0,0,0>,sphereradius
-
texture {
- pigment { Bright_Blue_Sky }
- scale .1
- finish { ambient .5 }
- }
- rotate <0,0,-sidec/spherecircumference*360>
- translate <-startleft+sideb,sphereradius+startheight-sidea,0>
- translate <blockwidth/2,0,0>
- translate <tiny_sideb, tiny_sidea,0>
- }
We first determine the starting location of the ball, and then we determine how far it has fallen and what that means for rightward motion and what that means as far as ‘true’ motion rolling down the incline. The math is pretty much the same, except that our side ‘a’ is determined by the fall rather than by the motion rightward.
You can play around with it by adjusting the angle and seeing what happens.
- Accelerating ball scene
- In this scene, the ball accelerates as it rolls down the incline.
Easier ways and Harder ways
I did a couple of things here that you might not need the formula for, just because I wanted to keep things simple. Don’t forget that in some cases you don’t have to know any of this. POV always rotates around the origin. If you have a ball resting on one end of your board, and you rotate the board around the ‘z’ axis 32 degrees, just rotate the ball around the ‘z’ axis by 32 degrees also. It will stay exactly where it is on the board. If you want to roll it, roll it before you rotate the board.
For example, making the ball roll left to right at a constant speed: we could have rolled the ball while the board was flat, and then rotate both the ball and the board by the same amount.
Likewise, don’t forget that cylinders don’t have to be level. And you might also find the ‘vector’ functions useful.
And finally, some more advanced formulae from Josh English:
Given any triangle with vertices A,B, and C, and their opposing sides, a,b,and c, the Law of Sines states: (The Points and their angles are refered to by the same capital letters, the lengths of the sides are in lower case) (sin A)/a = (sin B)/b = (sin C)/c.
The Law of cosines states:
a^2 = b^2 + c^2 -2bc cos A
b^2 = a^2 + c^2 -2ac cos B
c^2 = a^2 + b^2 -2ab cos C.In POV-Ray terms, cos A can be found with vdot(B-A,C-A)/a,c. In the vdot, use the position vectors, not the angles at those points.
- Triangle angles and sides scene
- This POV-Ray scene shows which angles and sides in a triangle match up. In a right triangle, it’s fairly easy to calculate all of the sides and angles as long as you have any two numbers.
- Rolling ball, flat incline
- This scene flattens the incline, so that the ball accelerates more slowly.
- Rolling ball, steep incline
- This scene steepens the incline, so that the ball accelerates more quickly.
