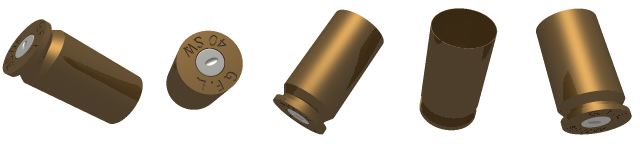
In this lesson, we’re going to go, step-by-step, through the creation of a spent bullet casing. We’ll start simple, with the basic shape, and end up by programming POV to wrap some text stamped into the bottom.
The Basic Bullet Shape
Lathes are one of the most useful shape functions in POV. The classic use for a lathe is to create a wine bottle. A lathe can create anything that is “circularly symmetrical”. That is, if you could take a coat hanger and shape it into half of the outline, and then rotate the coat hanger in a circle to get the shape, you can use a lathe to make this shape in POV.
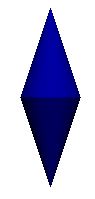
This lathed object has three ‘points’. It starts out .75 units high and 0 to the right, goes to 0 units high and .25 units to the right, and then goes to .75 units low and 0 units to the right.
Compare the graph to the final image. Here is how you actually type it:
[toggle code]
-
lathe {
- linear_spline
- 3
- <0,.75>,<.25,0>,<0,-.75>
- }
First, we tell it that it has a “linear_spline”. This means that the corners are sharp. You can also make the corners curved, but this is more complicated. Second, we tell it that this lathe has 3 points. Finally, we tell POV what those points are, in ‘x’ and ‘y’ co-ordinates. Normally, we give POV co-ordinates that have three numbers: left/right, up/down, and in/out (x, y, and z). The lathe starts with a flat shape in ‘x’ and ‘y’, however, and “rotates” that shape through the “in/out”, or ‘z’, numbers. That’s how we end up with a circular object.
So, what’s the shape of a bullet casing? Well, we’re going to use a .40 S&W that I happen to have sitting on my desk. We’ll use 10 points to model it:
[toggle code]
- #include "distances.inc"
-
lathe {
- linear_spline
- 10,
- <0,2.1>*centimeters,
- <1.1/2,2.1>*centimeters,
- <1.1/2,.35>*centimeters,
- <.9/2,.2>*centimeters,
- <.9/2,.1>*centimeters,
- <1.1/2,.1>*centimeters,
- <1.1/2,0>*centimeters,
- <.5/2,0>*centimeters,
- <.48/2,.2>*centimeters,
- <0,.2>*centimeters
-
texture {
- T_Brass_3A
- }
- translate <0,-1,0>*centimeters
- //rotate <-45,0,0>
- }
Looks pretty similar, except that we have a lot more points, and we’re multiplying all of them by centimeters! In order to make this one work, you need to create a file called “distances.inc”, and in that file, put “#declare centimeters = 2.54/12;”. In POV, the “default unit” is whatever you want it to be. You can claim that a ‘1’ means a mile, a foot, a meter, or even some made-up alien measure. In this case, we’re claiming that one unit is the same as one foot: and then, since I measured the bullet casing in centimeters, we’re converting each of those numbers from centimeters to feet. When you multiply a set of points (“<.9/2,.1>”) by another number (“centimeters”, which we’ve declared to be “2.54/12”), POV changes all of the numbers inside that “point”.
For the “texture” of the object, we used one of the brasses in “metals.inc”, T_Brass_3A. “Metals.inc” is an “include file” that comes with POV. It contains colors and textures that can make your objects look like they were made of metal. POV has a lot of “include files”. To use them, you have to add “#include "filename"” to your POV scene. Remember, in these tutorials, you can click on the image and see the source for the image!
After we add the texture, we “translate” the object down by 1 centimeter. “Translate” just moves the object. In this case, we’ve moved it so that it is in front of the camera. (We could just as well have moved the camera.)
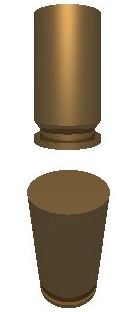
Then, we “rotate” the object: or we don’t. Those two slashes in front of “rotate” mean that this is a “comment”. We aren’t actually doing it. You can use comments to keep extra POV statements around that you might use in the future, but don’t want to use right now. In this case, that’s how we made the two bullets above: the first one is with the “rotate” commented, and the second, tilted bullet is with the rotate command uncommented (the two slashes removed).
How did we tilt the bullet? By rotating it 45 degrees towards us around the ‘x’ axis.
- Simple lathe scene file
- This simple diamond shape is about the simplest lathe object as you can make.
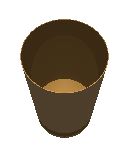
- Basic bullet shape scene file
- This lathe will provide the basic bullet shape for the rest of the tutorial.
Hollowing Out Our Bullet
But our bullet casing is solid brass! Real bullet casings are open on one end. How to fix that? POV has a feature called “Constructive Solid Geometry”, or “CSG”. CSG allows us to combine multiple shapes into a single shape. We can add shapes to each other, merge them together, or gouge one shape out of another. That’s what we’re going to do. We are going to gouge a cylinder out of our solid bullet.
[toggle code]
-
difference {
-
lathe {
- //what we had before
- }
-
cylinder {
- <0,.39,0>*centimeters,<0,2.5,0>*centimeters,
- 1.08/2*centimeters
- }
-
texture {
- T_Brass_3A
- }
- translate <0,-1,0>*centimeters
- rotate <-65,0,0>
-
lathe {
- }
That looks a lot better, doesn’t it? Now, what happened here? The POV statement to “gouge” one shape out of another is the “difference” statement. The first object is the ‘real’ object, and the rest of the objects in a difference statement ‘take away from’ the real object. Here, we’re taking the “difference” between our original lathe and our new cylinder. The cylinder is centered right/left and front/back, but starts at .39 centimeters up and ends 2.5 centimeters up. If you look at our lathe, it starts at 0 centimeters up and ends at 2.1 centimeters up. This means that our cylinder, when it is ‘removed’ from our lathe, will leave the lathe solid on the bottom, hollow, and open on the top. Finally, we gave our cylinder a 1.08/2 centimeter radius. Since our lathe has a 1.1/2 centimeter radius, this gives a very thin wall to our hollow bullet casing.
We also rotated the bullet a little bit more so that we could see inside it.
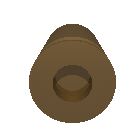
- Hollowed Bullet
- Using the difference statement, we remove a cylinder from our bullet lathe so as to make it hollow.
Now, what about the primer?
Go ahead and rotate your bullet casing by 75 degrees around the x axis instead of -65. This way, you can see the bottom. Looks pretty good except that the dented silver primer button is missing! So, first we will create a silver button, and then we will stick it in the indentation at the bottom of our casing.
The easiest way to create a button would be to make a very small cylinder. But cylinders have sharp edges, and our button will look much nicer if it has slightly rounded edges. POV has a special shape just for cubes and cylinders with rounded edges: the “super ellipsoid”. Go ahead and read the manual on it, it’s pretty useful. For our purpose, we’re going to set the super ellipsoid’s two radiuses to ‘1’ and ‘.1’. This creates a cylinder with rounded edges. However, the cylinder is lying on its side, so we have to rotate it 90 degrees around the ‘x’ axis to bring it standing up.
We combine our superellipsoid and our lathe by using the “union” statement. It combines two different shapes. And, as we see here, those two shapes can themselves be made out of CSG.
[toggle code]
-
union {
- //see above for our hollowed lathe here
- //and add the dented silver primer button
-
difference {
- //the silver button
-
superellipsoid { <1,.1>
- rotate <90,0,0>
- scale <.05,.005,.05>
- translate <0,.024,0>*centimeters
- texture { T_Silver_3B }
- }
- //the dent
-
sphere {
- <0,0,0>.059*centimeters
- scale <2,.5,1>
- translate <-.024,0,0>*centimeters
- texture { T_Silver_3A }
- }
- }
-
texture {
- T_Brass_3A
- }
- translate <0,-1,0>*centimeters
- rotate <75,0,0>
- }
So we’ve created a super ellipsoid, scaled it by a significant amount (and more so in the up/down axis than the others, to flatten it), moved it up .024 centimeters so that it’s nestled in our little indentation, and then given it a silver texture. Then, we gouge out an oblong sphere from this button. Our sphere starts out .059 centimeters in radius, but we scale it so that it is twice that in the left/right axis and half that in the up/down axis. This makes our sphere oblong. We move the sphere left by .024 centimeters, so that it isn’t in the exact center of our button. We give the sphere a slightly duller silver texture: in a difference statement, if any of the ‘gougers’ have their own texture, that texture is applied to the area that is gouged out.
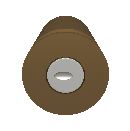
- Bullet with primer scene
- The super ellipsoid object makes a fine primer for the bullet, especially with a sphere indented into it using difference.
Stamping Text Into the Bottom
Now our bullet casing looks quite good. But most casings have the manufacturer and caliber stamped into the bottom. POV has a text object, so we could make a text object and then take the difference between that and our brass casing. But the bottom of our casing is circular, so our text can’t be in a straight line: it has to be rotated around the circle. We could do this by hand, but why not let POV rotate the text for us? That’s what computers are for!
In order to make POV do the rotation for us, we need to understand a little bit about POV’s programming language. Don’t panic! You’ve already used it.
- #declare
- The basic part of the programming language built into POV is the “declare” statement. This puts a number, a point, or an entire object into a container. In programming terms, the container is called a “variable”, because we can vary the container’s contents at will. We used to this to declare that the variable called “centimeter” contains the number that converts between feet and centimeters. We can also declare entire objects, and we’re going to do that here: declare the text that we’re going to stamp as an object, and then stamp this object into the bottom of our bullet casing.
- Any ‘declare’ that is a number or a formula must end in a semi-colon. Others must not.
- #while
- We can ask POV to repeat itself as long as a certain condition is met. Every statement between the “#while” and the “#end” will be repeated. In this case, we are going to create a string of text and have POV go through and work on each letter in that string of text. The part inside the “while” and “end” are called the “while loop”, because POV will “loop” through that text as many times as we want.
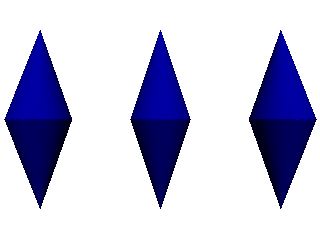
Let’s start with a simple example. Let’s go back to that simple, diamond-shaped lathe we created at the beginning, “declare” it, and then duplicate it three times.
[toggle code]
- //create a blue double cone
-
#declare double_cone = lathe {
- linear_spline
- 3
- <0,.75>,<.25,0>,<0,-.75>
-
pigment {
- color Blue
- }
- }
- #declare Counter = 1;
-
#while (Counter <= 3)
-
object { double_cone
- translate <-2+Counter,0,0>
- }
- #declare Counter = Counter + 1;
-
object { double_cone
- #end
First, we use “#declare” to declare that “double_cone” is really our lathe. Wherever we use “double_cone”, POV will replace that with all the lathe text: we don’t have to retype it. Note that “underscore” in double_cone: declared variables in POV cannot contain spaces.
Second, we “#declare” a variable called “Counter”, and we set it to ‘1’. Third, we do something “while” our “Counter” is less than or equal to 3. Well, it’s currently 1, so that is definitely less than or equal to 3. Inside the while loop, we make use of our double_cone object, and then we move it to the left according to the Counter variable. When Counter is 1, we move it -1 unit to the right (that is, one unit to the left); when Counter is 2, we move it 0 units to the right (that is, we don’t move it at all), and when Counter is 3, we move it 1 units to the right.
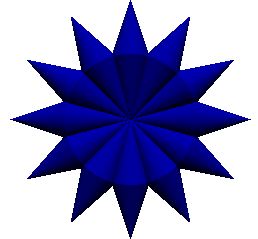
For creating three very simple images, spaced 1 apart, this might be a bit of overkill. But if your images are complex, or you want tens or hundreds of them, this technique becomes invaluable. Let’s make a circle of these diamond-cones. Replace the while loop with:
[toggle code]
- #declare Counter = 1;
-
#while (Counter <= 12)
-
object { double_cone
- translate <0,-.75,0>
- rotate <0,0,Counter*30>
- }
- #declare Counter = Counter + 1;
-
object { double_cone
- #end
You’ll also want to move the camera 3 units back instead of 2. See what happened? We did pretty much the same thing, except that we moved the double_cone so that its tip was at 0 on the y axis: the cone is .75 units high, so when we translated it down by .75 units, it ends up having its tip at zero. When x, y, and z are all zero, that’s called the “origin”. This is what POV rotates things around. It rotates them around the origin. So, next, we rotate the double_cone by Counter*30 degrees. Since we are going from 1 to 12, this will rotate the double_cone all the way around the origin from 30 degrees to 360 degrees.
That looks pretty cool, but let’s go ahead and create our text object so we can stamp the bottom of our bullet casing.
[toggle code]
- //create the bullet text
-
#declare bullet_text = union {
- //top text
- #declare Title = "G.F.L."
- #declare CharCount = 1;
-
#while (CharCount <= strlen(Title))
-
text {
- ttf "Geneva.ttf", substr(Title,CharCount,1), .07*centimeters, 0
- scale <.05,.05,1>
- translate <0,.33*centimeters,0>
- rotate <0,0,-120*CharCount/strlen(Title)+60>
- }
- #declare CharCount = CharCount+1;
-
text {
- #end
- //bottom text
- #declare Title = "4 0 S.W."
- #declare CharCount = 1;
-
#while (CharCount <= strlen(Title))
-
text {
- ttf "Geneva.ttf", substr(Title,CharCount,1), .07*centimeters, 0
- scale <.05,.05,1>
- translate <0,-.47*centimeters,0>
- rotate <0,0,110*CharCount/strlen(Title)-80>
- }
- #declare CharCount = CharCount+1;
-
text {
- #end
- rotate <-90,0,0>
- }
This is pretty big, so let’s take it a step at a time. First, we deal with the manufacturer, Fiocchi. They stamp “G.F.L.” on the bottom of their cases. Then, we set our Counter, “CharCount”, to 1, and we loop as long as CharCount is less than or equal to the length of the Title string. That’s what the “strlen(Title)” does; in this case, “strlen(Title)” is the same as “6”, because that’s how many characters are in “G.F.L.”. It counts the periods as well.
We use the truetype font “Geneva.ttf”. You may need to use TTConverter to create it: see the software utilities list on the front page of these tutorials. Geneva.ttf must be in your “includes” folder. We’re using “substr(Title,CharCount,1)”. That means, take the “sub”, or inner part, of the string Title, starting at character CharCount, and going for 1 character. In this case, for example, if CharCount is 2, this uses the second character, a period. We make this character .07 centimeters deep. We scale it down by half left/right and up/down, then we move it .33 centimeters up, so that it’s straight above the silver button. Finally, we rotate it so that it covers a 120 degree span, starting at 60 degrees to the left and moving to 60 degrees to the right.
We do something similar to the bottom text, except that we move it .47 centimeters down, and make it span 110 degrees, and we move it off-center, so that it goes from 80 degrees on the left to 30 degrees on the right.
Now, how do we make use of this object? Go back to your last “bullet” text and, below the hollowing out of the cylinder, add:
[toggle code]
- //stamp the text
-
object { bullet_text
- translate <0,-.047,0>centimeters
- texture { T_Brass_2A }
- }
We move the bullet text “up” by .047 centimeters to ensure that it is indented into the bullet case. We add the less-bright Brass texture, T_Brass_2A to this indentation. And then we’re done!
- Simple while translation example
- Create multiple versions of the same diamond-shaped cone using POV’s while statement.
- While rotation example
- This while example takes the diamond cone and rotates it around a central point.
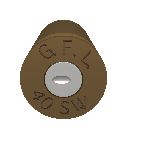
- Bullit with stamped text
- This scene file completes the spent bullet casing, stamping the manufacturer’s name along the bottom.
- Spent bullet casings scene file
- The final scene displays the spent bullet casing from several angles.
