Persistence of Vision Locations
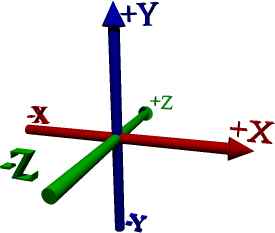
Persistence of Vision uses what’s called a cartesian coordinate system. This means that locations in POV are specified with numbers, sort of like latitude and longitude on a map, except flat. Any object can be placed in a POV scene by specifying three numbers: the left/right location, the up/down location, and the in/out location. These are called ‘x’, ‘y’, and ‘z’, respectively. You always write them as <x,y,z>. In a cartesian coordinate system, the ‘center’ is a special place: this is the location that is neither left nor right, up nor down, in nor out: <0,0,0>
In POV, ‘left’ numbers are negative, and ‘right’ numbers positive; ‘up’ numbers are positive and ‘down’ numbers negative; and ‘in’ numbers positive and ‘out’ numbers negative.
The numbers in POV mean nothing except what you want them to mean. They’re just generic ‘units’, miles, feet, inches, meters, whatever you want. Moving something ‘5’ to the left or ‘9’ out isn’t moving it 5 feet or 9 inches, unless that’s what you want it to mean. But you have to be consistent: if you decide that POV units are ‘feet’ in one part of your scene, you need to keep them as feet in the rest of the scene. You can’t move something ‘6 inches’ up, you have to move it ‘.5’ up or ‘1/2’ up: because 6 inches is half a foot. On the other hand, if you decide that your POV units are inches in one part of the scene, and know that your desk is 4 feet off the ground, you can’t write it as 4, you have to write it as 48, because 4 feet is 48 inches.
- Locations example file
- This POV scene file displays arrows along each axis to show how the coordinate system works.
Persistence of Vision Camera
A POV ‘scene’ is a three dimensional place with objects in it. Just as real photographers do, you have to decide where to place the ‘camera’ and where to point it. A camera in POV can do lots of things that a real camera can do: it can tilt, pan, take special effects such as colored lenses or fish-eye lenses, or be focussed or unfocussed. However, the two simplest things you need to know to handle your camera are (a) where it is, and (b) where it is pointed. Both of these are standard POV <x,y,z> locations:
[toggle code]
-
camera {
- location <0,4,-2>
- look_at <0,0,2>
- }
This camera is placed in the center of the left/right axis (x), four units up, and two units out. It is looking at the location which is 0 units left, 0 units up, and two units in. The ‘location’ keyword sets where the camera is, and the ‘look_at’ keyword sets where the camera is pointed.
Take a good look at the way the camera’s information is written. This is how you will write most things in POV. You’ll have a keyword describing the object (‘camera’ in this case), an opening curly bracket, some lines with keywords describing the object (‘location’ and ‘look_at’ in this case), and a closing curly bracket.
You can place the camera wherever you want and have it look at whereever you want. Sometimes, if you have really complicated objects, you will want to not point the camera straight at the center of the object. Because of the way POV works, if you have the camera pointing directly at the center of an object, down a line parallel to either the x, y, or z axis, you will see irregularities in the object’s surface. You can easily fix this by moving the camera a tiny amount in one direction, or moving where the camera is pointed to. Even a .0001 difference will be enough to remove the bad irregularities. Don’t worry about this, however, unless it starts happening.
Persistence of Vision Light Sources
In order to see things in your POV scene, you have to have more than a camera: you also have to have lights! You can have spotlights, colored lights, or arrays of lights, but usually while you are beginning you will use what is called a ‘point’ light. This is a light that originates from one point and never gets dim no matter how far from the source it is.
[toggle code]
-
light_source {
- <1,10,-10>
- color Green
- }
This light source is 1 unit to the right, 10 units up, and 10 units out. It illuminates with a green light. Most of the time, you’ll probably end up using ‘color White’ to get a white light.
Note that light sources do not look like anything unless you make an object yourself and put it in the same place as the light source. You won’t see a ‘bright spot’ if you point the camera directly at the light source. ‘Light’ in POV has no existence until it hits and illuminates an object that you’ve placed in the scene.
Persistence of Vision Backgrounds
If your scene isn’t completely filled with objects, there will be ‘empty’ spots where nothing exists. You should tell POV what color you want this emptiness to be.
[toggle code]
-
background {
- color White
- }
In this case, we’ve set the background’s color to be ‘White’. The default is ‘Black’, but this isn’t a good choice, generally, because it means that shadows (which are also black) blend in with the background, making it harder for you to see what’s going on in your scene.
The background is infinitely far away in all directions, and never gets shadows cast on it.
Persistence of Vision Include Files
The concept of ‘include’ files is borrowed from ‘C’ programming, but don’t let that scare you. ‘Include files’ (often abbreviated to ‘includes’ in programmer lingo) exist to make things easier for you, not harder. For example, in all of the POV object fragments I’ve shown you, I’ve specified colors by name: White, Green, Blue, or Red. I can do this because I use the ‘colors.inc’ include file. POV, like your computer, knows colors by numbers, not names. Each color is a combination of a certain amount of red, green, or blue. The include file ‘colors.inc’ tells POV that the word ‘Green’ is a color with no red or blue, just green, and that the color ‘Yellow’ is a color with no blue, just red and green.
- #include "colors.inc"
Special POV ‘statements’ that don’t specifically refer to objects, but instead refer to the POV ‘code’, almost always begin with the pound sign ‘#’. In this case, we’re telling POV to go find the file ‘colors.inc’ and ‘include’ it right here. Normally, you’ll put the ‘#include’ statement at the beginning of your POV scene description. POV reads the description sequentially, so if you have any objects before ‘#include "colors.inc"’, they can’t make use of the color words. To keep that from happening, just put ‘#include "colors.inc"’ in the front of the file.
POV’s built-in include files, such as ‘colors.inc’, are all stored in a special folder called “Include”. You can also create your own include files, and either put them in that special folder, or put them in the same folder as your scene file. That’s a bit too complicated to get into right now, but the idea is that you can keep commonly used scene objects inside a single file, and then instead of retyping them all the time, you can ‘include’ that file in any scenes that use those objects. For example, if you’ve created POV descriptions of buildings in your town, and you are creating six postcards that use those descriptions, you can create one file with the building descriptions, and each postcard scene file will ‘#include’ the ‘buildings.inc’ file. The advantage, besides not having to retype each building for each postcard, is that if you improve your building descriptions, the next time you make the postcards the improved buildings will be in each postcard automatically.
In general, include files will end in ‘.inc’.
An include file you might find useful is a distances include file that specifies distances in relation to various measurements. For example, you might decide that a POV unit is one foot, and then create an include file that converts inches, centimeters, miles, and whatever, to feet.
- POV distances include file example
- You can make a “distances” include file for your Persistence of Vision scenes that lets you refer to inches, feet, meters, centimeters, miles, light years, and whatever other distances you plan to use.
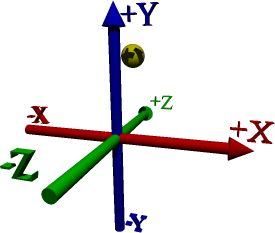
Moving objects within your scene
For reasons which will become clearer later, you will sometimes want to create a POV object in one location, and then move the object to another location. You do this with the ‘translate’ keyword.
[toggle code]
-
sphere {
- <0,0,0>,.5
- pigment { color Yellow }
- translate <0,3,2>
- }
In this case, we create a sphere at the origin (<0,0,0>), 1/2 unit in radius (so, 1 unit in diameter), and then we move it 0 units left, 3 units up, and 2 units in.
- Translating an object example scene
- This scene file creates a yellow sphere at the origin (0, 0, 0) and then translates it up the y-axis.
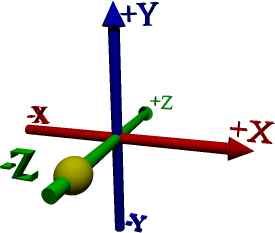
Rotating objects in your scene
Besides moving an object according to x, y, and z units, you can also rotate the object, in degrees around an axis. Rotated objects always rotate around an axis pole. You rotate objects a number of degrees from 0 to 360. Zero and 360 are the same thing, since a 360 degree rotation rotates all the way around the pole back to where the item started (whereas a zero degree rotation leaves the item where it started).
[toggle code]
-
sphere {
- <3,0,0>,.5
- pigment { color Yellow }
- rotate <0,90,0>
- }
In this case, we created the sphere 3 units to the right, but when we look at the picture, the sphere is sitting 3 units towards us on the ‘Z’ axis! That’s because we rotated the sphere 90 degrees around the ‘Y’ axis. If we had rotated the sphere ‘-90’ along the ‘Y’ axis, the sphere would have been 3 units in on the ‘Z’ axis. Rotating it ‘180’ or ‘-180’ would put it in the same place: 3 units to the left on the other side of the ‘Y’ axis. You may want to play around with this one to see how it works. Click on the image (or any image in this tutorial) to get the POV source, and modify the rotation numbers.
Since boxes are always created lying flat, you have to rotate them if you don’t want them lying flat. You can also rotate the camera if you want it to move in a circle around an axis.
- POV example rotation scene
- You can rotate any object around the origin, or zero-point, of your scene.
Scaling objects in your scene
Besides moving and rotating objects, you can also ‘scale’ them, that is, make them bigger or smaller. Like rotation, scaling works around the axes, in this case, around the ‘origin’, or <0,0,0>. For example, if you take a 1 unit radius sphere, which is 3 units high (2 units high on the bottom and 4 units high on top), and scale it by 2 (so that it is twice as big as before) it will now be 4 units high on the bottom and 8 units high on top! That’s because you’re actually scaling the distance of each part of the object from the axes. Not only will the scaled object be made bigger, it will also move further away from that axis. If the scaled object is made smaller, it will be moved closer to that axis.
This isn’t always what you want: and now we see one of the reasons for the ‘translate’ directive. Often, you will end up creating your object at the ‘origin’, scaling it, and then ‘translating’ it to where you want it to be. Since you scaled it at the origin, where it is 0 units away from each axis, the object will not be moved. Twice zero, or three times zero, or a hundred times zero, is still zero. The edges of the object will be made bigger, but the center of the object will not move.
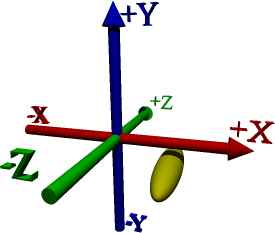
You can scale in two ways: you can scale the entire object, or you can scale the ‘x’, ‘y’, and ‘z’ parts separately. The directive ‘scale 3’ will simply make the object three times as big. The directive ‘scale <1,3,1>, however, will make the object three times as tall, but keep the width and depth the same. Here in our example, we’ve created a sphere at the origin, and then scaled its depth (‘z’) by 4, but left the other axes alone:
[toggle code]
-
sphere {
- <0,0,0>,.5
- pigment { color Yellow }
- scale <1,1,4>
- translate <2,-1,0>
- }
Then, after scaling, we moved the object 2 units to the right and 1 unit down, so that it was no longer centered at the origin and getting skewered by all three axes.
You can’t scale by 0. You can, however, scale by negative numbers. This gives you a mirror image of the object. Scaling by <-1,1,1> gives you a mirror image, mirrored through the y axis (that is, mirrored along the x axis).
- POV scale example scene
- Scaling is often best performed at the origin and followed by a translate. Here we make the sphere into an oblong thing and then move it right and down.
