One of the more useful objects in Persistence of Vision is the superellipsoid. The superellipsoid gives you an object with rounded corners—from as rounded as being a sphere or cone, to almost being a complete square.

The Basics of Superellipsoids
The superellipsoid is defined simply: you just need to specify the roundedness for those corners that are in the x-y plane, and a roundedness for the corners in the y-z plane. These numbers define the sharpness of the corners in those directions. If you set one to 1, it is completely spherical. If you set both to 1, you have a sphere. If you set them to very small values, you get very close to completely sharp edges. You cannot set them to exactly zero, and if you get really small, you might see incongruities.
Let’s look at an example:
[toggle code]
- #include "colors.inc"
-
light_source {
- <5,50,-50>
- color White
- }
-
camera {
- location <0,0,-3.5>
- look_at <0,0,0>
- }
-
background {
- color White
- }
-
superellipsoid {
- <1.0, 0.02>
-
pigment {
- color Green
- }
- //rotate <45,0,0>
- }
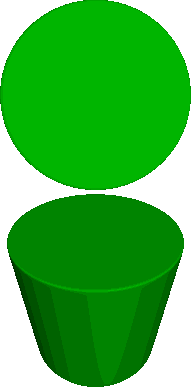
The top image is without the rotation, the bottom image is with the ‘superellipsoid’ rotated 45 degrees towards us. You can see at the top that this just looks like a disk. From the bottom, you can see that this is because we’re looking head on at a cylinder. That’s because the first number--the x-y corners--is set to 1, or completely round. Whereas the second, y-z number is set very low, so we get very little roundedness there. Let’s switch those numbers around:
[toggle code]
-
superellipsoid {
- <0.02,1.0>
-
pigment {
- color Green
- }
- //rotate <45,0,0>
- }
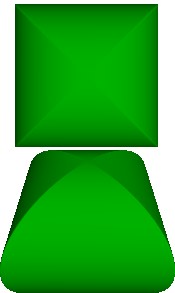
Similarly, the corners in the x-y plane have become nearly square, whereas we can see from the rotated (bottom) image that on the sides it is completely circular.
The size of the superellipsoid is approximately two in each direction, centered on the origin. That is, if it were completely square, it would be a box from <-1,-1,-1> to <1,1,1>. In actuality it is usually just inside that area.
Go ahead and play around a bit with different values of ‘roundedness’ and see what you can come up with. We aren’t going to do it right now, but superellipsoids make great bathroom tiles. You’ll also find that for most uses, you’ll probably want both of your roundedness numbers to be the same (for box-like objects) or for the first to be 1 (for cylindrical objects with rounded ends).
- Superellipsoid cylinder
- With perfectly rounded edges around its circumference, and nearly flat edges on the top and bottom, the superellipsoid creates a slightly-rounded cylinder.
- Superellipsoid with pointed ends
- Add sharper edges around its circumference, and the superellipsoid begins to look like two rounded pyramids stuck bottom-to-bottom.
Getting the Pips in the Box
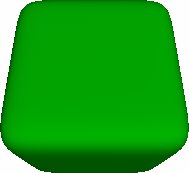
For our realistic dice, we want a rounded box. So, we want both of the superellipsoid’s numbers to be low. Let’s use .25 for each:
[toggle code]
-
superellipsoid {
- <0.25,0.25>
-
pigment {
- color Green
- }
- rotate <25,0,0>
- }
Okay, that’s nice and simple. You can adjust the roundedness if you want your dice to have more (or less) angular edges.
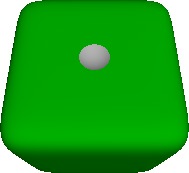
Now, how do we get the pips in the box? We’ll create some white spheres and use the difference statement to ‘gouge’ them out of the box.
[toggle code]
-
#declare pip = sphere {
- 0,.3
-
pigment {
- color White
- }
- }
-
difference {
-
superellipsoid {
- <0.25,0.25>
-
pigment {
- color Green
- }
- }
- //1 on top
- object { pip translate <0,0,-1.25> }
- rotate <25,0,0>
-
superellipsoid {
- }
That looks quite good! What did we do? First, we ‘declared’ a white sphere. By ‘declaring’ the sphere and calling it ‘pip’, we can use it elsewhere in our scene, and instead of having to retype it every time, we just use the phrase object { pip } to recall it. This also means that if we have this object many times in our scene, we only have to change it once to change it everywhere. This is important, because each die has 6+5+4+3+2+1 pips, or 21 pips! If we decided to change the pip afterwards, we would have to type the changes 21 times, which is time-consuming and prone to error.
After declaring the pip, we put the superellipsoid into a ‘difference’ statement. ‘Difference’ means that while the superellipsoid remains the ‘main’ shape, we’re going to be ‘gouging’ other shapes out of it. In this case, the other shape we gouge out of the superellipsoid is a white sphere. That’s why we see a white depression in the die’s front.
We moved the pip forward because we created the sphere at the origin, but the die is about 1 unit out in every direction. If we didn’t translate the pip, all it would do would be to create a little tiny hollow spot inside of our die, which is kind of interesting but no one can see it.
Speaking of declaring items that might be prone to error--why don’t we also declare how far out we have to translate the pip? That’s something else we are going to have to type 21 times, and we might want to change that later as well. In fact, there are two numbers associated with the pip: how far out it has to be moved to be visible, and how far towards the edges they have to be moved when there are more than one pip on a side. Let’s declare ‘pip_out’ and ‘pip_lateral’ for each of those cases:

[toggle code]
- #declare pip_out = 1.25;
- #declare pip_lateral = .475;
- // create a superquadric ellipsoid shape
-
difference {
-
superellipsoid {
- <0.25, 0.25>
- }
- //1 on top
- object { pip translate <0,pip_out,0> }
- //2 on back
- object { pip translate <pip_lateral,pip_lateral,pip_out> }
- object { pip translate <-pip_lateral,-pip_lateral,pip_out> }
- //3 on left side
- object { pip translate <-pip_out,-pip_lateral,pip_lateral> }
- object { pip translate <-pip_out,0,0> }
- object { pip translate <-pip_out,pip_lateral,-pip_lateral> }
- //4 on right side
- object { pip translate <pip_out,-pip_lateral,pip_lateral> }
- object { pip translate <pip_out,-pip_lateral,-pip_lateral> }
- object { pip translate <pip_out,pip_lateral,pip_lateral> }
- object { pip translate <pip_out,pip_lateral,-pip_lateral> }
- //5 on front
- object { pip translate <pip_lateral,pip_lateral,-pip_out> }
- object { pip translate <-pip_lateral,-pip_lateral,-pip_out> }
- object { pip translate <0,0,-pip_out> }
- object { pip translate <-pip_lateral,pip_lateral,-pip_out> }
- object { pip translate <pip_lateral,-pip_lateral,-pip_out> }
- //6 on bottom
- object { pip translate <-pip_lateral,-pip_out,-pip_lateral>}
- object { pip translate <0,-pip_out,-pip_lateral>}
- object { pip translate <pip_lateral,-pip_out,-pip_lateral>}
- object { pip translate <-pip_lateral,-pip_out,pip_lateral>}
- object { pip translate <0,-pip_out,pip_lateral>}
- object { pip translate <pip_lateral,-pip_out,pip_lateral>}
-
pigment {
- color Green
- }
- rotate <25,0,0>
-
superellipsoid {
- }
Well, we’re pretty much done now, aren’t we? In this version we’ve put the five-pip side on front, and you can see the six-pip side, barely, on the bottom. You can change the value of ‘pip_lateral’ to make your pips more or less crowded. Now, let’s take advantage of having ‘declared’ the pip to make some more interesting pips. Change your sphere declaration to:

[toggle code]
-
#declare pip = sphere {
- 0,.3
-
pigment {
- checker White, Black
- scale .1
- }
- }
Now, all of our pips are checkered black and white. If you had other objects in your scene, you could even make your pips reflective, reflecting the rest of your scene. For that matter, you can gouge anything you want out of the pip. It doesn’t have to be a sphere. How about my name? Try:
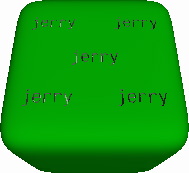
[toggle code]
-
#declare pip = text {
- ttf "crystal.ttf", "jerry",
- .6, // the extrusion depth
- 0 // inter-character spacing
-
pigment {
- color White
- }
- translate <-1.2,-.3,-.3>
- scale <.2,.2,1>
- }
You’ll notice one thing pretty quickly: this image took a lot longer to render, and it isn’t a very good image. You would have to turn anti-aliasing on to get a good image, and that would take even longer! A ‘text’ object is a much more complex object than a sphere, so it takes your computer longer to work with it. Also, if you look at the bottom face of the die, you’ll see that the name doesn’t appear there. You’ll find it easiest to use pips that are symmetrical. Otherwise, you have to rotate the pip so that it appears correctly on each face. (If you could see the back of the die, you would see that my name is backwards.)
Here’s an interesting one:
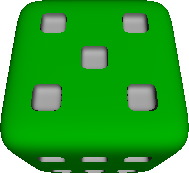
[toggle code]
-
#declare pip = superellipsoid {
- <0.45,0.45>
-
pigment {
- color White
- }
- scale .3/2
- }
- #declare pip_out = 1.05;
- #declare pip_lateral = .475;
We’ve got square pips on our die! This time we gouged a somewhat more rounded superellipsoid out of our larger superellipsoid. Note that we had to change the value of ‘pip_out’ to get it to work.
Now you can add gambling to your POV scenes. I’ll leave the pool tables up to you!
- Basic die shape
- The first step to making a square die is to choose the appropriate sharpness/curviness value for your die’s edges.
- Six-sided die with a single pip
- Adding one pip to the die is just a matter of using difference to gouge out a small sphere from the middle of one side.
- Six-sided die with all pips
- Indenting the pips onto the sides is just a matter of translating them correctly. It’s a lot of typing (or a lot of copying and pasting), but there’s nothing particularly difficult about it.
- Six-sided die with checkered pips
- Because POV-Ray isn’t using real objects, you can get as surreal as you’d like (and your skill will take you). This checkering of the pips is a simple example of applying a texture to the indented pips.
- Six-sided die with text pips
- You can take any CSG-able object and use it as your pip shape. Here I’ve set my name as the pip shape, so that each pip is my name.
- Six-sided die with cubic pips
- Sometimes, the shape of your pip will require adjusting the distance you move the pips around. That’s why it is useful to always use variables for any value you need to use more then once in your scene.
- Six-Sided dice bar
- Once you have the basic dice shape, you can reproduce it in any color and texture you wish.
