Sparkling lights for Christmas
It’s time once again to play with tinker toys for Christmas. This Christmas, like last Christmas, the tinker toys are the Persistence of Vision raytracer. (And by the way, if you enjoy this kind of toy, Astounding Scripts is currently on sale.)
And this time, instead of using the command-line version, I used the GUI version from Yvo Smellenbergh. I’m using the 3.8 development version although I’m not sure it matters for this scene; the 3.7 version is likely fine also. However, as betas go this has so far been very reliable. At the time of writing, I have not had a single crash, and the scenes render as I expect them to.
The GUI version recognizes the syntax of POV and highlights the keywords just as Textastic does for other scripting languages. It can also list your variables and macros, and it provides easy templates for the various POV shapes and scene elements.
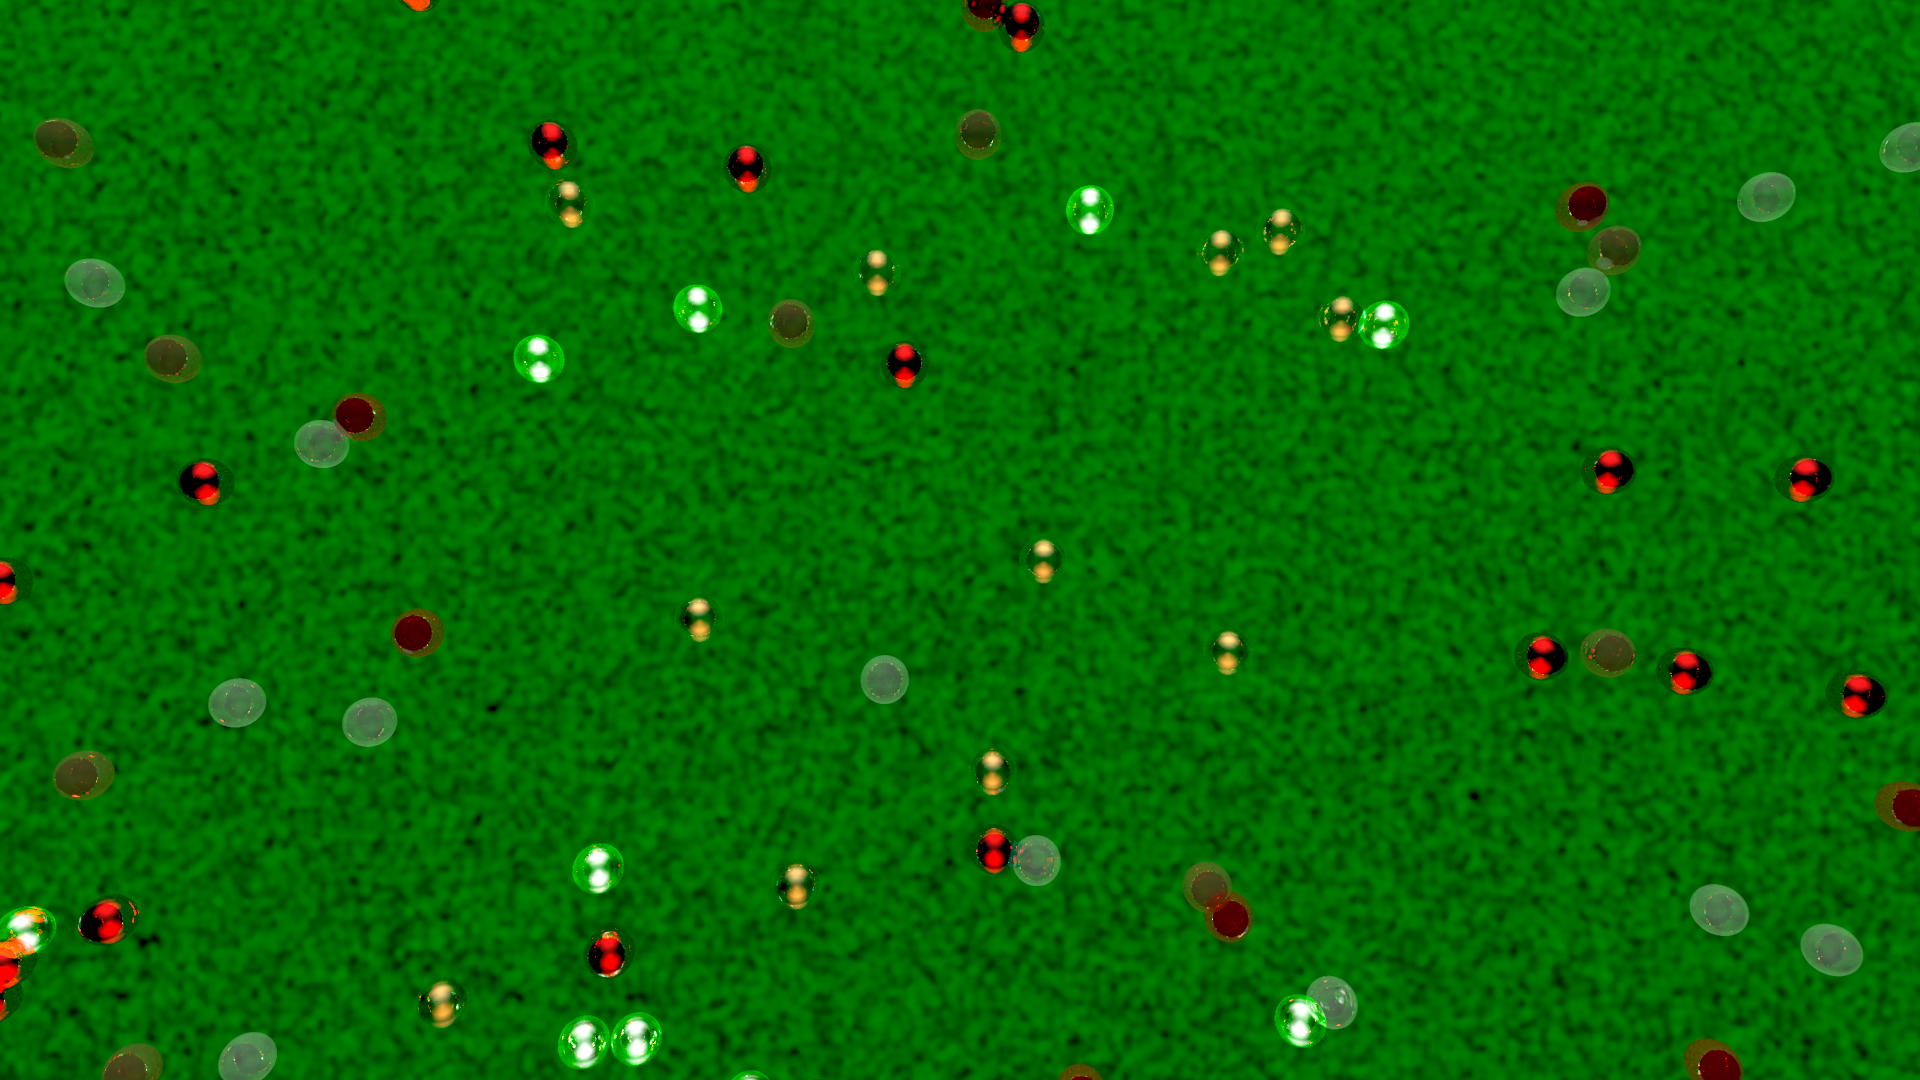
I was inspired by the Christmas tree photo I used in O Little Town of Bethlehem, which is a photo of the Macy’s Christmas tree in San Francisco. I was also inspired by the wonderful artwork in the Charlie Brown Christmas Special. This video is a rough combination of those two inspirations.
You can easily change the background. The background in this scene is a shape like any other: a plane. I didn’t do anything special to create it, just played around with normals in Persistence of Vision. Normals are basically roughness on the surface of a shape. The most common is probably a bumpy surface, and that’s what I used first, scaled by .1. Scaling a bumpy surface by less than one makes the bumps smaller and more numerous.
[toggle code]
-
normal {
- bumps
- scale .1
- }
After playing around while reading the manual about normals, I ended up choosing the marble keyword, with a turbulence of 1. That's pretty much all I did—read through the various keywords for altering the normal and chose the one that felt right.
You can download the scene file, as well as the music that went along with it, as a zip file (Zip file, 10.6 KB).
[toggle code]
- #include "colors.inc"
- //1920x1080 is a good 16:9
- //use 24 frames per second
- //frames needed for 45 seconds:
- //24*45: 1080.000000
- #declare videoDuration = 45;
-
global_settings {
- ambient_light Black
- assumed_gamma 1.0
- }
-
light_source {
- <0, 35, -20>
- color White*.5
- }
-
camera {
- location <0, 0, -10>
- look_at <0,.5,0>
- right x*image_width/image_height
- }
- //green background
-
plane {
- z, 0
-
pigment {
- color Green
- }
-
normal {
- marble turbulence 1
- }
- }
- //prep the random number streams
- #declare locationSeed = seed(1010);
-
#if (final_frame > 0)
- #declare flashSeedNumber = int(videoDuration*5*frame_number/final_frame);
-
#else
- #declare flashSeedNumber = 0;
- #end
- #local flashSeed = seed(flashSeedNumber);
- #declare colorSeed = seed(223);
- //get a range centered on zero
-
#macro randomZero(rangeWidth)
- #local zeroBasedLocation = rand(locationSeed)*rangeWidth-rangeWidth/2;
- zeroBasedLocation
- #end
- //flashing gold and red lights
-
union {
-
#for (i, 0, 124)
- #local lightX = randomZero(20);
- #local lightY = randomZero(14);
- //fifty-fifty chance that a bulb is lit
-
#if (rand(flashSeed) > .5)
- #declare bulbIsLit = 1;
- #declare bulbFilter = 1.5;
-
#else
- #declare bulbIsLit = 0;
- #declare bulbFilter = 0.8;
- #end
- #local colorChoice = rand(colorSeed);
-
#if (colorChoice > .66)
- #local bulbColor = color Gold;
-
#elseif (colorChoice > .33)
- #local bulbColor = color Red;
-
#else
- #local bulbColor = color White;
- #end
-
sphere {
- <lightX, lightY, -1>
- .2
-
pigment {
- color bulbColor
- filter bulbFilter
- }
-
finish {
-
#if (bulbIsLit)
- specular albedo 0.9
- #end
- metallic
- reflection {0.5}
-
#if (bulbIsLit)
- }
- }
- #end
- no_shadow
-
#for (i, 0, 124)
- }
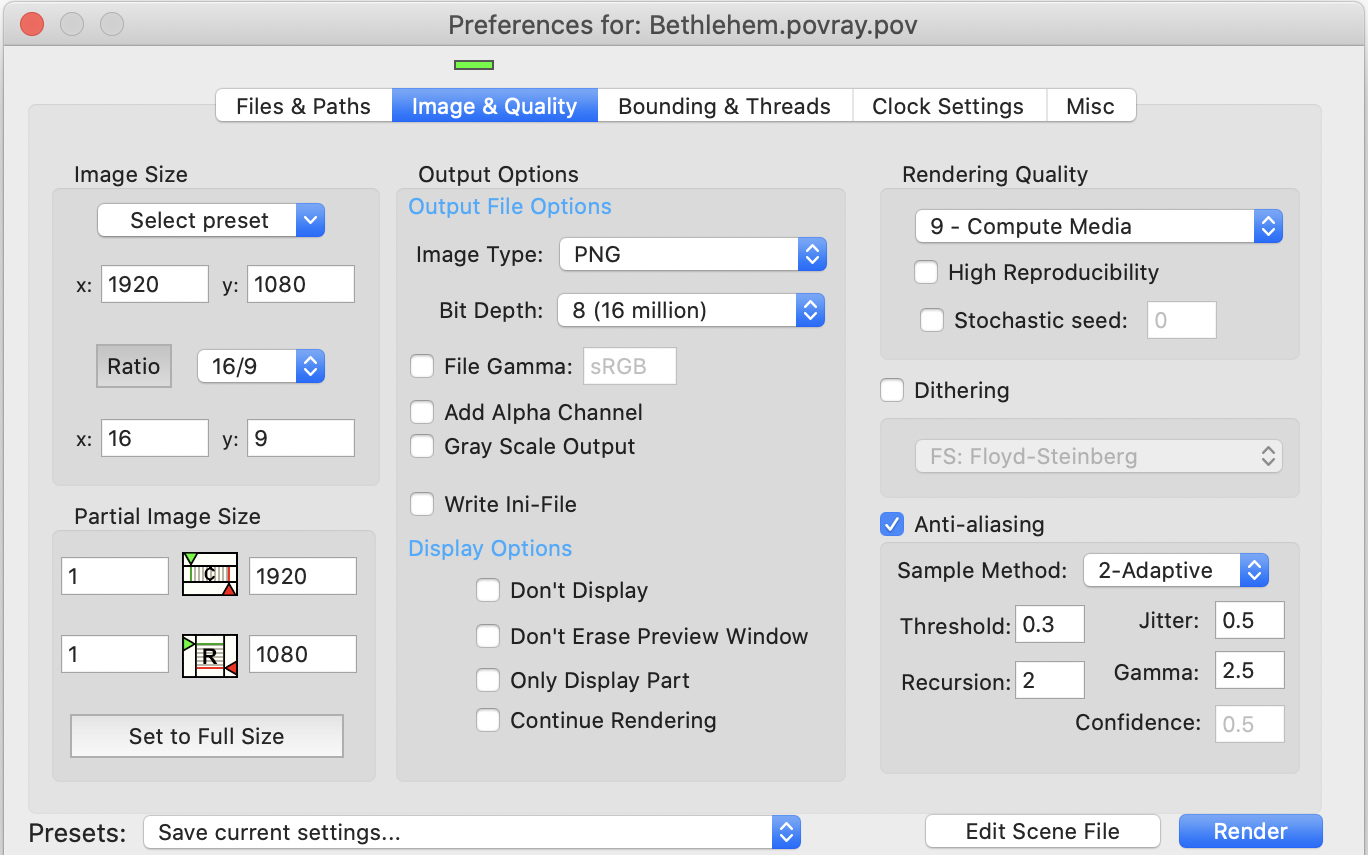
To render this as an image, open Persistence of Vision and set the image and quality options. While playing around with any scene, you’ll probably want to keep the image size small. It will render a lot faster, letting you see the results and make changes that much faster.
You get to POV-Ray’s preferences from the Window menu and the Render Preferences menu item.
Once you’re ready to test a full video, you’ll also need to set where the frames go and set the clock. Set the output folder in the “Misc” pane. If you don’t set an output folder, all 1,080 frames will go in the same folder as your scene file, which will clutter that folder up and possibly make it easier to accidentally insert spurious frames in the final video.
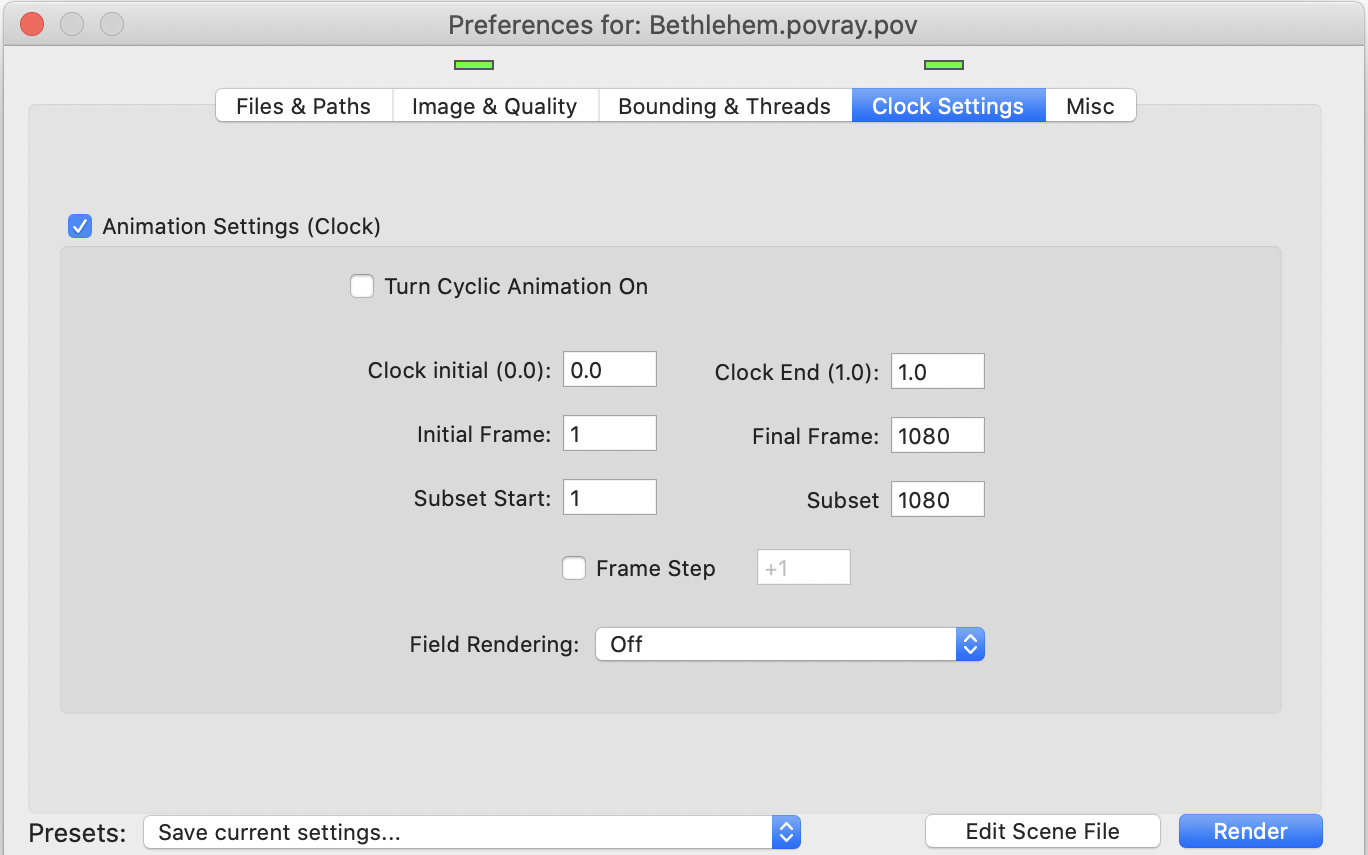
To get the scene to render multiple frames, change the Clock Settings pane. Enable “Animation Settings (Clock)”, set the initial frame to 1, the final frame to 1080. Make sure Subset Start is also 1 and Subset is 1080. You can use the subset options to test out a smaller range of frames in the animation or to rerender only parts you’ve changed, if you have a complicated video.
If you’ve been rendering a full-size image for your final test of the still image, you may wish to switch back to rendering very small images for testing the video. The smaller the image, the faster the rendering will go, and any speed you can get when rendering over a thousand images will help! I rendered the Christmas lights video at 512 by 288 for the test, before rendering it at 1920 by 1080 for the final video.
I stitched the frames together using QuickTime Player. QuickTime Player makes it easy to turn a series of still frames into a movie. In QuickTime Player, from the File menu, choose Open Image Sequence… and select all of the frames. If you’re doing this immediately after rendering completes, double-check to make sure you selected all of them. Select All sometimes misses some, as if it doesn’t yet know they’re there, so scroll through them to double-check.
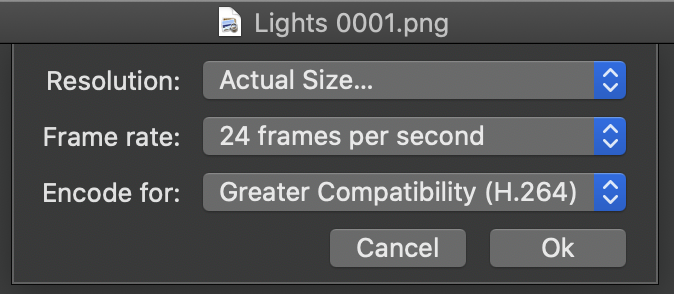
It’ll ask you what size you want the video to be, the frame rate (frames per second), and what devices you want to encode for. I left the Resolution at Actual Size…, the Encode for at Greater Compatibility (H.264), and changed the frame rate to 24 framers per second. If you want a smoother video, you can use a higher frame rate—but that will also mean rendering that many more frames. A 45-second video, like this, at 60 frames per second will require 2,700 frames. Even at 24 frames per second it requires 1,080.
Once QuickTime Player creates the video, add the music by dragging the music file on top of the video in QuickTime Player. If your music file is in the Music app, you can find it by right-clicking it in the Music app and choosing “Show in Finder”.
When you are satisfied with the full-size single-frame renders and are satisfied with the small test videos, you’re ready to render the full quality frames. You may wish to check “Don’t Display” in the “Image & Quality” pane before rendering all 1,080 frames. It will make the rendering go a little faster.
How does this scene file work? For the most part, POV places shapes and light sources in an imaginary space. You can see their keywords in the source code: a plane, a sphere, a light_source, and then a camera to set the perspective. This script uses some of the special programming features of Persistence of Vision to help (a) create a bunch of spheres without having to place them all by hand, and (b) cause those spheres to light up at random moments during the animated video.
[toggle code]
- //prep the random number streams
- #declare locationSeed = seed(1010);
-
#if (final_frame > 0)
- #declare flashSeedNumber = int(videoDuration*5*frame_number/final_frame);
-
#else
- #declare flashSeedNumber = 0;
- #end
- #local flashSeed = seed(flashSeedNumber);
- #declare colorSeed = seed(223);
Because Persistence of Vision is an animation tool, it must pay special attention to how randomness is generated. In an animation, randomness must be predictable. Otherwise, the randomly placed item will be in a different random place for every new animation frame. So POV allows you to set up streams of random numbers from a seed number, using the “seed()” function. The stream is guaranteed to generate the same sequence of semirandom numbers each time it is created. This means that, for each frame that the seed remains the same, the random numbers also remain the same, ensuring that lights flash for more than a single frame in the resulting video.
I chose to set up three streams, one for the location of each Christmas light, one for whether it’s currently flashing, and one for its color (red, gold, or white). This way, if I change how flashes work, for example, the location of the lights won’t change.
The flash stream is set up differently depending on whether this is an animation or a single frame. If it's an animation, POV will set the frame_number and final_frame variables. The frame_number is the number of the current frame, and final_frame is the number of the maximum frame—which you will set yourself in the Clock Settings pane. The code itself sets the variable videoDuration to 45, for 45 seconds, and then instructs you to set the final_frame to however many frames you want. This will probably be the frames per second you plan on choosing in QuickTime Player multiplied by the number of seconds you want.
By multiplying videoDuration by something less than the number of frames per second, and then that by a number between 0 and 1 depending on which frame this is, each flash will last for multiple frames before the flash random number stream gets a new seed. If you reduce the five, your lights should flash less often; if you increase the five, your lights should flash more often.
The rand function uses a random number stream to generate random numbers between 0 and 1.
[toggle code]
- //fifty-fifty chance that a bulb is lit
-
#if (rand(flashSeed) > .5)
- #declare bulbIsLit = 1;
- #declare bulbFilter = 1.5;
-
#else
- #declare bulbIsLit = 0;
- #declare bulbFilter = 0.8;
- #end
If the random number from the flash random number stream is greater than .5, the bulb is lit. I set the boolean variable bulbIsLit to 1, and the filter to 1.5. The filter is used later to set how transparent the sphere is to its color. The higher the number, the more light it lets through, filtered by whatever color the object is.
If the random number is not greater than .5, bulbIsLit is set to zero and the bulbFilter is set to only 0.8.
As you can see in the code, the random color is generated similarly, but with three options instead of two. Because it has three options, the random number needs to be saved in a variable.
There’s also a loop:
[toggle code]
-
#for (i, 0, 124)
- //code for creating spheres
- #end
This loop creates a variable called “i”1 with the value of zero. Then it loops through the inner code, adding one to the variable each time, until it exceeds 124. Since the only shape the inner code here contains is a sphere, this creates a hundred and twenty four spheres.
Finally, there’s also a macro:
[toggle code]
- //get a range centered on zero
-
#macro randomZero(rangeWidth)
- #local zeroBasedLocation = rand(locationSeed)*rangeWidth-rangeWidth/2;
- zeroBasedLocation
- #end
Macros in POV are somewhat like functions. If you look at the code, I’m referencing this macro using lines like #local lightX = randomZero(20);. The number between parentheses (in this case, “20”) is sent to the macro as an argument, just like any other function you might use in 42 Astounding Scripts. The macro works on that value and returns a new value. The way that macros in POV return values is to have the variable holding that value be on its own on the last line of the macro.
So this macro:
- Takes a value which it calls “rangeWidth”;
- Generates a random number from the random number stream for locations, and multiplies it by “rangeWidth”; this creates a number between zero and rangeWidth; it then subtracts half of rangeWidth from the result, which generates a number centered on zero;
- Assigns that new zero-centered random number to the variable “zeroBasedLocation”;
- And finally, returns “zeroBasedLocation” as the result of the macro.
Remember, the rand function generates a number between zero and one. To get a number between zero and some number other than one, multiple the result of rand by that other number.
This is a simple script, but it uses a handful of complex features of Persistence of Vision. If you play around with it, you should be able to see how they’re useful. Merry Christmas, and have fun with your Christmas toys!
In response to Have a Merry Scripting Christmas with Persistence of Vision: The ASCII Merry Christmas from Astounding Scripts was taken from a scene I created in Persistence of Vision. It’s a very simple scene that highlights many of the advantages of using POV to create images.
The letters i, j, and k are traditional variable names for
↑forloops.
- 42 Astoundingly Useful Scripts and Automations for the Macintosh
- MacOS uses Perl, Python, AppleScript, and Automator and you can write scripts in all of these. Build a talking alarm. Roll dice. Preflight your social media comments. Play music and create ASCII art. Get your retro on and bring your Macintosh into the world of tomorrow with 42 Astoundingly Useful Scripts and Automations for the Macintosh!
- O Little Town of Bethlehem
- How still we see thee lie. Play this song on your Mac’s command line with the piano script.
- O Little Town of Bethlehem with Christmas lights: Jerry Stratton at Mimsy@YouTube
- The melody of O Little Town of Bethlehem from the piano script played over flashing Christmas lights from the Persistence of Vision raytracer.
- Unofficial Mac versions of POV-Ray
- “This site is about Unofficial Mac versions of POV-Ray 3.7.0.x and 3.8.x. POV-Ray is a free ray tracing program to render 3D images. It uses a text-based scene description language (SDL).”
- O Little Town of Bethlehem (Zip file, 10.6 KB)
- The piano files for O Little Town of Bethlehem, along with the MIDI files and a POV-Ray scene file for some Christmas lights to go along with it.
More Christmas
- Peppermint Dessert with stale Easter Bread
- This very simple whipped cream dessert is also a great way to use up stale Easter (or Christmas) bread.
- Candy cane oatmeal crispies
- These candy cane cookies are a great way to use up post-Christmas candy canes. You might even want to hit the after-Christmas sales just to get canes to make these with.
- 8 (bit) Days of Christmas: Day 0 (Go Tell It On the CoCo!)
- Day 0 of the 8 (bit) days of Christmas. Christmas Eve, and the cattle are lowing.
- 8 (bit) Days of Christmas
- Eight holiday images created on the TRS-80 Color Computer, from the early to mid eighties.
- Have a Merry Scripting Christmas with Persistence of Vision
- The ASCII Merry Christmas from Astounding Scripts was taken from a scene I created in Persistence of Vision. It’s a very simple scene that highlights many of the advantages of using POV to create images.
- Three more pages with the topic Christmas, and other related pages
More honorary blog post
- Balboa Park’s World of Beak and Wing
- Engraved into the sidewalks at the corner of Balboa Park on Upas and 28th, there is a list of “Perching Birds of San Diego” and “Local Birds of North Park”. These are those birds.
- Let mortal tongues awake
- Samuel Francis Smith’s America—more commonly known as “My Country, ’Tis of Thee”— is short, direct, and a wonderful hymn to God as the soul of liberty. It’s a perfect hymn for the Fourth of July. It’s also very easy to play using the piano script from 42 Astounding Scripts.
- Critical (fantasy) race theory
- It isn’t racist to address D&D characters by their race. D&D character races are things the character can do. It is racist to imply that real world races are as inferior and superior as fantasy races. Woke racism is still racism.
- The True History of the Hare and the Tortoise
- And even to this day, “a glorious victory for the forces of swiftness” is a catch-phrase in the house of the snail.
- O Little Town of Bethlehem
- How still we see thee lie. Play this song on your Mac’s command line with the piano script.
- Two more pages with the topic honorary blog post, and other related pages
More Persistence of Vision
- Have a Merry Scripting Christmas with Persistence of Vision
- The ASCII Merry Christmas from Astounding Scripts was taken from a scene I created in Persistence of Vision. It’s a very simple scene that highlights many of the advantages of using POV to create images.
- Photo-editing with Persistence of Vision
- You can use the Persistence of Vision raytracer from the command-line to add elements to photos.
- Persistence of Vision tutorial
- A step-by-step tutorial, available under the Gnu Free Documentation License, on using the Persistence of Vision raytracer.


